# Quick help portal

Get the help you need, when you need it! Our Fast-Track Solutions ensure quick and effective assistance for all your needs.

<table data-view="cards"><thead><tr><th></th><th></th><th></th><th data-hidden data-type="content-ref"></th><th data-hidden data-card-cover data-type="files"></th><th data-hidden data-card-target data-type="content-ref"></th></tr></thead><tbody><tr><td><strong>NeoDove Admin Portal</strong></td><td>Your hub for user management, campaign creation, data handling, lead optimization, data-driven reports, and seamless integrations.</td><td></td><td><a href="/admin-portal">Admin Portal</a></td><td><a href="https://2103666731-files.gitbook.io/~/files/v0/b/gitbook-x-prod.appspot.com/o/spaces%2F-MJasmeOMeAJhTVh0M75%2Fuploads%2FPrJb0iW22bq0bv1XlquS%2FAdmin%20Dashboard.png?alt=media&amp;token=904a7618-6e5f-4e01-a498-70d80ea2a97e">Admin Dashboard.png</a></td><td><a href="/admin-portal">Admin Portal</a></td></tr><tr><td><strong>NeoDove User Portal (Web Application)</strong></td><td>A versatile tele-calling solution accessible from your web browser, providing a comprehensive dashboard for user and agent tasks.</td><td></td><td><a href="broken://spaces/-MN2psPrgS5Ij4Jf2f32">Broken link</a></td><td><a href="https://2103666731-files.gitbook.io/~/files/v0/b/gitbook-x-prod.appspot.com/o/spaces%2F-MJasmeOMeAJhTVh0M75%2Fuploads%2FfmVRGUlfBxPKg9xM6LBi%2FWebApp%20Dashboard.png?alt=media&amp;token=1eeedd93-e8bc-49be-b479-aef5548ae453">WebApp Dashboard.png</a></td><td><a href="/neodove-web-application">NeoDove Web Application</a></td></tr><tr><td><strong>NeoDove User Portal (Mobile Application)</strong></td><td>A versatile tele-calling solution accessible from your web browser, providing a comprehensive dashboard for user and agent tasks.</td><td></td><td><a href="https://mobile-docs.neodove.com/neodialer">https://mobile-docs.neodove.com/neodialer</a></td><td><a href="https://2103666731-files.gitbook.io/~/files/v0/b/gitbook-x-prod.appspot.com/o/spaces%2F-MJasmeOMeAJhTVh0M75%2Fuploads%2FYABmuRs9YPIx24dMTA6L%2FNeodove%20Mobile%20Application.jpg?alt=media&amp;token=232030da-0540-41aa-86ca-6da1dfbf5594">Neodove Mobile Application.jpg</a></td><td><a href="/neodove-mobile-application">NeoDove Mobile Application</a></td></tr><tr><td><strong>WhatsApp API</strong></td><td>It is a service which businesses can use for the enhancing the engagement with their customers for multiple purposes be it is marketing or customer service. </td><td></td><td></td><td><a href="https://2103666731-files.gitbook.io/~/files/v0/b/gitbook-x-prod.appspot.com/o/spaces%2F-MJasmeOMeAJhTVh0M75%2Fuploads%2FimXT98ihnyyFiqCGWU6l%2FWhatsApp%20API.png?alt=media&amp;token=65971d67-3714-4706-b025-2a18c5e7ac39">WhatsApp API.png</a></td><td><a href="/admin-portal/marketplace-ivr/whatsapp-api-services">WhatsApp API Services</a></td></tr><tr><td><strong>IVR Services</strong>   </td><td>IVR systems are commonly used in telecommunications to provide automated assistance and gather information from callers through pre-recorded voice prompts and menu options. </td><td></td><td></td><td><a href="https://2103666731-files.gitbook.io/~/files/v0/b/gitbook-x-prod.appspot.com/o/spaces%2F-MJasmeOMeAJhTVh0M75%2Fuploads%2FbClZdij08hX5Pm9ctRdY%2FIVR%20Services.png?alt=media&amp;token=1e079c91-45be-4032-8b2d-5f9fed1ad4fc">IVR Services.png</a></td><td><a href="/admin-portal/marketplace-ivr/ivr-services">IVR Services</a></td></tr></tbody></table>


# NeoDove Onboarding

Let us understand the basic steps of onboarding in NeoDove

## NeoDove:

***

India’s Best **Telecaling CRM & Dialer** for Small and Medium Businesses.

### **Welcome to NeoDove:**

***

Your **CSM** will be available on Call, Mail or WhatsApp throughout your journey, **including** this onboarding, account set-up, integrations (if any), your timely renewal and of course, any daily issues/queries you have. Additionally, you can **connect** with us on:

📞 **Phone:** 9509624545\
✉️ **Email:** <support@neodove.com>

### Get Onboarded in 3 Easy Steps

***

1. **Add Agents:**

<figure><img src="https://2103666731-files.gitbook.io/~/files/v0/b/gitbook-x-prod.appspot.com/o/spaces%2F-MJasmeOMeAJhTVh0M75%2Fuploads%2FRoNTfN8UOw7S1T2pOK4S%2FManage%20Users.png?alt=media&amp;token=8c1024f6-7fb2-45f9-9893-5e5d786d97dc" alt=""><figcaption></figcaption></figure>

* First need to **login** with the admin credentials in (**connect.neodove.com**).
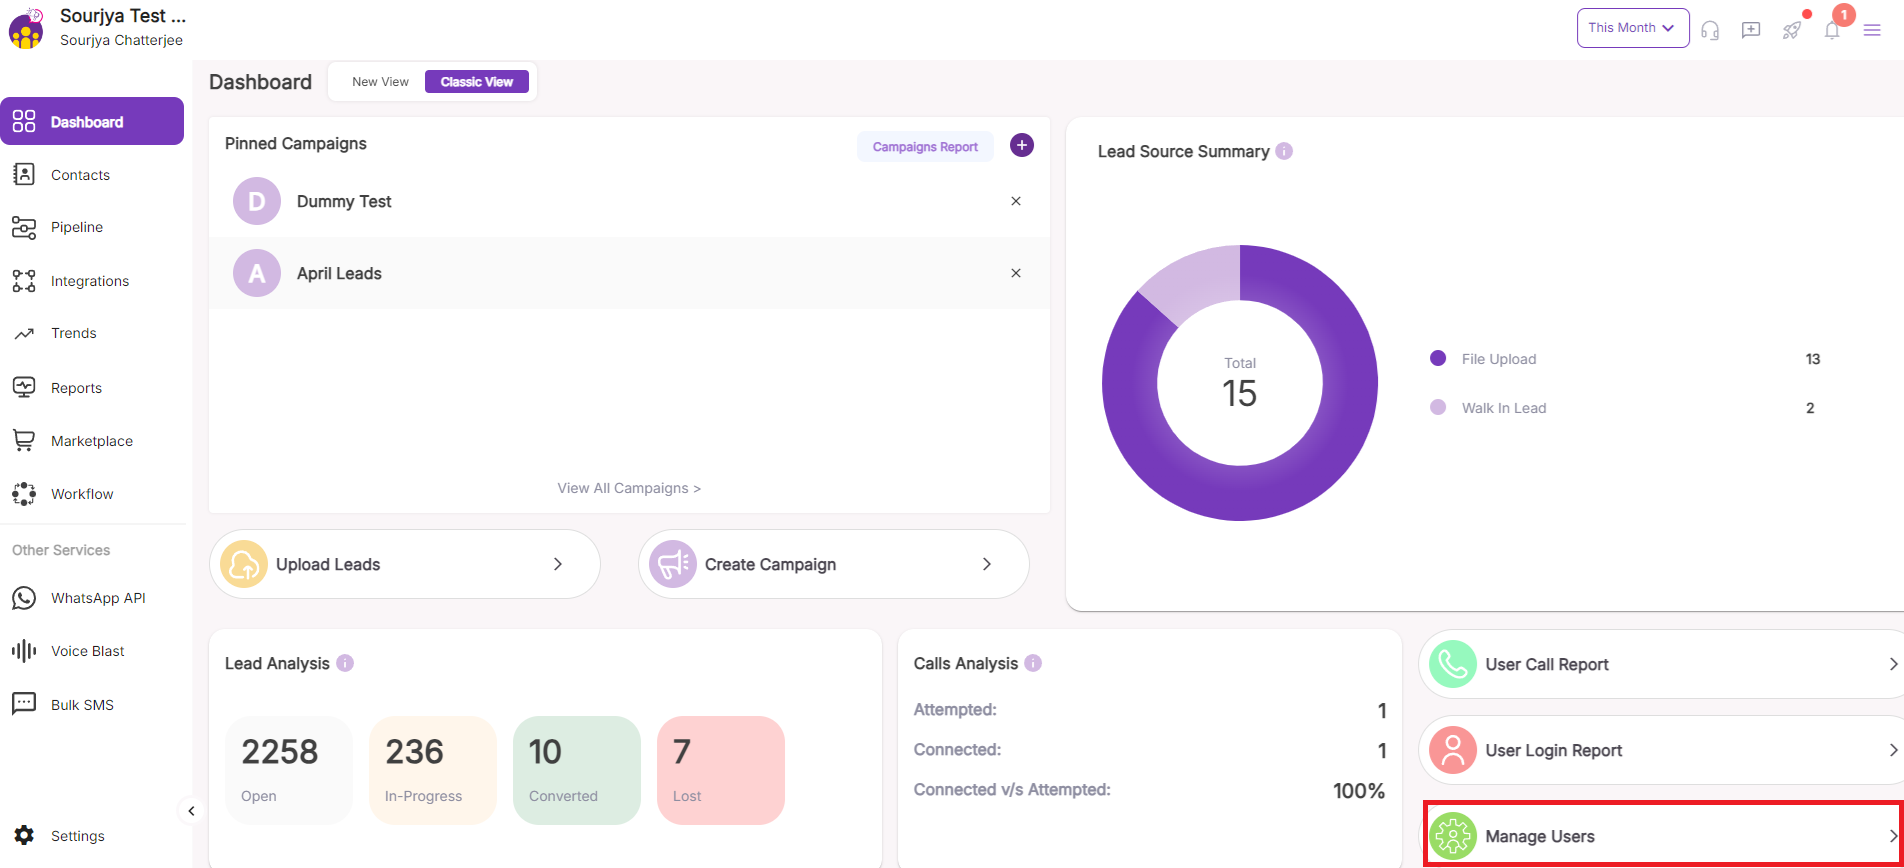
* Then, the first screen which will appear is the **Dashboard**.&#x20;
* Post that need to click on the **Manage Users** at the bottom right corner of the screen.

<figure><img src="https://2103666731-files.gitbook.io/~/files/v0/b/gitbook-x-prod.appspot.com/o/spaces%2F-MJasmeOMeAJhTVh0M75%2Fuploads%2FNeZXpYWZsEepmxBIbjwp%2FAdd%20User.png?alt=media&amp;token=995427e5-a6ef-4791-933f-438e306cc81e" alt=""><figcaption></figcaption></figure>

* A new window will appear where the **list of Users** would be visible.&#x20;
* Then need to click on the top right corner of the screen on the **"Add User"** button.&#x20;

<figure><img src="https://2103666731-files.gitbook.io/~/files/v0/b/gitbook-x-prod.appspot.com/o/spaces%2F-MJasmeOMeAJhTVh0M75%2Fuploads%2F8QaIBEUIEF3FmJUCPCIt%2FNew%20Users.png?alt=media&amp;token=a4c9beaf-81fc-4360-8bb8-e51534944a5d" alt=""><figcaption></figcaption></figure>

* Post that a **pop up screen** will appear.&#x20;
* There, need to put all the **details** of the user whom we want to add.&#x20;
* After putting all the details, need to click on **"Submit"** to get the user added.&#x20;

2. **Upload Lead Contacts:**

<figure><img src="https://2103666731-files.gitbook.io/~/files/v0/b/gitbook-x-prod.appspot.com/o/spaces%2F-MJasmeOMeAJhTVh0M75%2Fuploads%2Fy7QRmQ4Zp3MWnQSL1E26%2FContacts.png?alt=media&amp;token=331ca2e3-0522-4df7-b8ee-a1ae0ed4e0fb" alt=""><figcaption></figcaption></figure>

* After adding the users need to come down to the "**Dashboard**".&#x20;
* Post that need to click on the "**Contacts**" option which is present at the top left corner of the screen.&#x20;

<figure><img src="https://2103666731-files.gitbook.io/~/files/v0/b/gitbook-x-prod.appspot.com/o/spaces%2F-MJasmeOMeAJhTVh0M75%2Fuploads%2FIX4sDyL304KHKcpthk6O%2FLead%20Upload.png?alt=media&amp;token=e4391463-5f80-4641-99f4-1ec8fba069ce" alt=""><figcaption></figcaption></figure>

* A new screen will appear where we need to click on the "**Upload Contacts**" option which is present at the top right corner of the screen.
* After clicking, a **pop up screen** will appear which will ask to **browse the data** from the system which we want to **upload** as leads.&#x20;
* Post selecting the required file, need to **select the campaign** where exactly we want the data to get uploaded.&#x20;
* Then after, need to **map the data columns** with the required fields of the campaign to get the data uploaded with **proper attributes**.

3. **Get Started by Calling:**

<figure><img src="https://2103666731-files.gitbook.io/~/files/v0/b/gitbook-x-prod.appspot.com/o/spaces%2F-MJasmeOMeAJhTVh0M75%2Fuploads%2FiLXCgYcoKWnIPOO02a0N%2FData%20Campaign.png?alt=media&amp;token=99c921d8-9976-4155-9ce1-0c65df197c3f" alt=""><figcaption></figcaption></figure>

* Your File is now **uploaded** with the list of contact details present in the **excel sheet**.&#x20;
* You can now **access** the particular campaign and start calling.
* Check **"Reports"** for detailed data analysis.


# Admin Portal

Neodove is a comprehensive customer relationship management (CRM) platform designed specifically for telecalling and lead management purposes.

NeoDove comes with carefully designed features like an autodialer, a comprehensive lead management system, multichannel engagement, a choice of both direct and custom integrations, etc. NeoDove brings its users a customizable, safe, and secure platform for all their telecalling requirements.

## Dashboard

***

After logging into Neodove with your credentials, you will be directed to the **Dashboard**, the central hub for all your activities and insights.

The **Dashboard** offers two different viewing options:

1. **Classic View**: A familiar layout for those who prefer the traditional interface, providing quick access to key metrics and tools.

<figure><img src="https://2103666731-files.gitbook.io/~/files/v0/b/gitbook-x-prod.appspot.com/o/spaces%2F-MJasmeOMeAJhTVh0M75%2Fuploads%2FCD9r91TEnCvzs9AHuL2S%2FDashboard.png?alt=media&amp;token=033e9dc1-5e73-4f5b-891b-51b8462c50d6" alt=""><figcaption></figcaption></figure>

2. **New View**: A refreshed and modern design with enhanced features and a more streamlined experience for improved productivity and navigation.

<figure><img src="https://2103666731-files.gitbook.io/~/files/v0/b/gitbook-x-prod.appspot.com/o/spaces%2F-MJasmeOMeAJhTVh0M75%2Fuploads%2Fh61MDf0CR6N55fxiKN5O%2FDashboard%202.png?alt=media&amp;token=85983b04-976c-485a-8958-625512629a34" alt=""><figcaption></figcaption></figure>

## Key Features and Offerings of NeoDove

***

Let's understand the key features and offering of NeoDove listed below:

### Telecalling Services

***

NeoDove provides tools and features for managing outbound and inbound calls, including call tracking, call recording, and call analytics.

### Lead Management

***

NeoDove offers lead tracking and management capabilities, allowing users to capture, categorize, and nurture leads effectively.

### Integrations

***

NeoDove allows integration with key platforms like Facebook, IndiaMart, JustDial, 99 Acres, Magicbricks, TradeIndia, etc. Also, Custom Integrations can pull in data from various sources to streamline lead management and communication.

### AI Services

***

NeoDove incorporates artificial intelligence to enhance various aspects of telecalling and lead management, such as lead allocation, etc.

### Value - Added Service

***

* **Whatsapp API:** Integration with WhatsApp allows businesses to engage with customers through the popular messaging platform.
* **IVR Services:** Interactive Voice Response systems can automate call handling and routing.
* **Voice Blast:** This allows sending voice messages to a large group of contacts simultaneously.
* **SMS Blast:** Similar to voice blast, this feature allows bulk SMS messaging to contacts.
* **Custom Automations:** Neodove's ability to customize automation means it can cater to specific client needs and workflows.

### Customization

***

Clients can even tailor NeoDove to their specific requirements, ensuring it aligns with their unique telecalling and lead management processes.

### Reporting and Analytics

***

NeoDove offers reporting and analytics tools to help users gain insights into their telecalling and lead management performance.

### Multi-Channel Communication

***

With integrations like WhatsApp and SMS, NeoDove supports multi-channel communication to reach leads through their preferred channels.

### User-Friendly Interface

***

A user-friendly interface allows efficient telecalling and lead management, ensuring that users can navigate the platform easily.

### Customer Support

***

NeoDove offers customer support and training services to help clients make the most of the CRM.

{% hint style="success" %}
**NeoDove is a** **versatile CRM platform** tailored for businesses engaged in **telecalling and lead management.** Its integration capabilities and value-added services make it a powerful tool for reaching and engaging with potential customers across different channels while providing automation and analytics to streamline operations.
{% endhint %}

## Getting Started with NeoDove

***

Upon logging into your NeoDove account, you will be immediately directed to the NeoDove dashboard, which serves as your homepage.&#x20;

This dashboard is meticulously crafted to present a concise and easily digestible overview of all your account details, conveyed through easy-to-interpret statistical formats.

The dashboard is notably divided into a few sections:

* [Pinned Campaigns](#pinned-campaigns)
* [Lead Source Summary](#lead-source-summary)
* [Lead Analysis](#lead-analysis)
* [Call Analysis](#call-analysis)
* [Shortcut Keys](#shortcut-keys)

### Pinned Campaigns

***

{% hint style="success" %}
The Pinned Campaign feature allows users to conveniently bookmark and access specific campaigns with a single click.&#x20;
{% endhint %}

This feature streamlines the process of viewing and obtaining a comprehensive overview of these campaigns by keeping them readily accessible on the user's dashboard or main interface.&#x20;

It simplifies campaign management and ensures that key campaigns are easily within reach for quick reference and action.

<figure><img src="https://2103666731-files.gitbook.io/~/files/v0/b/gitbook-x-prod.appspot.com/o/spaces%2F-MJasmeOMeAJhTVh0M75%2Fuploads%2Fd4i18J76L5RXs7B4Yb22%2FPinned%20Campaigns%20l%20NeoDove.png?alt=media&amp;token=8a8fbeea-6541-4eb9-9523-78c63d46aab4" alt=""><figcaption><p>Pinned Campaign l NeoDove</p></figcaption></figure>

### Lead Source Summary

***

{% hint style="success" %}
The Lead Source Summary provides a comprehensive summary of leads within the account based on the selected timeframe.&#x20;
{% endhint %}

This feature offers an overview of lead data, enabling users to quickly assess lead performance and trends within their desired reporting period.

&#x20;It's a valuable tool for tracking lead acquisition and conversion metrics, helping users make informed decisions and strategize effectively.

<figure><img src="https://2103666731-files.gitbook.io/~/files/v0/b/gitbook-x-prod.appspot.com/o/spaces%2F-MJasmeOMeAJhTVh0M75%2Fuploads%2FUioJ2pt8t6D6Vc4Gniyt%2FLead%20Source%20Summary%20l%20NeoDove.png?alt=media&amp;token=abbad22f-c5d4-4344-903b-ca1b9bdd03e3" alt=""><figcaption><p>Lead Source Summary l NeoDove</p></figcaption></figure>

### Lead Analysis

***

{% hint style="success" %}
Lead Analysis is a feature that provides in-depth analytics and insights into leads categorized into various buckets or segments.&#x20;
{% endhint %}

This analysis helps users understand lead behavior, performance, and characteristics within each category.&#x20;

By dissecting leads into different groups or classifications, businesses can gain a more nuanced understanding of their customer base and tailor their strategies accordingly for improved lead management and conversion.

<figure><img src="https://2103666731-files.gitbook.io/~/files/v0/b/gitbook-x-prod.appspot.com/o/spaces%2F-MJasmeOMeAJhTVh0M75%2Fuploads%2FNPT1r22tUlLRhIEKXoij%2FLead%20Analysis%20l%20NeoDove.png?alt=media&amp;token=66b433fc-c0c9-42ff-bf4d-d861d270db1e" alt=""><figcaption><p>Lead Analysis l NeoDove</p></figcaption></figure>

### Call Analysis

***

{% hint style="success" %}
**Call Analysis** is a feature that offers a comprehensive breakdown of call-related statistics, including the total number of call attempts, the number of calls successfully connected, and the corresponding percentages for each category.&#x20;
{% endhint %}

This analysis provides valuable insights into the effectiveness of telecalling efforts, helping users gauge call success rates and make data-driven decisions to optimize their calling strategies.

<figure><img src="https://2103666731-files.gitbook.io/~/files/v0/b/gitbook-x-prod.appspot.com/o/spaces%2F-MJasmeOMeAJhTVh0M75%2Fuploads%2FTi9mzs3nPDTWf94LsNC0%2Fimage.png?alt=media&amp;token=c235292e-893b-411a-a397-6098a868c901" alt=""><figcaption></figcaption></figure>

### Shortcut Keys

***

To check the User Perspective Reports along with adding and managing Users we can go to the bottom right corner of the dashboard and we will get the following options.

<figure><img src="https://2103666731-files.gitbook.io/~/files/v0/b/gitbook-x-prod.appspot.com/o/spaces%2F-MJasmeOMeAJhTVh0M75%2Fuploads%2FCRv5YSQTJvg9czVWLygb%2FShortcut%20Keys%20l%20NeoDove.png?alt=media&amp;token=8806c941-a389-4efd-87de-b401be83c483" alt=""><figcaption><p>Shortcut Keys l NeoDove</p></figcaption></figure>

\
To upload the leads and to create a campaign we need to go to the following options which lie below the Pinned Campaigns and above the Lead Analysis.

<figure><img src="https://2103666731-files.gitbook.io/~/files/v0/b/gitbook-x-prod.appspot.com/o/spaces%2F-MJasmeOMeAJhTVh0M75%2Fuploads%2FJMjfTNNCVLBDjoZ0oqOY%2FShortcut%20Keys%202%20l%20NeoDove.png?alt=media&amp;token=72b020e5-6931-42e8-933a-620805f4951b" alt=""><figcaption><p>Shortcut Keys l NeoDove</p></figcaption></figure>

To contact support or to check the notifications or for new product updates, we need to go to the top right corner of the dashboard. Additionally, we can get access to the User Menu as well by clicking on the three vertical lines on the far right.

<figure><img src="https://2103666731-files.gitbook.io/~/files/v0/b/gitbook-x-prod.appspot.com/o/spaces%2F-MJasmeOMeAJhTVh0M75%2Fuploads%2FN6TXbW3Mr8myLaogfdEW%2FDashboard%203.png?alt=media&amp;token=628402df-15b5-4320-ab4d-037582558fd2" alt=""><figcaption></figcaption></figure>

\
To get access to the Settings for a few further options or to get access to the basic attributes of the CRM like Contacts, Campaigns, Integrations, Reports, Marketplace, and SMS Automation.&#x20;

***

## &#x20;              *<mark style="color:purple;">Enabling businesses to accelerate their growth 🚀</mark>*


# Create and Manage Users

In NeoDove, a "user" or "agent" refers to an individual who has access to the platform for tele-calling and lead management purposes.

{% embed url="<https://youtu.be/QFt0bNAKOYQ>" %}

## Who is a User and what are the types of Users?

***

Users or Agents are typically members of a team or organization that uses NeoDove to engage with **leads** and **customers**.&#x20;

{% hint style="success" %}
They have specific **roles** and **permissions** within the portal, allowing them to perform tasks such as making calls, managing leads, accessing analytics, and utilizing various CRM functionalities.&#x20;
{% endhint %}

Each user or agent can have a unique **login** and **profile**, and their activities are tracked and managed within the NeoDove system, contributing to the overall efficiency of **tele-calling operations**.

### The different types of **Users** which are present by default in NeoDove are:

***

* Organization Admin
* Manager
* Assistant Manager
* Executives

### &#x20;Organization Admin

***

The "Organization Admin" in NeoDove is the **primary administrator** and holds the highest level of **authority** within a particular account.&#x20;

{% hint style="success" %}
As the main person responsible for the account, the Organization Admin typically has **full control** over account settings, user management, access permissions, and configurations.&#x20;
{% endhint %}

They can add or remove users, customize the platform to align with the organization's needs, and oversee the **overall operation** of the NeoDove account.&#x20;

This role ensures that the organization's account is **properly managed** and that its tele-calling and lead management activities run **smoothly** and **securely**.

<br>

### Manager

***

In NeoDove, managers are **responsible** for overseeing assigned campaigns, supporting their team of executives, and supervising their performance.&#x20;

{% hint style="success" %}
They have the **authority** to create campaigns, access campaign and user reports for the executives they oversee, and efficiently manage multiple campaigns simultaneously.&#x20;
{% endhint %}

This supervisory role ensures smooth campaign operations, provides executive assistance and enables data-driven decision-making to achieve tele-calling and lead management goals.

<br>

### Assistant Manager

***

In NeoDove, the Assistant Manager's role closely **mirrors** that of a Manager, but with slightly reduced permissions and access levels in comparison to the Manager.

{% hint style="success" %}
Assistant Managers typically share **responsibilities** related to campaign supervision, executive support, and overseeing campaign performance.&#x20;
{% endhint %}

However, their access to certain features and data may be limited compared to Managers, ensuring a structured hierarchy within the organization for efficient tele-calling and lead management operations.

### Executives

***

In NeoDove, Executives are the individuals **responsible** for handling tele-calling activities and managing the leads assigned to them.&#x20;

{% hint style="success" %}
Their role is to make calls, engage with leads or customers, and execute the strategies defined for **tele-calling campaigns**.&#x20;
{% endhint %}

Executives are on the **frontline** of lead management, working to convert leads into valuable prospects or customers and **contribute** to the organization's overall tele-calling success.

<figure><img src="https://2103666731-files.gitbook.io/~/files/v0/b/gitbook-x-prod.appspot.com/o/spaces%2F-MJasmeOMeAJhTVh0M75%2Fuploads%2F0traRyQ3btFdL6Y1BgM9%2FUsers.png?alt=media&amp;token=a3246216-97bc-42af-ac59-d415f07b932f" alt=""><figcaption></figcaption></figure>


# How to Add a New User?

The "Manage Users" page serves as the central hub for accessing a comprehensive list of all your users within NeoDove.

{% hint style="success" %}
From this page, you have the **provision** to create new user profiles, update existing ones, and execute a variety of user-related actions. Let's walk through the process of **creating** a new user in NeoDove.
{% endhint %}

## Steps:

***

1. **Log in** to your NeoDove account ( <https://connect.neodove.com/> )
2. Go to the **Manage Users** Section, present on the bottom-right-hand section of your screen.

<figure><img src="https://2103666731-files.gitbook.io/~/files/v0/b/gitbook-x-prod.appspot.com/o/spaces%2F-MJasmeOMeAJhTVh0M75%2Fuploads%2F10rU9GNuqumyUwk0aYvs%2FManage%20User.png?alt=media&amp;token=a7b2600d-ab56-4bf6-b49a-d0e9746f5880" alt=""><figcaption></figcaption></figure>

3. Click on the "**Add Users Option"**, present on the top right corner of the screen.

<figure><img src="https://2103666731-files.gitbook.io/~/files/v0/b/gitbook-x-prod.appspot.com/o/spaces%2F-MJasmeOMeAJhTVh0M75%2Fuploads%2Fs8g6jMUh1smnVcwI55uo%2FAdd%20Users.png?alt=media&amp;token=7466bf47-72ef-483c-8ad5-f7be40fba3a3" alt=""><figcaption></figcaption></figure>

4. An "**Add User Form"** will appear.
5. Fill all the details of the User in the "**Add User** **Form"**

* **Name -** Full name of the User.
* **Contact Number -** Add the contact number of the User.
* **Password -** Create a password which is being used as the **login credentials** for the Users in their User Application and User Portal.
* **Role -** If you want to add a new Manager or Assistant Manager, select the **designation** as a Manager or Assistant Manager respectively, but if you want to create a new executive, select the **designation** as Executive.
* **Email (optional)** - Add the email ID of the Users.&#x20;

{% hint style="success" %}
**Note:** This field is **optional**, so you can leave it **blank** if required.
{% endhint %}

* **Employee ID  (optional) -** Add the employee ID of the Users.&#x20;

{% hint style="success" %}
This, too, is an **optional field** and can be left **blank**.
{% endhint %}

<figure><img src="https://2103666731-files.gitbook.io/~/files/v0/b/gitbook-x-prod.appspot.com/o/spaces%2F-MJasmeOMeAJhTVh0M75%2Fuploads%2FQIuMmSeQKF5WlmuHzVl4%2FAdd%20Userss.png?alt=media&amp;token=92fb6469-ecc3-4c13-b8b5-ffc797a69b00" alt=""><figcaption></figcaption></figure>

6\. Now click on the **Submit button.**

{% hint style="success" %}
**Note:** The maximum number of users you can add is **determined** by your NeoDove subscription plan.
{% endhint %}


# How to Add Users in Bulk?

This convenient feature allows for quick and efficient addition of multiple users in one go.

{% hint style="success" %}
To add multiple users to your organization, you can leverage the "**Bulk Users**" feature, which streamlines the process by enabling you to upload a file containing the names and details of **multiple executives**.
{% endhint %}

## Steps:

***

1. **Log in** to your NeoDove account ([https://connect.neodove.com/](https://app.neodove.com/)).
2. Go to the **Manage Users** Section, present on the bottom-right-hand section of your screen.

<figure><img src="https://2103666731-files.gitbook.io/~/files/v0/b/gitbook-x-prod.appspot.com/o/spaces%2F-MJasmeOMeAJhTVh0M75%2Fuploads%2FKPMUBYyUuWg9XJGYm6WS%2FManage%20User.png?alt=media&amp;token=49445dd7-5b04-48ac-b30c-21d8fa9c2579" alt=""><figcaption></figcaption></figure>

3. Click on the "**Add Users Option"**, present on the top right corner of the screen.

<figure><img src="https://2103666731-files.gitbook.io/~/files/v0/b/gitbook-x-prod.appspot.com/o/spaces%2F-MJasmeOMeAJhTVh0M75%2Fuploads%2F0gMT31nQMdCgDL8LfsdP%2FAdd%20Users.png?alt=media&amp;token=6c41f8e9-999d-4d0b-b843-ddd2e458a866" alt=""><figcaption></figcaption></figure>

4. Click on the "**Add Bulk users**" option.

<figure><img src="https://2103666731-files.gitbook.io/~/files/v0/b/gitbook-x-prod.appspot.com/o/spaces%2F-MJasmeOMeAJhTVh0M75%2Fuploads%2F164yikLHqJKHahoiWUc9%2FAdd%20Bulk%20User.png?alt=media&amp;token=a9446ae3-311c-41a8-9e1b-637fd3bd8e09" alt=""><figcaption></figcaption></figure>

5. Click on the "**Select File**" button.

<figure><img src="https://2103666731-files.gitbook.io/~/files/v0/b/gitbook-x-prod.appspot.com/o/spaces%2F-MJasmeOMeAJhTVh0M75%2Fuploads%2Fr51caLtBs3DmD1rb7oos%2FBulk%20Users.png?alt=media&amp;token=8cc7dd7d-35d4-4989-973f-c5470e64037f" alt=""><figcaption></figcaption></figure>

6. Select the **file/sheet** where the **Bulk User’s List** is there.

### **Note:**

***

{% hint style="success" %}
**A few Essential Points before uploading Bulk Users:**

(a) Ensure that the file you are uploading is in .xls, .xlsx, or .csv **formats** only.

(b) The **following fields** which should be there in the file that is being uploaded are listed below:
{% endhint %}

* **Name (user\_name) -** Name of the Users
* **Contact Number (mobile\_number) -** Put the mobile number of the Agents or the Users
* **Password (user\_password) -** Assign a password to the Users

<div align="left"><figure><img src="https://2103666731-files.gitbook.io/~/files/v0/b/gitbook-x-prod.appspot.com/o/spaces%2F-MJasmeOMeAJhTVh0M75%2Fuploads%2FIGC0VHVqJnVlVvkX7NTb%2FSample%20File.png?alt=media&amp;token=e0cc467e-51c1-443c-9251-196b7721ab46" alt=""><figcaption></figcaption></figure></div>

{% hint style="success" %}
Then after the **file** is selected, it will ask you to fill in a few more **fields** for the Users to whom we want to add it to in **bulk**.
{% endhint %}

* **Role -** The particular role of the Users as per the hierarchy
* **Email (optional) -** The email ID of the Users. This is an optional field which may be left blank if required.
* **Manager -** The Reporting Manager needs to be selected for all the Users whom you want to add in bulk
* **Employee ID (optional) -** Add the employee ID of the Users. This is an optional field which may be left blank if required.

<figure><img src="https://2103666731-files.gitbook.io/~/files/v0/b/gitbook-x-prod.appspot.com/o/spaces%2F-MJasmeOMeAJhTVh0M75%2Fuploads%2FWAJoCaMYffdrYBpV9aKc%2FBulk%20User.png?alt=media&amp;token=638e117a-a890-4a7e-bb8f-d85efcbbb1ef" alt=""><figcaption></figcaption></figure>

{% hint style="success" %}
Then you need to click on **Submit** in order to get all the Users added in bulk or in one go. After that, it will give you a **Success Status** that the User is being **created** successfully. If someone is already added in system then it will show the **Failed Status** along with the **description** for the failure.
{% endhint %}

<figure><img src="https://2103666731-files.gitbook.io/~/files/v0/b/gitbook-x-prod.appspot.com/o/spaces%2F-MJasmeOMeAJhTVh0M75%2Fuploads%2F24Mfacnxr9iGCkIuRNnK%2FBulk%20users%20upload.png?alt=media&amp;token=dfbe5fc0-a934-4592-9c21-82beccf35395" alt=""><figcaption></figcaption></figure>


# How to Edit Users?

NeoDove's web portal offers a dedicated section for editing user accounts, providing a convenient and comprehensive platform to make these changes to user profiles.

{% hint style="success" %}
Frequently, it becomes necessary to **Update** and **Modify** user information, such as mobile numbers, email IDs, passwords, or a user's role and designation within the organization.&#x20;
{% endhint %}

This **feature** ensures that User Information remains **accurate** and **up-to-date**, aligning with the organization's evolving needs and requirements.<br>

## Steps:

***

1. **Log in** to your NeoDove account ([https://connect.neodove.com/](https://app.neodove.com/))
2. Go to the **Manage Users** Section, present on the bottom-right-hand section of your screen.

<figure><img src="https://2103666731-files.gitbook.io/~/files/v0/b/gitbook-x-prod.appspot.com/o/spaces%2F-MJasmeOMeAJhTVh0M75%2Fuploads%2FdzxU5L6lg5rFYwU2dS2h%2Fimage.png?alt=media&amp;token=cda07176-e655-4226-b41a-aff5824b4cab" alt=""><figcaption></figcaption></figure>

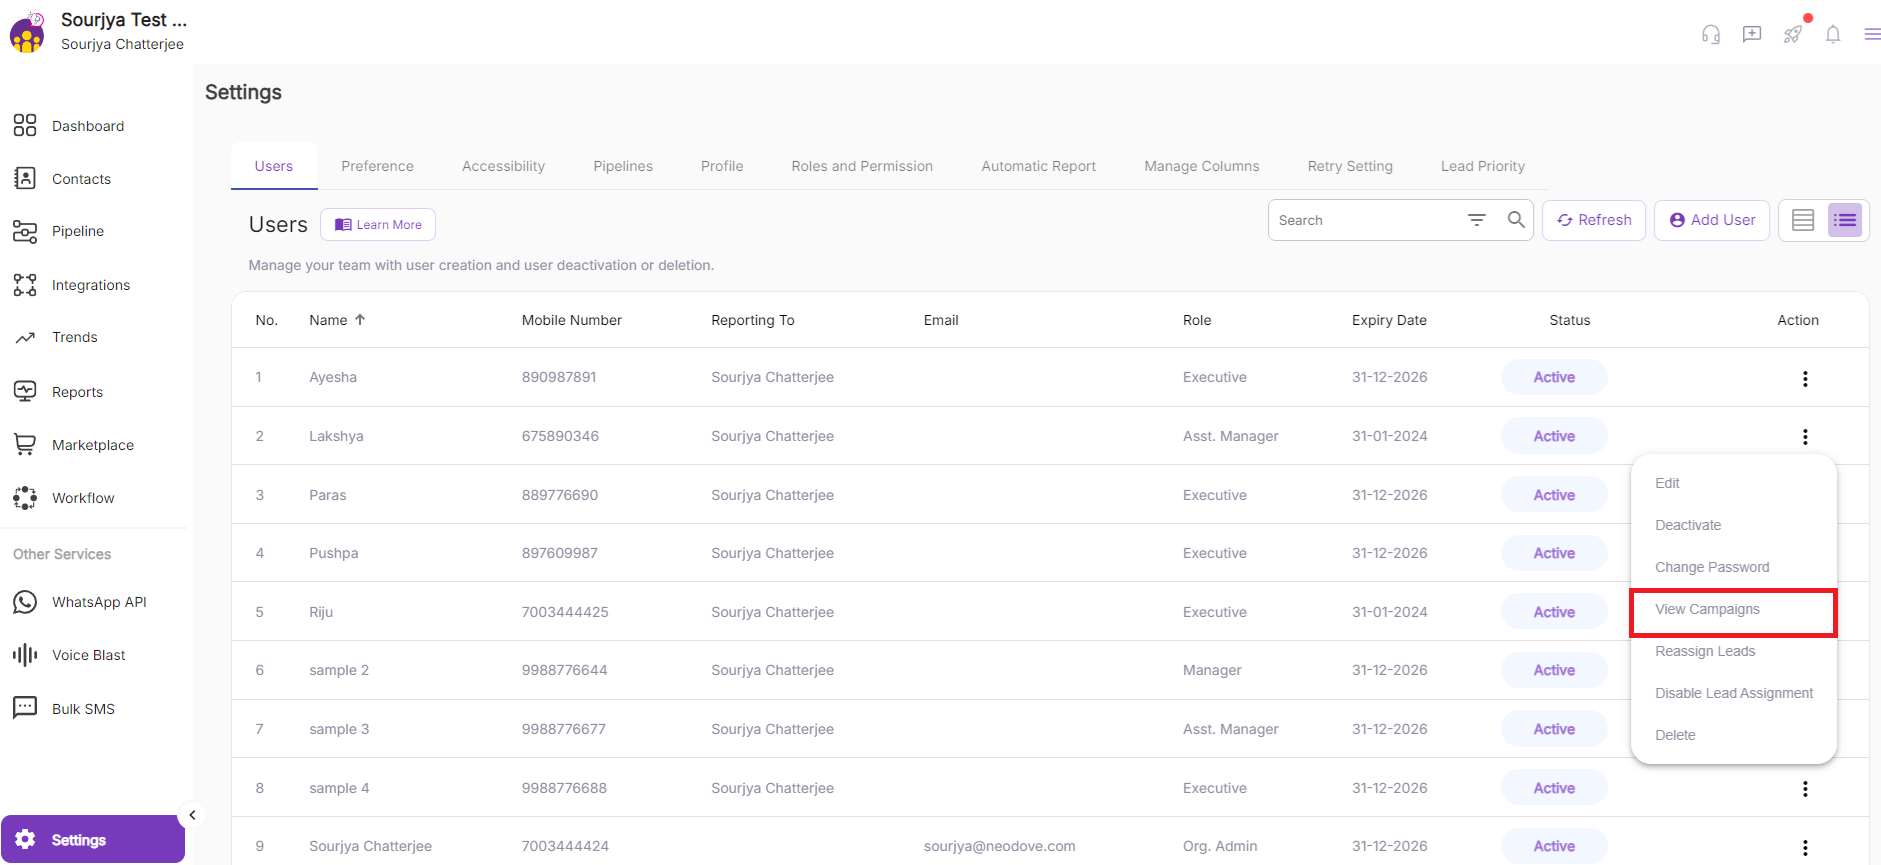
3. By default, a list of all the **Users** is visible.
4. In this list, under the heading "**Action**", you will find a **Menu Icon** (3 vertical dots) against every User’s Name.&#x20;
5. Click on this **Menu Icon** present against the User you want to edit.&#x20;
6. A drop-down "**Menu Bar**" will appear.&#x20;
7. Click on the "**Edit**" option in the "**Menu Bar**"**.**

<figure><img src="https://2103666731-files.gitbook.io/~/files/v0/b/gitbook-x-prod.appspot.com/o/spaces%2F-MJasmeOMeAJhTVh0M75%2Fuploads%2F6wayUgkQRW6VY3GlEMQW%2FEdit.png?alt=media&amp;token=da19b5df-c61d-4ab5-ac12-583d166e36c3" alt=""><figcaption></figcaption></figure>

8. Edit as per your **requirement**.
9. Click on "**Update**" when you are done.

<figure><img src="https://2103666731-files.gitbook.io/~/files/v0/b/gitbook-x-prod.appspot.com/o/spaces%2F-MJasmeOMeAJhTVh0M75%2Fuploads%2FegqDovPhOqvSYZvisgoV%2FUpdate.png?alt=media&amp;token=53c6c164-58d9-4738-9920-4abad52051d4" alt=""><figcaption></figcaption></figure>


# How to Deactivate Users?

NeoDove holds the power to remove a user's access to lead assignment capabilities.

{% hint style="success" %}
To **disable** the user, they will no longer be **allocated** any further leads, and their login privileges will be **revoked**.
{% endhint %}

Users are typically **deactivated** to prevent them from **accessing** a system or platform, often due to reasons such as employee termination, change in roles, or security concerns.

## Steps:

***

1. **Log in** to your NeoDove account ([https://connect.neodove.com/](https://app.neodove.com/))
2. Go to the **Manage Users** Section, present on the bottom-right-hand section of your screen.

<figure><img src="https://2103666731-files.gitbook.io/~/files/v0/b/gitbook-x-prod.appspot.com/o/spaces%2F-MJasmeOMeAJhTVh0M75%2Fuploads%2Fjd6yFVq1i3QLGq928CV3%2Fimage.png?alt=media&amp;token=0d605c1b-c6cf-440a-ba65-fa4936c52c98" alt=""><figcaption></figcaption></figure>

3. By default, a list of all the **Users** is visible.
4. In this list, under the heading "**Action**", you will find a **Menu Icon** (3 vertical dots) against every User’s Name.&#x20;
5. Click on this **Menu Icon** present against the User you want to **deactivate**.&#x20;
6. A drop-down "**Menu Bar**" will appear.&#x20;
7. Click on the "**Deactivate**" option in the "**Menu Bar**"**.**

<figure><img src="https://2103666731-files.gitbook.io/~/files/v0/b/gitbook-x-prod.appspot.com/o/spaces%2F-MJasmeOMeAJhTVh0M75%2Fuploads%2FHZmD7BOsKZxVjUKa9Ta0%2FDeactivate.png?alt=media&amp;token=5f95ce34-2d05-4af5-8684-e89f8c72263e" alt=""><figcaption></figcaption></figure>

8. A **pop-up** will appear which states the **consequences** after deactivating that specific user.
9. Then after reading the statement, we can click on "**Yes**" to deactivate the particular user.

<figure><img src="https://2103666731-files.gitbook.io/~/files/v0/b/gitbook-x-prod.appspot.com/o/spaces%2F-MJasmeOMeAJhTVh0M75%2Fuploads%2F7xfF604X1nQZrK099XwI%2FDeactivated.png?alt=media&amp;token=6290aa4b-2c03-4d80-90e6-3197d1e23785" alt=""><figcaption></figcaption></figure>

10. After pressing on "**Yes**", the user will get deactivated and will be **logged** out from their account automatically.

<figure><img src="https://2103666731-files.gitbook.io/~/files/v0/b/gitbook-x-prod.appspot.com/o/spaces%2F-MJasmeOMeAJhTVh0M75%2Fuploads%2FWhANmicpiGCyjItzUAxm%2FDeactivation.png?alt=media&amp;token=84107d0f-40f9-4251-9974-7ba0b4ed61e0" alt=""><figcaption></figcaption></figure>

{% hint style="success" %}
To **reactivate** a deactivated user, you would need to click on the specific user's '**Menu**' icon located on the right-hand side, then select the '**Activate**' option to restore their access and privileges.
{% endhint %}

<figure><img src="https://2103666731-files.gitbook.io/~/files/v0/b/gitbook-x-prod.appspot.com/o/spaces%2F-MJasmeOMeAJhTVh0M75%2Fuploads%2Fas5cm5hC4xDNrXVbTcSS%2FReactivated.png?alt=media&amp;token=fd04c0bf-1f4c-42f3-869f-e8fd1f270df1" alt=""><figcaption></figcaption></figure>


# How to Reset a User Account Password?

In case a user forgets the password for their NeoDove account, the organization's admin holds the authority to initiate a password reset for that user's account.

{% hint style="success" %}
This **functionality** ensures that Users can regain access to their accounts with the assistance of the admin, promoting a secure and user-friendly experience within the **NeoDove platform**.
{% endhint %}

## Steps:

***

1. **Log in** to your NeoDove account ([https://connect.neodove.com/](https://app.neodove.com/))
2. Go to the **Manage Users** Section, present on the bottom-right-hand section of your screen.

<figure><img src="https://2103666731-files.gitbook.io/~/files/v0/b/gitbook-x-prod.appspot.com/o/spaces%2F-MJasmeOMeAJhTVh0M75%2Fuploads%2FvZsnxyKWH7WXXOSyCUEx%2Fimage.png?alt=media&amp;token=ee48da1d-5ea9-471b-8681-645ebf92c1e1" alt=""><figcaption></figcaption></figure>

3. By default, a list of all the **Users** is visible.
4. In this list, under the heading "**Action**", you will find a **Menu Icon** (3 vertical dots) against every User’s Name.&#x20;
5. Click on this **Menu Icon** present against the User you want to Change the **Password** for.&#x20;
6. A drop-down "**Menu Bar**" will appear.&#x20;
7. Click on the "**Change Password**" option in the "**Menu Bar**"**.**

<figure><img src="https://2103666731-files.gitbook.io/~/files/v0/b/gitbook-x-prod.appspot.com/o/spaces%2F-MJasmeOMeAJhTVh0M75%2Fuploads%2FODDnnqw4GnCzQCy1d3an%2FChange%20Password.png?alt=media&amp;token=75be2b9c-ba8b-484c-997a-089553d588c4" alt=""><figcaption></figcaption></figure>

8. An "**Update Password**" bar will appear.
9. Create a **New password** for the User.
10. Now, click on the "**Update button**" to get the New Password updated.

<figure><img src="https://2103666731-files.gitbook.io/~/files/v0/b/gitbook-x-prod.appspot.com/o/spaces%2F-MJasmeOMeAJhTVh0M75%2Fuploads%2FxCztfI2zJWMsqufsC8rh%2FUpdated%20Password.png?alt=media&amp;token=ce9b0a07-f497-405c-b313-673615434b1c" alt=""><figcaption></figcaption></figure>


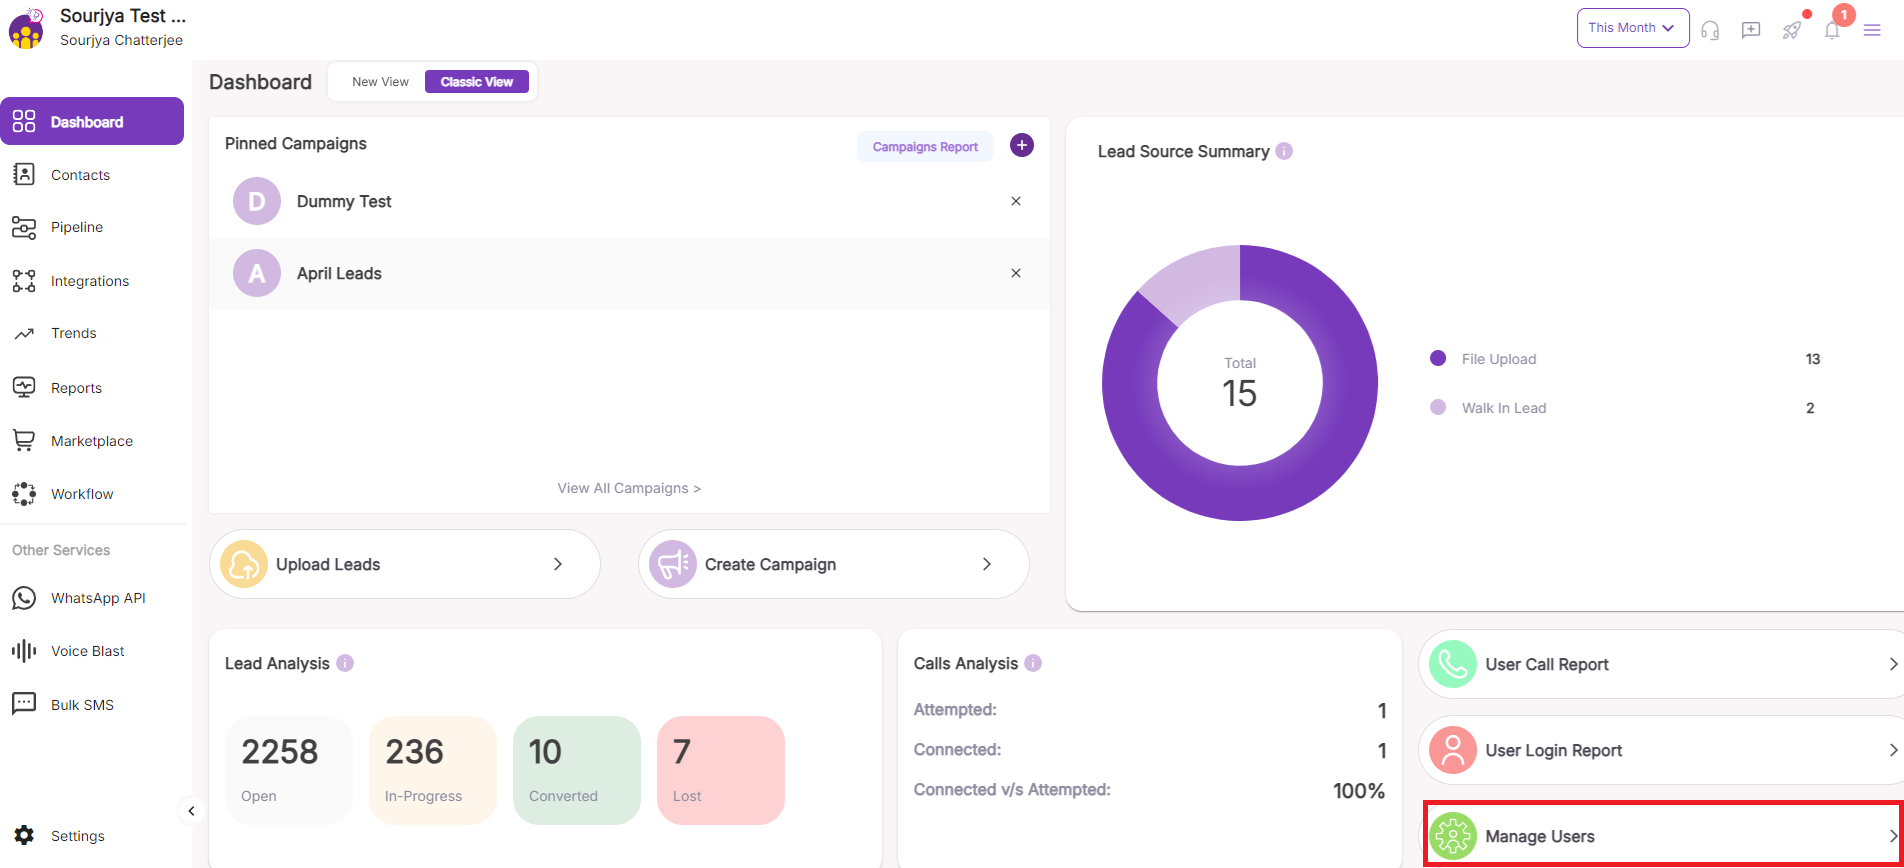
# How to View all the Assigned Campaigns of a User?

The "View Campaign" feature in NeoDove allows you to easily access and review all the campaigns to which a specific user is assigned.

It provides **comprehensive information** about these campaigns, including performance metrics and other relevant details.&#x20;

{% hint style="success" %}
This feature is valuable for **monitoring** and **assessing** how different users are contributing to various campaigns, helping you keep a close eye on user performance across different contexts.
{% endhint %}

## Steps:

***

1. **Log in** to your NeoDove account ([https://connect.neodove.com/](https://app.neodove.com/))
2. Go to the **Manage Users** Section, present on the bottom-right-hand section of your screen.
<figure><img src="https://2103666731-files.gitbook.io/~/files/v0/b/gitbook-x-prod.appspot.com/o/spaces%2F-MJasmeOMeAJhTVh0M75%2Fuploads%2Fm8lyzIByALFuD7xwje9S%2Fimage.png?alt=media&amp;token=5a15f62e-ada1-4266-b936-d8571c282301" alt=""><figcaption></figcaption></figure>

3. By default, a list of all the **Users** is visible.
4. In this list, under the heading "**Action**", you will find a **Menu Icon** (3 vertical dots) against every User’s Name.&#x20;
5. Select this **Menu Icon** present against the User you want to view the **campaigns** of.
6. A drop-down "**Menu Bar**" will appear.&#x20;
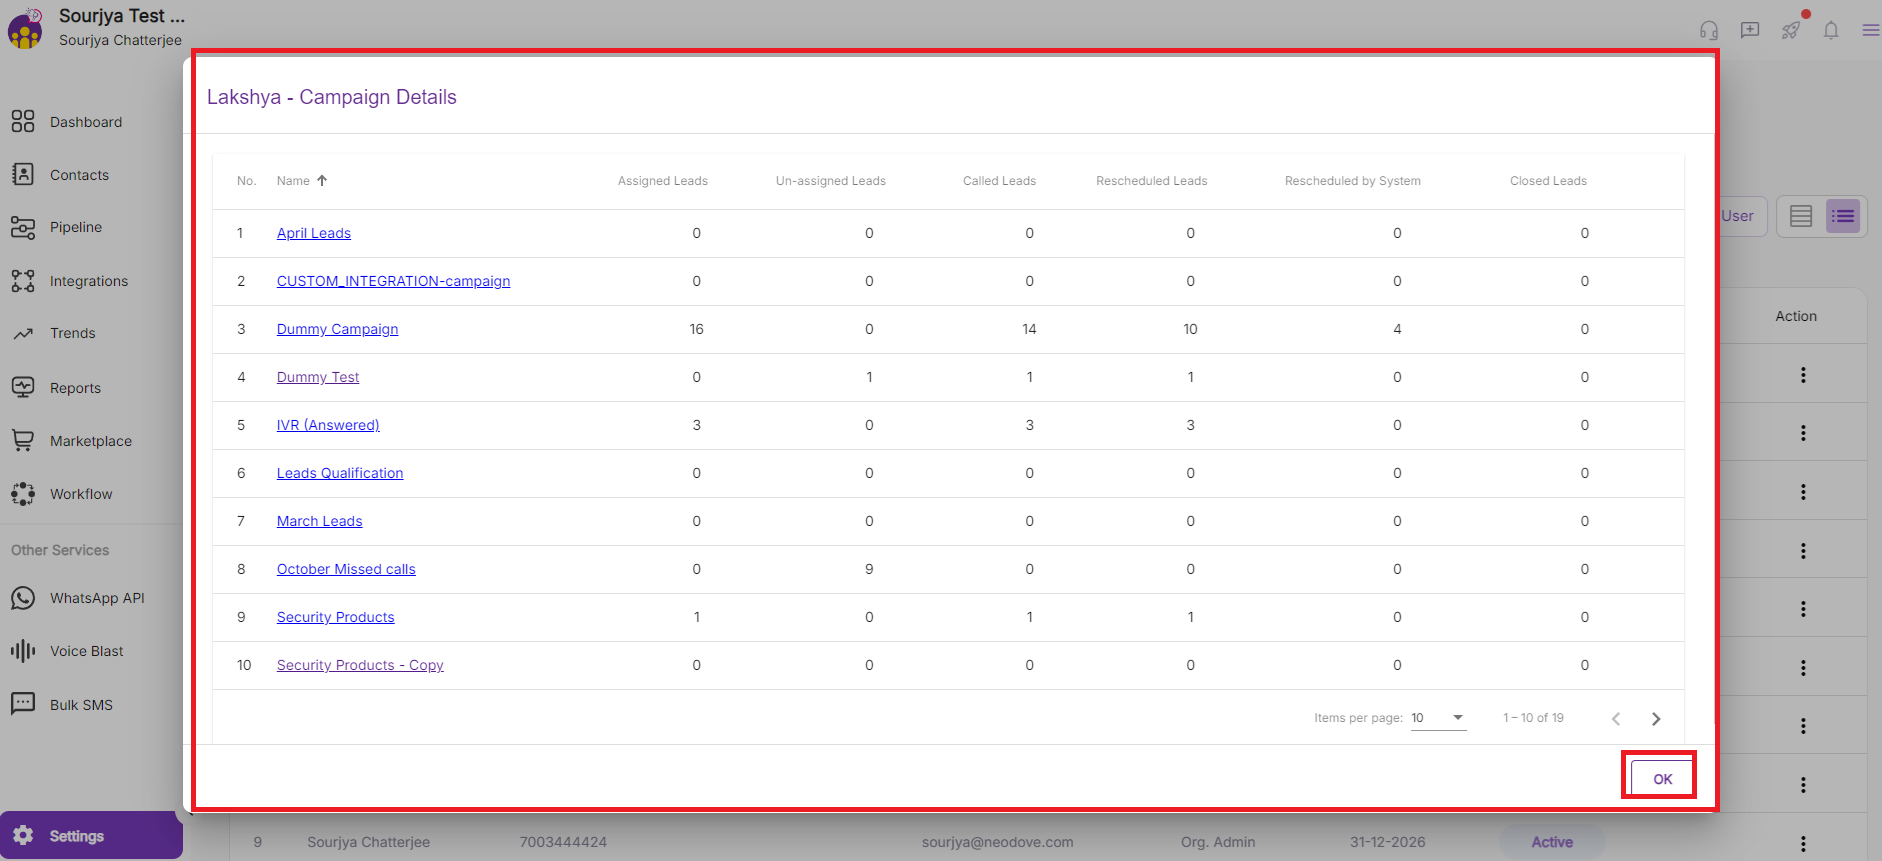
7. Click on the "**View Campaigns**" option in the "**Menu Bar**"**.**

<figure><img src="https://2103666731-files.gitbook.io/~/files/v0/b/gitbook-x-prod.appspot.com/o/spaces%2F-MJasmeOMeAJhTVh0M75%2Fuploads%2FvRrPLNsAzz8kr9lgGepk%2FView%20Campaign.png?alt=media&amp;token=2eeb5984-dec2-43d4-a986-3806d70488d5" alt=""><figcaption></figcaption></figure>

{% hint style="success" %}
You can view a list containing comprehensive **Campaign Details** for the selected User. This list typically includes **information** such as:
{% endhint %}

* **Name of the campaign -** Name of all the Campaigns to which the User is assigned.
* **Assigned leads -** The number of Leads in each campaign that are assigned to the User.
* **Un-assigned leads -** The number of Leads that are yet to be assigned.
* **Called leads -** The number of Leads on which the calling has been done.
* **Rescheduled leads -** The number of Leads that have been rescheduled for further **Follow-Ups**.
* **Rescheduled by the system -** The number of Leads that have been rescheduled by the system due to being switched off, busy, or out-of-network calls.
* **Closed leads -** The number of leads that have been closed by the User.

<figure><img src="https://2103666731-files.gitbook.io/~/files/v0/b/gitbook-x-prod.appspot.com/o/spaces%2F-MJasmeOMeAJhTVh0M75%2Fuploads%2FqDbXuCyWyJlNMpZ0CQdE%2FCampaigns.png?alt=media&amp;token=7b896c8e-38d7-4989-a670-1b8d6da60381" alt=""><figcaption></figcaption></figure>


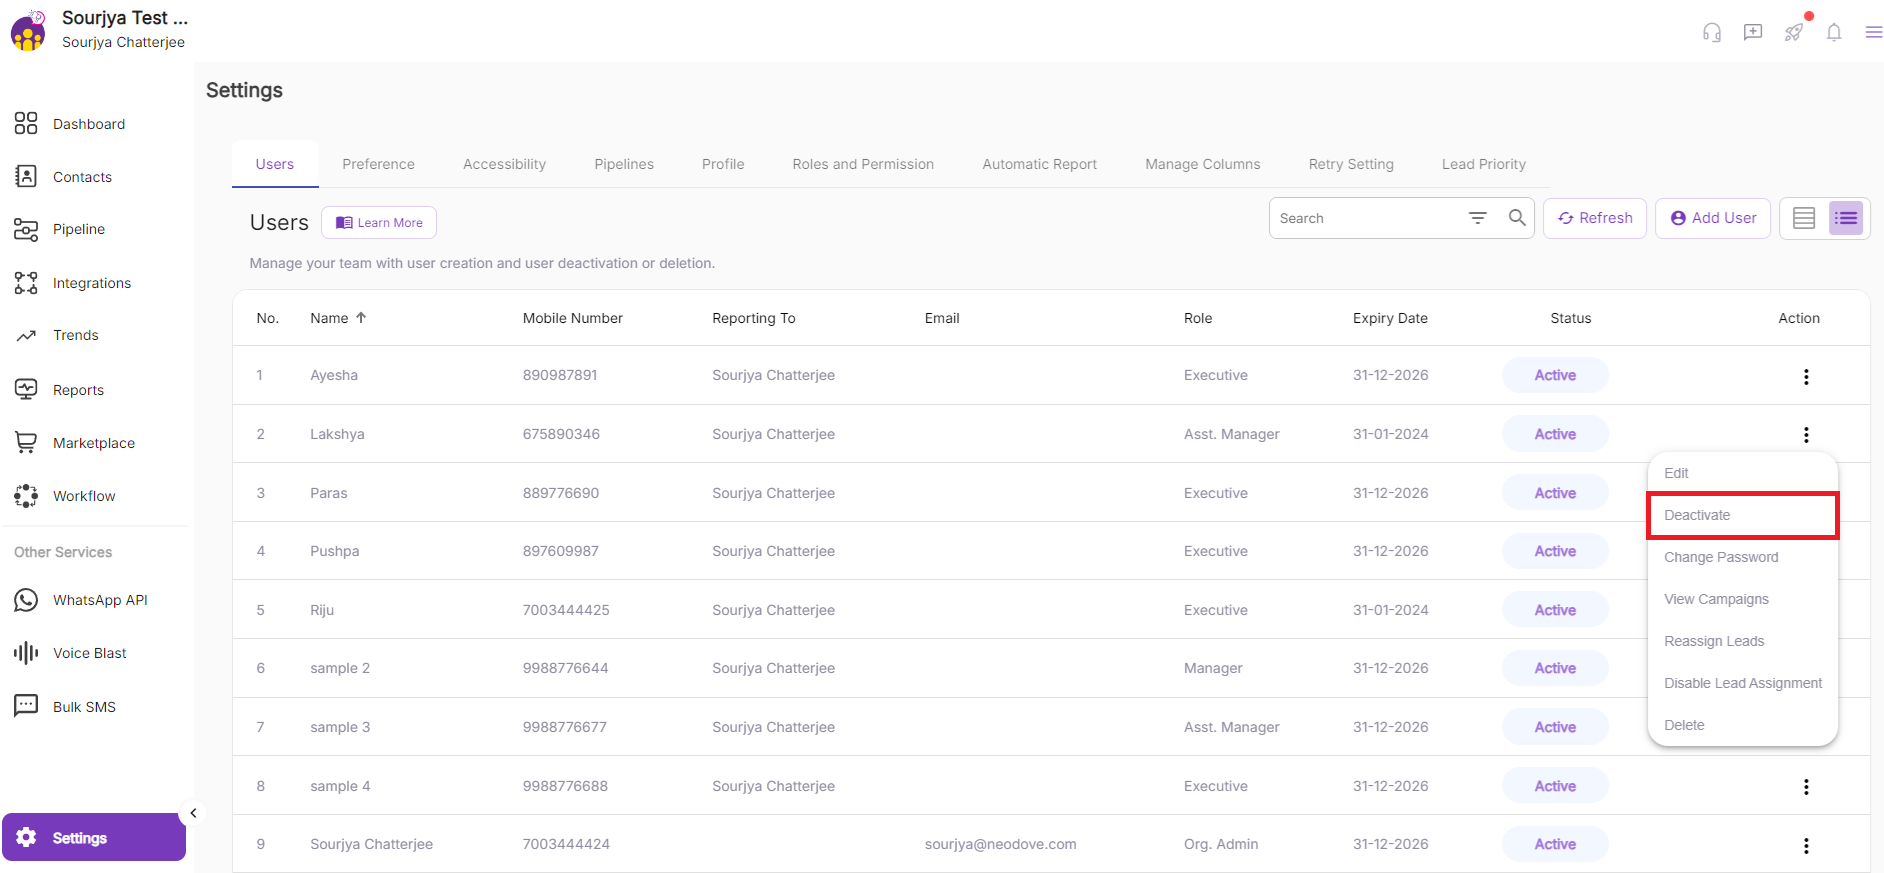
# How to Re-Assign the complete leads of a User irrespective of all the Campaigns?

In NeoDove, you have the option to transfer all of a user's leads to another user, irrespective of the campaigns associated with those leads.

{% hint style="success" %}
This action essentially shifts **ownership** of the leads from one user to another, resulting in the original user no longer having **access** to those leads.&#x20;
{% endhint %}

This can be a **strategic move** for reallocating lead management responsibilities within the organization, but it should be carefully considered and executed.

## Steps:

***

1. **Log in** to your NeoDove account ([ https://connect.neodove.com/](https://app.neodove.com/))
2. Go to the **Manage Users** Section, present on the bottom-right-hand section of your screen.
<figure><img src="https://2103666731-files.gitbook.io/~/files/v0/b/gitbook-x-prod.appspot.com/o/spaces%2F-MJasmeOMeAJhTVh0M75%2Fuploads%2F48wSxT3WWZ0fnUVeAjzw%2Fimage.png?alt=media&amp;token=be125049-f4ce-4cb5-9b5e-ca0c6bb381b6" alt=""><figcaption></figcaption></figure>

3. By default, a list of all the **Users** is visible.
4. In this list, under the heading "**Action**", you will find a **Menu Icon** (3 vertical dots) against every User’s Name.&#x20;
5. Click on this **Menu Icon** present against the User you want to **Re-assign** the leads to someone else.
6. A drop-down "**Menu Bar**" will appear.&#x20;
7. Click on the "**Reassign Leads**" option in the "**Menu Bar**"**.**

<figure><img src="https://2103666731-files.gitbook.io/~/files/v0/b/gitbook-x-prod.appspot.com/o/spaces%2F-MJasmeOMeAJhTVh0M75%2Fuploads%2FIBseprDUPd0mpug5vNDp%2FReassign%20Leads.png?alt=media&amp;token=3239f575-8c9c-47c7-a5ae-a41a9031a0b3" alt=""><figcaption></figcaption></figure>

8. A "**Reassign Leads**" option will appear.
9. Then you need to select the **Campaigns** from where you want the leads to get **reassigned** to the second User or Executive.
10. Even there is another option called "**Reassign All Campaigns**". So, if you click on that then you would be able to **reassign** all the leads from all the campaigns altogether at a single glance.

<figure><img src="https://2103666731-files.gitbook.io/~/files/v0/b/gitbook-x-prod.appspot.com/o/spaces%2F-MJasmeOMeAJhTVh0M75%2Fuploads%2F2uMnHjMJI30u8Hg8xtMe%2FReassign%20Campaigns.png?alt=media&amp;token=95d3baa7-20ab-42fa-afb8-17d1470313ec" alt=""><figcaption></figcaption></figure>

11. After clicking on **Reassign** from any of the campaign, it will redirect you to an another page with the **lead details**.&#x20;
12. Then, the leads need to be **selected** which needs to be reassigned and need to click on "**Bulk Action**".
13. Post that, needs to be clicked on "**Update**" and then needs to select the **particular user or agent** whom you want to assign to and again need to click on **Update** to get the lead reassigned.

<figure><img src="https://2103666731-files.gitbook.io/~/files/v0/b/gitbook-x-prod.appspot.com/o/spaces%2F-MJasmeOMeAJhTVh0M75%2Fuploads%2F5fNGq8280QJCKu0Et1Tk%2FLead%20assigned.png?alt=media&amp;token=dca38e90-2c08-466f-9f00-c44cc2c07509" alt=""><figcaption></figcaption></figure>


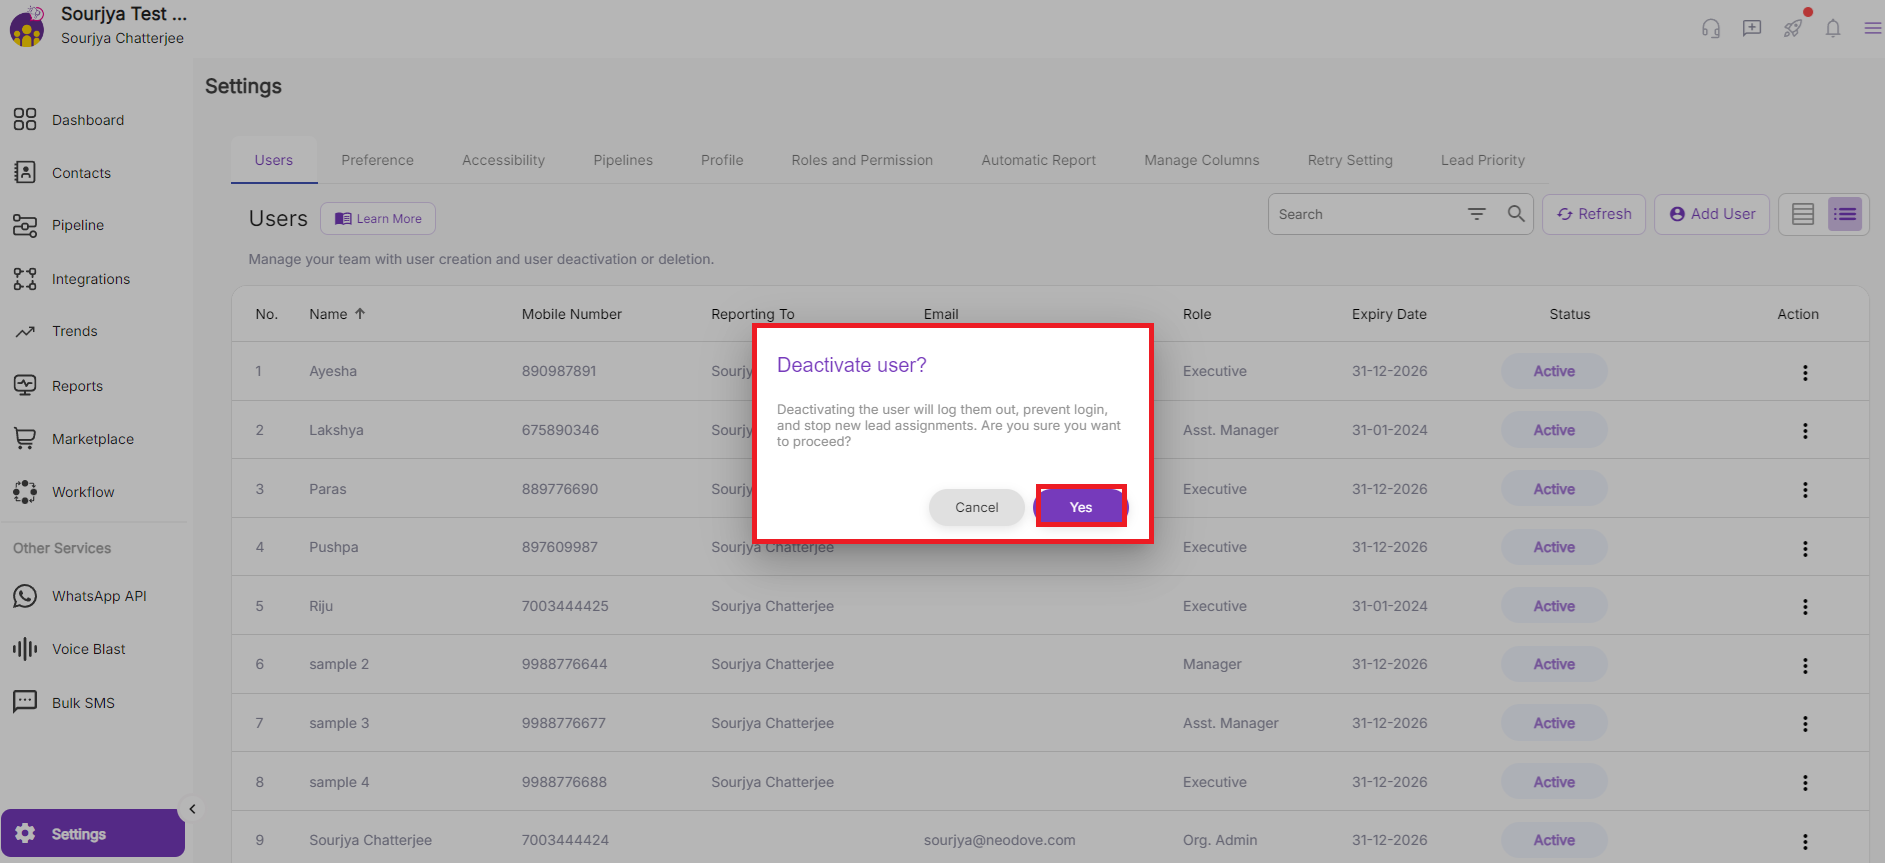
# How to Disable Lead Assignment?

To prevent the allocation of new leads to a specific user within the account irrespective of all the campaigns

Disabling the lead assignment option may be **necessary** when a user is no longer actively involved in lead management, such as upon their departure from the company or a change in their role.&#x20;

It ensures that leads are **distributed** efficiently to active and relevant users, avoiding potential confusion or oversight.&#x20;

{% hint style="success" %}
Additionally, it helps **maintain** data accuracy by preventing leads from being assigned to inactive or unresponsive users.
{% endhint %}

## Steps:

***

1. **Log in** to your NeoDove account ([https://connect.neodove.com/](https://app.neodove.com/))
2. Go to the **Manage Users** Section, present on the bottom-right-hand section of your screen.
<figure><img src="https://2103666731-files.gitbook.io/~/files/v0/b/gitbook-x-prod.appspot.com/o/spaces%2F-MJasmeOMeAJhTVh0M75%2Fuploads%2FbUfzyVTqJISGTtXVlflW%2Fimage.png?alt=media&amp;token=9aa9c287-97ec-4d4f-af34-a8e89dec3f68" alt=""><figcaption></figcaption></figure>

3. By default, a list of all the **Users** is visible.
4. In this list, under the heading "**Action**", you will find a **Menu Icon** (3 vertical dots) against every User’s Name.&#x20;
5. Select this **Menu Icon** present against the User you want to **disable** the Lead Assignment.
6. A drop-down "**Menu Bar**" will appear.&#x20;
7. Click on the "**Disable Lead Assignment**" option in the "**Menu Bar**"**.**

<figure><img src="https://2103666731-files.gitbook.io/~/files/v0/b/gitbook-x-prod.appspot.com/o/spaces%2F-MJasmeOMeAJhTVh0M75%2Fuploads%2FQKsFA2SSw7mUZ7c8ZGMI%2FDisable%20Lead%20Assignment.png?alt=media&amp;token=1ac5d2e1-4559-425a-a472-05637cf84f91" alt=""><figcaption></figcaption></figure>

8. Then, the lead assignment will be automatically **disabled** for the specified user, thereby preventing the **allocation** of leads to them during upload processes.

<figure><img src="https://2103666731-files.gitbook.io/~/files/v0/b/gitbook-x-prod.appspot.com/o/spaces%2F-MJasmeOMeAJhTVh0M75%2Fuploads%2FtLLpYqdvXWEa6OJdZu5O%2FDisabled.png?alt=media&amp;token=1c3bf3dd-1d90-49a9-969b-6a31f930cf65" alt=""><figcaption></figcaption></figure>

{% hint style="success" %}
**Note:** To **re-enable** lead assignment for the user, click on the **menu icon** located on the right-hand side of the specific User, then select the '**Enable Lead Assignment**' option from the dropdown menu.
{% endhint %}

<figure><img src="https://2103666731-files.gitbook.io/~/files/v0/b/gitbook-x-prod.appspot.com/o/spaces%2F-MJasmeOMeAJhTVh0M75%2Fuploads%2Fdf1ngQBWWuZsp58ZZEvv%2FEnable.png?alt=media&amp;token=9aae119f-428c-4c40-8631-acfbc4b91868" alt=""><figcaption></figcaption></figure>


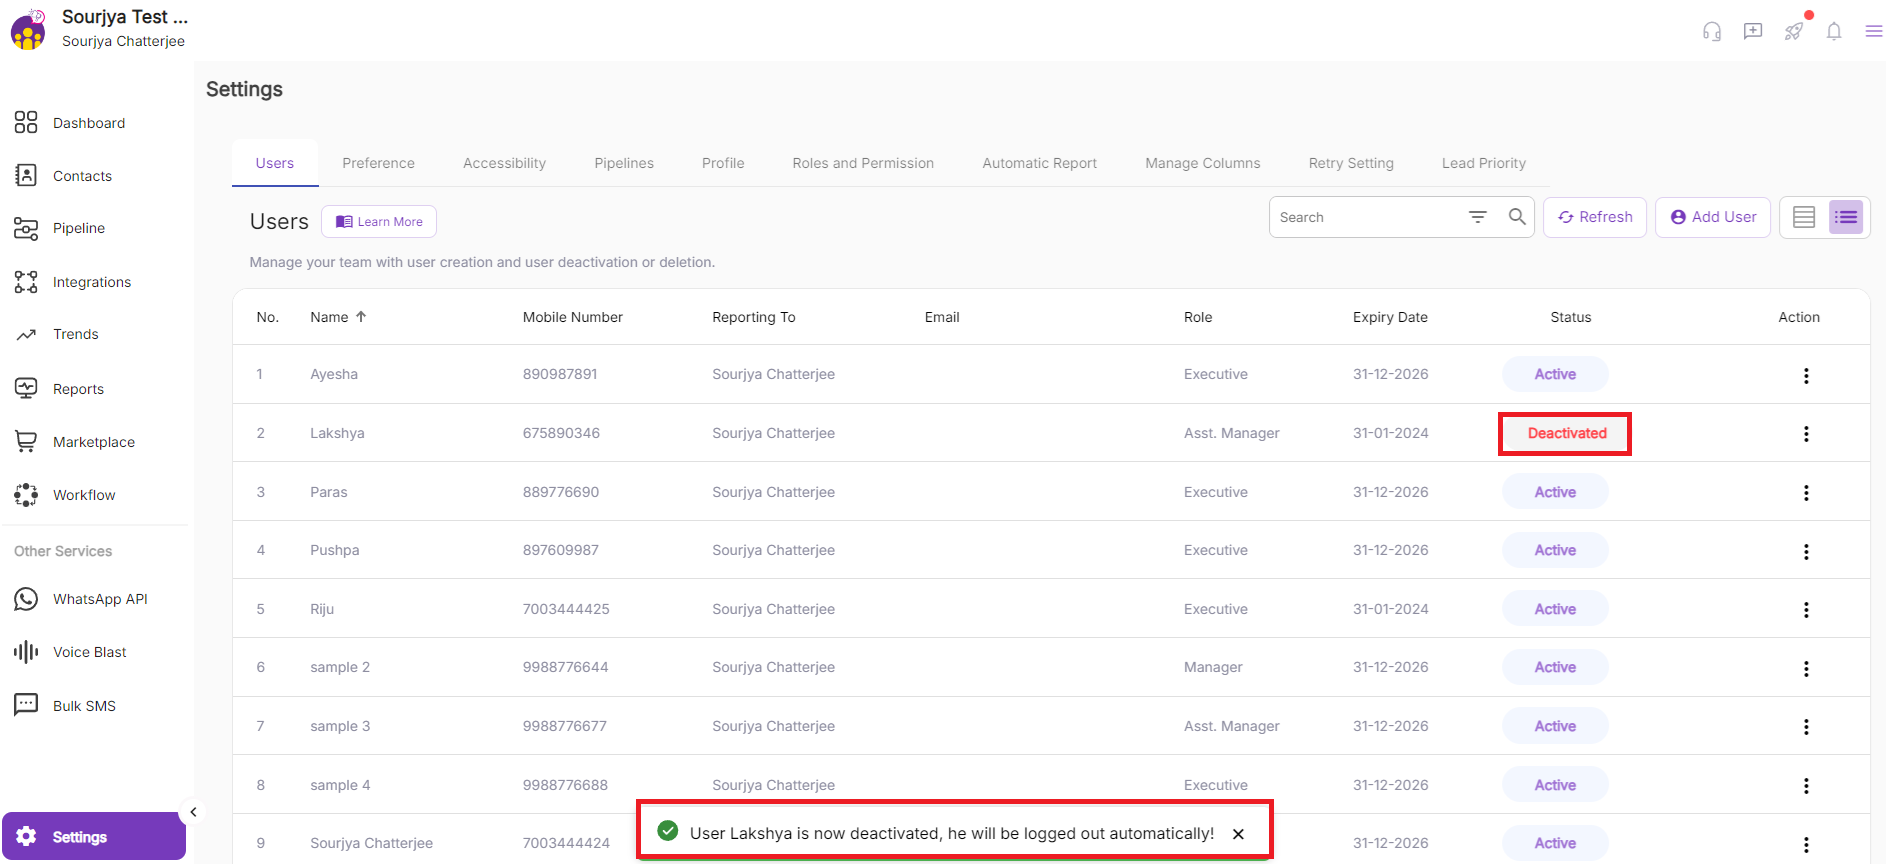
# How to Delete Users?

The NeoDove admin has the authority to permanently remove a user from the organization's NeoDove account.

{% hint style="success" %}
This action results in the user's complete **deletion** from the system, including all associated data and access rights.
{% endhint %}

It's a significant **administrative action** that should be carried out with **caution**, typically done when a User's presence within the organization is no longer required.

## Steps:

***

1. **Log in** to your NeoDove account ([https://connect.neodove.com/](https://app.neodove.com/))
2. Go to the **Manage Users** Section, present on the bottom-right-hand section of your screen.
<figure><img src="https://2103666731-files.gitbook.io/~/files/v0/b/gitbook-x-prod.appspot.com/o/spaces%2F-MJasmeOMeAJhTVh0M75%2Fuploads%2FTIlE5SD7ScJoxlVSUII9%2Fimage.png?alt=media&amp;token=30a66c25-9e45-4844-a49a-bccdd4868365" alt=""><figcaption></figcaption></figure>

3. By default, a list of all the **Users** is visible.
4. In this list, under the heading "**Action**", you will find a **Menu Icon** (3 vertical dots) against every User’s Name.&#x20;
5. Select this **Menu Icon** present against the User you want to **Delete**.
6. A drop-down "**Menu Bar**" will appear.&#x20;
7. Click on the "**Delete**" option in the "**Menu Bar**"**.**

<figure><img src="https://2103666731-files.gitbook.io/~/files/v0/b/gitbook-x-prod.appspot.com/o/spaces%2F-MJasmeOMeAJhTVh0M75%2Fuploads%2F7rIUdVocDtO9Y79ZWBU6%2FDelete.png?alt=media&amp;token=06d90eb8-2a68-418d-8b9a-fb891a09b9e3" alt=""><figcaption></figcaption></figure>

8. Select on "**Yes**" button to confirm.

<figure><img src="https://2103666731-files.gitbook.io/~/files/v0/b/gitbook-x-prod.appspot.com/o/spaces%2F-MJasmeOMeAJhTVh0M75%2Fuploads%2Fji0MEONwz2tB33AAjcyd%2FDeleted.png?alt=media&amp;token=2a9e9633-2f5d-40fa-a438-6d0c77bc066a" alt=""><figcaption></figcaption></figure>

{% hint style="success" %}
**Note:** If this User has some Pending Leads or Campaigns left, then we will further receive a Menu Bar called **Reassign Leads**.

* As we are deleting this User’s account, we need to **Reassign** his/her leads to some Other User.
* From the User’s option, select the User who should receive the **Pending Campaigns** and **Leads**.
  {% endhint %}

<figure><img src="https://2103666731-files.gitbook.io/~/files/v0/b/gitbook-x-prod.appspot.com/o/spaces%2F-MJasmeOMeAJhTVh0M75%2Fuploads%2F90K4pUp3akV1KpZTBMRE%2FDeletion.png?alt=media&amp;token=651b4376-c2f1-4ff3-ac7f-8a6abfcd357a" alt=""><figcaption></figcaption></figure>

9. Now click on the "**Update**" button to get it updated.


# How to Define the Roles and Permissions of a User?

Within NeoDove, clients have the ability to establish a Hierarchical Structure for their organization.

{% embed url="<https://youtu.be/h7B_fSvu9lM>" %}

{% hint style="success" %}
This structure enables them to **allocate** specific roles and permissions to users based on their **designated responsibilities**.&#x20;
{% endhint %}

Each **role** is associated with a unique set of permissions, ensuring that users have the appropriate level of **access** and **control** within the platform.&#x20;

This Role-based approach **facilitates** efficient Campaign Management and Portal Usage while aligning with the organizational hierarchy and User Roles.

{% hint style="success" %}
**Note:**&#x20;

**For example**; In NeoDove, the **Organization Admin** has full control over account settings, user management, and access permissions.&#x20;

**Managers** have similar privileges but may have restrictions set by the admin.&#x20;

**Assistant Managers** typically assist managers and have limited access compared to managers.&#x20;

**Executives** have basic access to perform sales-related tasks assigned to them but do not have administrative privileges.
{% endhint %}

## Steps:

***

1. **Log in** to your NeoDove account ([https://connect.neodove.com/](https://app.neodove.com/))
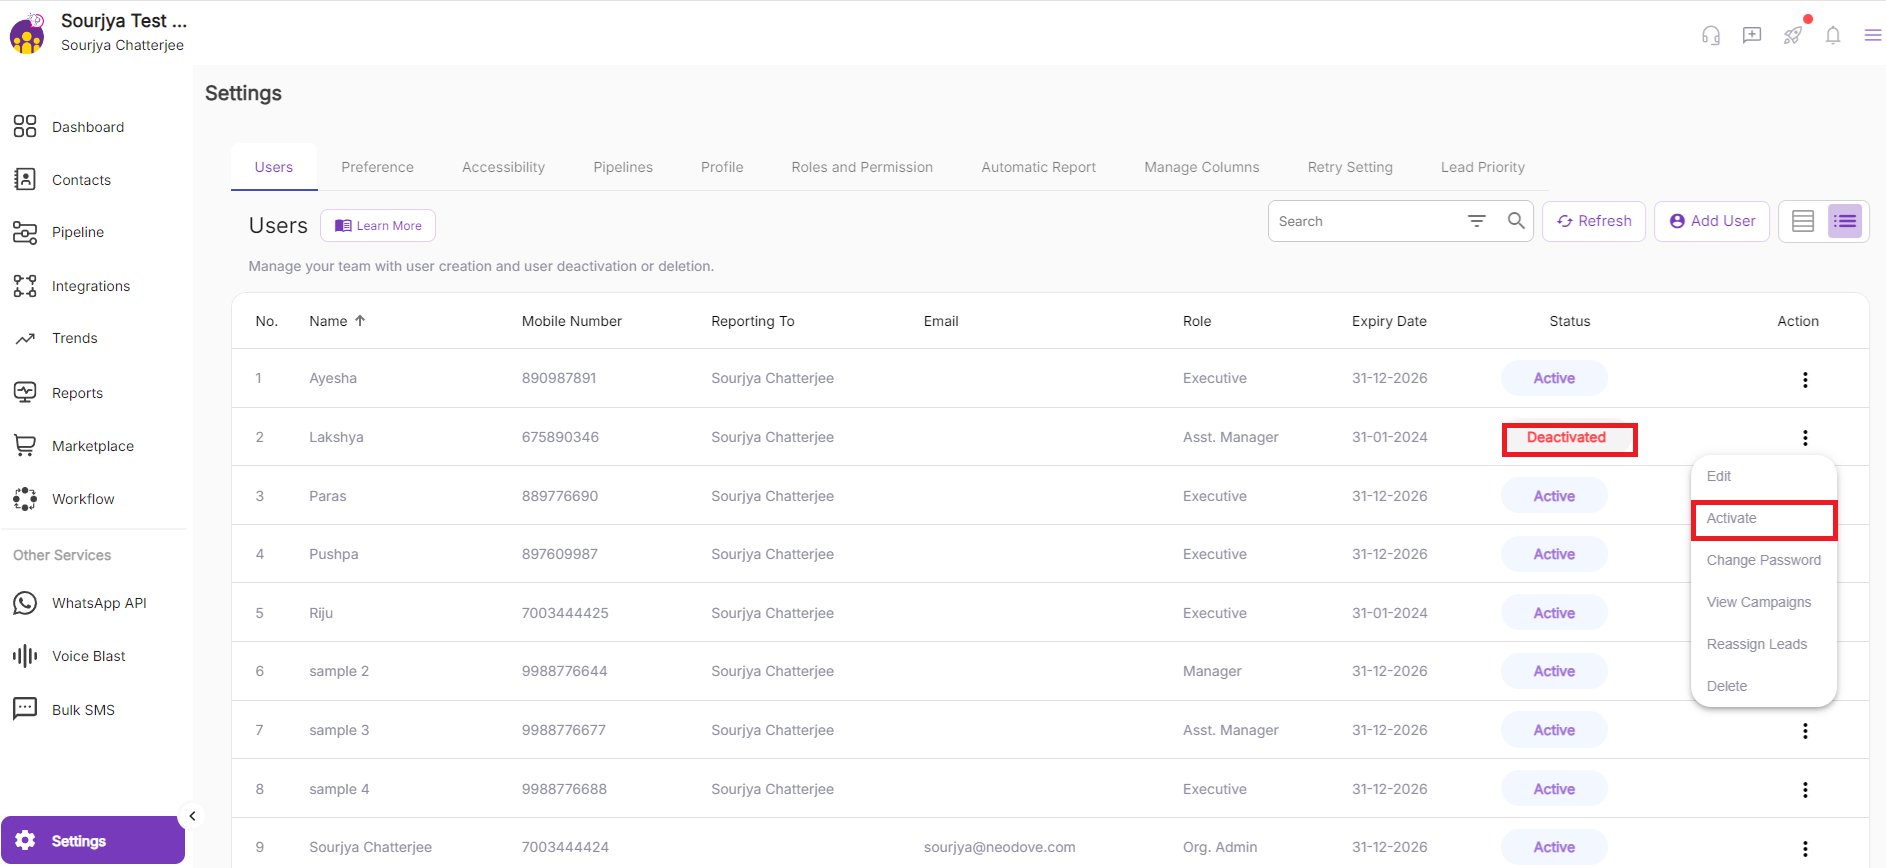
2. Go to the **Manage Users** Section, present on the bottom-right-hand section of your screen.
<figure><img src="https://2103666731-files.gitbook.io/~/files/v0/b/gitbook-x-prod.appspot.com/o/spaces%2F-MJasmeOMeAJhTVh0M75%2Fuploads%2FdUG7jHCcgoFOUughE0bi%2Fimage.png?alt=media&amp;token=a0a86a9e-23b4-432a-9a0c-75f83d6e9482" alt=""><figcaption></figcaption></figure>

3. By default, a list of all the **Users** is visible.
4. Click on the "**Roles and Permissions**" button, at the top of the screen just between the "**Profile**" and the "**Automatic Report**" options.

<figure><img src="https://2103666731-files.gitbook.io/~/files/v0/b/gitbook-x-prod.appspot.com/o/spaces%2F-MJasmeOMeAJhTVh0M75%2Fuploads%2FiH0iaPcRr26aMTlVYW9V%2FRoles%20and%20permission.png?alt=media&amp;token=e405a0d3-a593-44f6-a361-a4da0b95c3bb" alt=""><figcaption></figcaption></figure>

5. Then all the **Roles** are listed at the top of the screen.

<figure><img src="https://2103666731-files.gitbook.io/~/files/v0/b/gitbook-x-prod.appspot.com/o/spaces%2F-MJasmeOMeAJhTVh0M75%2Fuploads%2FaZZdpWJ7ubbrfSSI6stH%2FRoles.png?alt=media&amp;token=5fcf8389-9cde-4f65-abcf-f03a75188c48" alt=""><figcaption></figcaption></figure>

6. All the **Permissions** are listed on the left-hand side of the screen.

<figure><img src="https://2103666731-files.gitbook.io/~/files/v0/b/gitbook-x-prod.appspot.com/o/spaces%2F-MJasmeOMeAJhTVh0M75%2Fuploads%2F8DoHlzn67D0FJzSsm4A5%2FPermissions.png?alt=media&amp;token=68af4e86-c098-4a33-bd2a-d96b931a3d51" alt=""><figcaption></figcaption></figure>

7. So, as per the Roles, whatever Permissions we wanted to grant, we just need to click on the **checkboxes** and then click on the "**Save Changes**" button to get it saved.
8. If we want to add a **New Role**, then we need to click on the "**Add New Role**" option from the top right hand side of the screen.

<figure><img src="https://2103666731-files.gitbook.io/~/files/v0/b/gitbook-x-prod.appspot.com/o/spaces%2F-MJasmeOMeAJhTVh0M75%2Fuploads%2FMwgIUbOumlhFDy5mOsAz%2FAdd%20New%20Role.png?alt=media&amp;token=d4751a41-5536-47cd-8ba9-1fe7b606e427" alt=""><figcaption></figcaption></figure>

9. The **New Role Name** which we want to add and then accordingly click on the ‘**Add**’ button to get it added.

<figure><img src="https://2103666731-files.gitbook.io/~/files/v0/b/gitbook-x-prod.appspot.com/o/spaces%2F-MJasmeOMeAJhTVh0M75%2Fuploads%2FsV5PT4HilvHl42zYGhNY%2FNew%20role%20added.png?alt=media&amp;token=5135b3e9-a934-47b0-b434-9f6955cd2475" alt=""><figcaption></figcaption></figure>

10. &#x20;Then we need to **customize** the Roles with the Permissions for that new role that we want to grant and then click on the ‘**Save Changes**’ button to get it saved.
11. Even if we want to again go back to the **default Roles and Permissions** which was being set before then we just need to click on the "**Reset to Default**" option.

<figure><img src="https://2103666731-files.gitbook.io/~/files/v0/b/gitbook-x-prod.appspot.com/o/spaces%2F-MJasmeOMeAJhTVh0M75%2Fuploads%2F1GTGk26ATHY2FiVXsKiR%2FReset%20to%20default.png?alt=media&amp;token=86e3ed88-659e-4865-a54c-0db0cbbbd46b" alt=""><figcaption></figcaption></figure>


# FAQs (Create and Manage Users)

Here are a few FAQs on adding and managing users in NeoDove.

1. **How do I add a new user to my NeoDove account?**
   * To add a new user, navigate to the "Manage Users" section in the admin panel, click on the "Add User" button, and fill in the required details such as name, number, password and role. Then, click on "Submit" to add the user.
2. **What roles and permissions can I assign to users?**
   * NeoDove offers various roles such as Admin, Manager, Assistant Manager and Executive, each with different levels of access and permissions. Admins have full control over the account, Managers have limited administrative privileges, and Executives can access specific features based on their role in the organization. Even, new roles are also can be created and even the existing roles can also be edited with their permissions can be customized.
3. **Can I edit or update user information after adding them?**
   * Yes, Admins or Managers can edit user information such as name, email, role, and permissions at any time from the "Manage Users" section in the admin panel. Simply locate the user, click on the edit icon, make the necessary changes, and save.
4. **How do I deactivate or delete a user from my account?**
   * To deactivate or delete a user, go to the "Manage Users" section, find the user you want to deactivate, and click on the deactivate or delete icon after clicking on the three dots under the "Action" section. This will prevent the user from accessing the account and their login ability will get revoked.
5. **Can I track user activity and performance within NeoDove?**
   * Yes, NeoDove provides comprehensive user activity logs and performance metrics. Admins and Managers can monitor user activity, call logs, lead interactions, and performance metrics to assess productivity and identify areas for improvement from the Reports, Trends and Campaign section as well.
6. **How many users can I add to my NeoDove account?**
   * The number of users you can add depends on your subscription plan. NeoDove offers flexible plans with varying user limits. You can upgrade your plan or contact support to increase the user limit if needed.

{% hint style="success" %}
**Note:** These FAQs should help you understand the **process** of adding and managing users in NeoDove more effectively. If you have any further questions or need assistance, feel free to reach out to our **support team**.
{% endhint %}


# Pipeline

Explore the Pipeline and how to create and customize it.

{% embed url="<https://youtu.be/MqEbt7z4T70>" %}

The pipeline plays a **crucial role** in the creation of campaigns and the management of leads. It serves as the **backbone** for organizing and streamlining the **lead journey**, from initial capture to eventual conversion.&#x20;

{% hint style="success" %}
To input data into NeoDove, users must **create** a campaign. However, creating a campaign requires setting up a **pipeline** with a lead journey.&#x20;
{% endhint %}

If users have **multiple purposes**, they can create **multiple pipelines** accordingly.&#x20;

Each campaign created will be associated with a **specific pipeline**, aligning with the intended purpose and ensuring data population within the **designated pipeline**.

<figure><img src="https://2103666731-files.gitbook.io/~/files/v0/b/gitbook-x-prod.appspot.com/o/spaces%2F-MJasmeOMeAJhTVh0M75%2Fuploads%2FQEyz2nb72cUG96vvFDaf%2FPipelines.png?alt=media&amp;token=95b9db09-18ff-4bc8-9491-712e8f67f889" alt=""><figcaption></figcaption></figure>

### Let us explore how to create a Pipeline:

***

1. **Log in** to your NeoDove account ( <https://connect.neodove.com/> )&#x20;
2. Need to click either on the "**Settings**" option or "**Manage Users**" option.

<figure><img src="https://2103666731-files.gitbook.io/~/files/v0/b/gitbook-x-prod.appspot.com/o/spaces%2F-MJasmeOMeAJhTVh0M75%2Fuploads%2F8cI77ap56LAiYoVQp1U3%2FPipeline%20Creation.png?alt=media&amp;token=e986e234-7657-4257-9612-9c73e0a3de6b" alt=""><figcaption></figcaption></figure>

3. Once **clicked** on any of the options, it will redirect to a window with **nine sections** but predominantly showing the "**Manage Users**" section.

<figure><img src="https://2103666731-files.gitbook.io/~/files/v0/b/gitbook-x-prod.appspot.com/o/spaces%2F-MJasmeOMeAJhTVh0M75%2Fuploads%2FIOTrKxbFEr7KMwAEYeAe%2FUsers%20Part.png?alt=media&amp;token=eed63012-5ea7-4b21-978b-8fb180420f16" alt=""><figcaption></figcaption></figure>

4. Then, need to click on the "**Pipelines**" option just in between the "**Preference**" and "**Profile**" options.

<figure><img src="https://2103666731-files.gitbook.io/~/files/v0/b/gitbook-x-prod.appspot.com/o/spaces%2F-MJasmeOMeAJhTVh0M75%2Fuploads%2FxbfwJagQQVyZi0qf27fb%2FPipeliness.png?alt=media&amp;token=0b181b5d-a1e9-41e8-9c8a-3712bc5e24af" alt=""><figcaption></figcaption></figure>

5. A default **Pipeline** would be visible along with the **default** Stages, Tags and Transitions.
6. In order to **add** or **customize** any stages need to click on the **"+"** button inside the stages.

<figure><img src="https://2103666731-files.gitbook.io/~/files/v0/b/gitbook-x-prod.appspot.com/o/spaces%2F-MJasmeOMeAJhTVh0M75%2Fuploads%2FsKRGdtiXpFoWpa2NsSu2%2FStages%20and%20Tags.png?alt=media&amp;token=7ce29aca-b697-4d17-825c-44c893fdf10d" alt=""><figcaption></figcaption></figure>

7. An "**Add Stage**" option will pop-up where we need to add the **stage name** which we want to create in the **lead journey**.

<figure><img src="https://2103666731-files.gitbook.io/~/files/v0/b/gitbook-x-prod.appspot.com/o/spaces%2F-MJasmeOMeAJhTVh0M75%2Fuploads%2FcCHOFkaz3g9zZQ7Cy10Q%2FAdd%20a%20Stage.png?alt=media&amp;token=75626f78-54d9-4e48-8444-6f907ff03c67" alt=""><figcaption></figcaption></figure>

8. After clicking on **create**, the particular **Stage** will get created with a **pop-up** on the top of the screen.

<figure><img src="https://2103666731-files.gitbook.io/~/files/v0/b/gitbook-x-prod.appspot.com/o/spaces%2F-MJasmeOMeAJhTVh0M75%2Fuploads%2FZQYb0Wu0UpTUkyGDx4dj%2FInterested.png?alt=media&amp;token=69f1faca-5cfa-4166-99cc-39cb516ee273" alt=""><figcaption></figcaption></figure>

9. Now, to further **add tags** and **transitions** to the stages, select any **stage**.

<figure><img src="https://2103666731-files.gitbook.io/~/files/v0/b/gitbook-x-prod.appspot.com/o/spaces%2F-MJasmeOMeAJhTVh0M75%2Fuploads%2F8n8osXpiQR42EMS0Yglk%2FTags%20and%20Transitions.png?alt=media&amp;token=e84e4a32-9077-4bd8-a0e4-15d95f3a4b12" alt=""><figcaption></figcaption></figure>

10. Choose the **transitions** of our choice.
11. We can add as many **Tags** as we want and then press **Enter**.  **E.g. -** hot, cold, warm (We can **assign** different tags to different stages).
12. We can edit the **Stage Name** and even the **Pipeline Name** also can be edited.

<figure><img src="https://2103666731-files.gitbook.io/~/files/v0/b/gitbook-x-prod.appspot.com/o/spaces%2F-MJasmeOMeAJhTVh0M75%2Fuploads%2F8PsRXN6xvjz9wzAe9nFv%2FStage%20Name.png?alt=media&amp;token=3559a860-3309-4ef0-a851-55370091d82c" alt=""><figcaption></figcaption></figure>

13. After the **editing part**, we need to click on the "**Save**" button from the top right corner of the **screen**.

<figure><img src="https://2103666731-files.gitbook.io/~/files/v0/b/gitbook-x-prod.appspot.com/o/spaces%2F-MJasmeOMeAJhTVh0M75%2Fuploads%2FhcE1W4hGMGEqodltDnP0%2FSave%20Pipeline.png?alt=media&amp;token=61f33e57-a65f-448d-bd51-e4a84bd0065b" alt=""><figcaption></figcaption></figure>

{% hint style="success" %}
Once a **pipeline** is created and set up, it can be **edited** or **customized** at any time to adapt to changing business needs or requirements.&#x20;
{% endhint %}

Additionally, if users wish to create a new pipeline, they can do so by clicking on the "**Create Pipeline**" option located in the top right corner of the screen.&#x20;

This **flexibility** allows users to continuously refine and optimize their **lead management processes** to achieve better results.&#x20;

<figure><img src="https://2103666731-files.gitbook.io/~/files/v0/b/gitbook-x-prod.appspot.com/o/spaces%2F-MJasmeOMeAJhTVh0M75%2Fuploads%2FyXV5E0Ce4Dm4wR2Kemuu%2FCreate%20a%20Pipeline.png?alt=media&amp;token=f76f2d2a-e26a-40ce-bd52-8be340a52c8a" alt=""><figcaption></figcaption></figure>


# How to create a campaign?

A Step-by-Step Guide on How to Create a Successful Campaign

{% hint style="success" %}
A **campaign** is a folder which stores a group of leads that are targeted based on the specific type of calling to be conducted.
{% endhint %}

{% embed url="<https://youtu.be/ryVTkia2zvA>" %}

## Steps:

***

1\. **Log into** your NeoDove account ([https://connect.neodove.com/](https://app.neodove.com/)).

2\. Go to the **Pipeline** section, present on the left side-bar of your screen.

3\. Select the **Pipeline type** where we want to create the campaign.&#x20;

<figure><img src="https://2103666731-files.gitbook.io/~/files/v0/b/gitbook-x-prod.appspot.com/o/spaces%2F-MJasmeOMeAJhTVh0M75%2Fuploads%2FWXzovSz3EtvjBO1lSng5%2FPipelinesss.png?alt=media&amp;token=bec1b18c-cf5d-4410-8d40-05e37303250d" alt=""><figcaption></figcaption></figure>

4. Click on the '**Create Campaign'** button on the top right-hand section of your screen.

<figure><img src="https://2103666731-files.gitbook.io/~/files/v0/b/gitbook-x-prod.appspot.com/o/spaces%2F-MJasmeOMeAJhTVh0M75%2Fuploads%2Fy71hmY6d9viS5ZUrjtNV%2FCreate%20Campaign.png?alt=media&amp;token=b39ea7c4-ac10-4760-a4e0-ff638275a751" alt=""><figcaption></figcaption></figure>

5\. Fill in the basic details required to create a campaign in the '**Basic details form'** available.

***

* **Campaign Name -** Name of the campaign.
* **Pipeline Type -** Select the pipeline type.
* **Who will be managing this campaign -** Select and appoint a campaign manager who will oversee and manage the campaign.
* **Select Agents -** Allocate executives or users to the campaign who will be responsible for handling and among whom the leads will be distributed.
* **Lead Distribution Settings -** Different types of lead distribution settings are available, enabling the system to distribute leads among users based on the selected options.
* **Campaign Priority -** Select a suitable priority for your campaign based on the method of targeting leads. (Executives will receive high-priority campaigns first if they choose to call leads in order of priority).
* **Lead Duplicacy Settings -** Different types of Lead Duplicacy settings refer to the configuration that dictates how the system handles duplicate leads.

<figure><img src="https://2103666731-files.gitbook.io/~/files/v0/b/gitbook-x-prod.appspot.com/o/spaces%2F-MJasmeOMeAJhTVh0M75%2Fuploads%2Fbo5dUXY0HXp9lP7zUnYZ%2FCreate%20a%20Campaign.png?alt=media&amp;token=8151d14e-2f91-47f8-bd61-055809e2fa0a" alt=""><figcaption></figcaption></figure>

6\. Once the form is complete, Click on the '**Create**' button present below.&#x20;

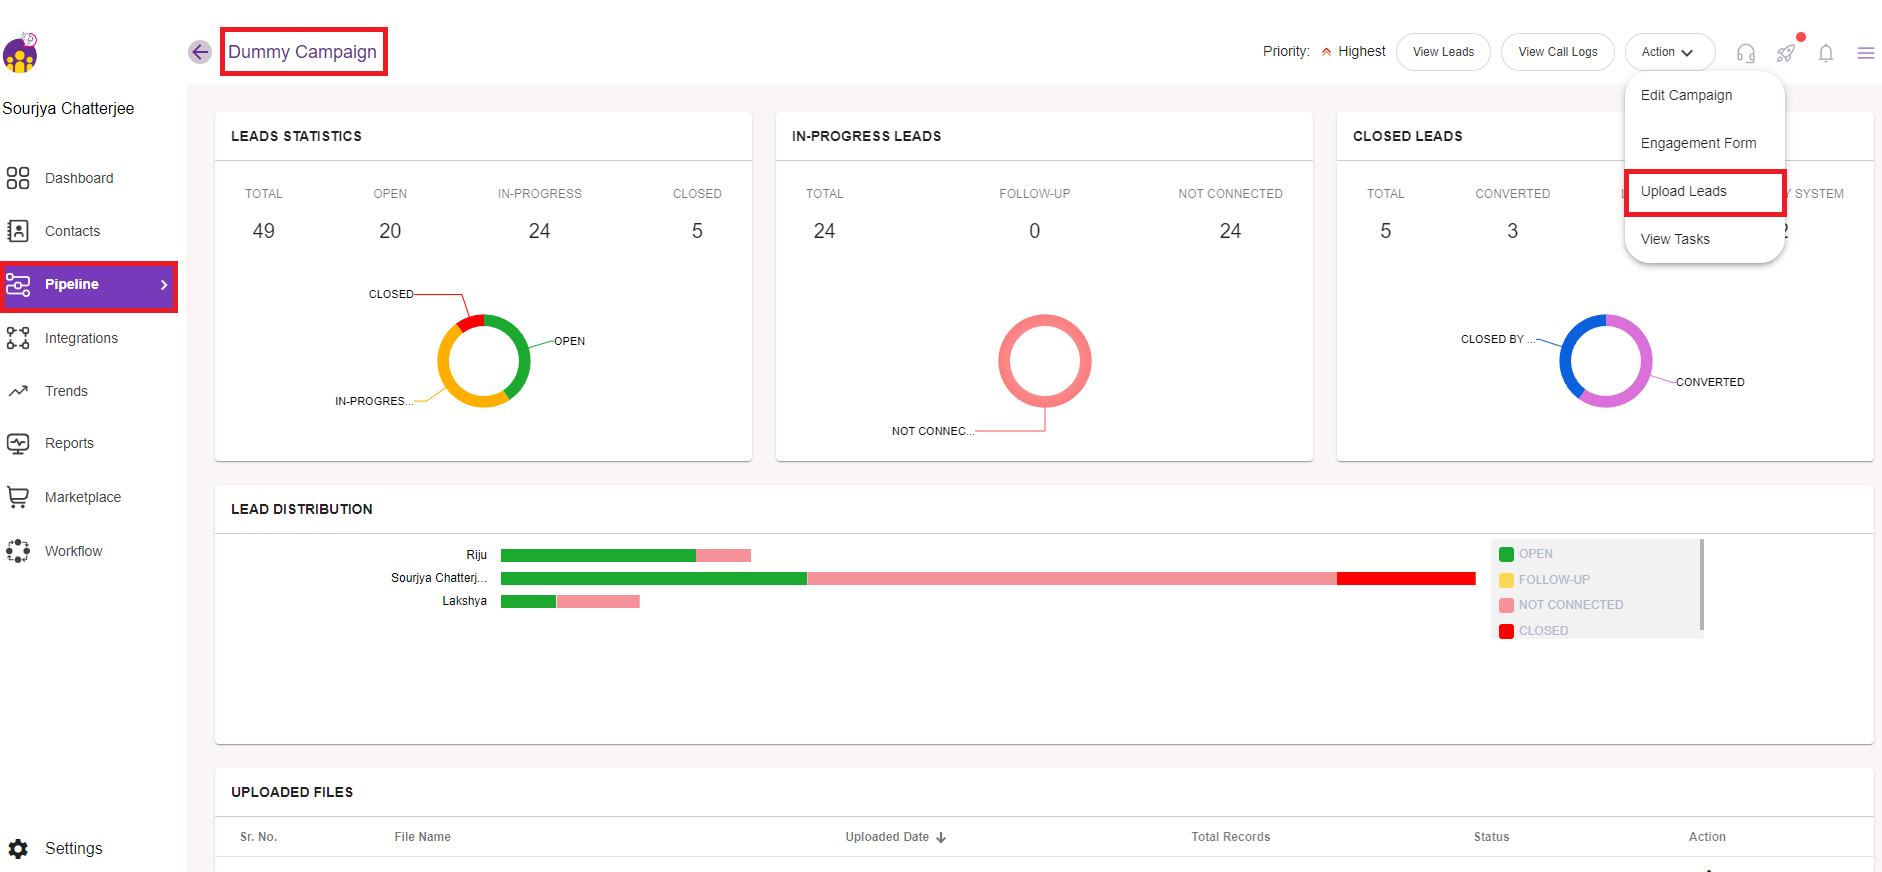
7\. Then, the campaign will get **created** and it will give us an option to either "**Upload Leads**" or to "**Create an Engagement Form**"

<figure><img src="https://2103666731-files.gitbook.io/~/files/v0/b/gitbook-x-prod.appspot.com/o/spaces%2F-MJasmeOMeAJhTVh0M75%2Fuploads%2F1m3nrreuWYPKj5qSP7mL%2FCampaign%20Saved.png?alt=media&amp;token=20523ff8-a794-4fcd-af73-d49a081f67a8" alt=""><figcaption></figcaption></figure>

{% hint style="success" %}
**Note:** The users assigned to a specific campaign will receive the leads directly in their **NeoDove mobile application.**
{% endhint %}


# Lead Distribution Settings

Lead distribution settings enable you to determine how leads should be distributed among users in a specific campaign.

{% embed url="<https://youtu.be/Qm5FK3bOIWo>" %}

{% hint style="success" %}
This option is crucial as it allows you to **customize** lead distribution according to your preferences.
{% endhint %}

There are three different '**Lead Distribution Setting'** options available:

***

1. AI Assignment
2. Equal Assignment
3. Conditional Assignment

<figure><img src="https://2103666731-files.gitbook.io/~/files/v0/b/gitbook-x-prod.appspot.com/o/spaces%2F-MJasmeOMeAJhTVh0M75%2Fuploads%2Fw37rKfcLRwCHaoxo4teZ%2FLead%20Distribution.png?alt=media&amp;token=61487a9a-b8dd-4e13-a363-8f389c5a54a2" alt=""><figcaption></figcaption></figure>

1. **AI Assignment:** This option allows you to keep the leads in a bucket. After uploading, all the leads will be in an unassigned or open stage. Leads are delivered to users on a first-come, first-served basis. Users who actively make calls will receive leads, while those who do not won't get any.
2. **Equal Assignment:** This option will distribute the leads equally among all the users present in that particular campaign. Each user will receive a fair share of the leads.
3. **Conditional Assignment:** This option allows you to distribute leads based on specific conditions. You can set conditions based on different column's values from the data to distribute leads either to a specific user or a group of users.

<figure><img src="https://2103666731-files.gitbook.io/~/files/v0/b/gitbook-x-prod.appspot.com/o/spaces%2F-MJasmeOMeAJhTVh0M75%2Fuploads%2FO4zqtcebigfJ66us8e92%2FConditional%20Assignment.png?alt=media&amp;token=f6afd1e1-f019-42ca-90a1-29de4f4f3df3" alt=""><figcaption></figcaption></figure>

In this setting, identify a '**Column Name**' or '**Field Name**' from your data, specify a **value** in the '**Option 1**' section, and assign the lead either to a specific user by selecting their **name** based on the value of that column from the data or select the **group of users** whom all you want to assign the specific data value.

{% hint style="success" %}
**For e.g.,** if you have a lead where **language** is Hindi and you want such leads to be shared between 2 people and leads speaking in English should get **distributed** between all users of the campaign, then this can now be **achieved** by selecting the designated users against a **condition** and new leads will start getting **equally distributed** between the selected users whenever the condition matches.
{% endhint %}

Configure **multiple conditions** for lead distribution based on **specific criteria**. For leads not meeting any conditions, assign them to a specific user using the '**Otherwise assign lead to**' option, and save the settings by clicking '**Update**.'

{% hint style="success" %}
**Note:** Set up lead distribution settings **before** uploading data, allowing the system to efficiently assign leads to users based on **specified criteria** or **conditions** in the campaign.
{% endhint %}


# Engagement Form

How to create a Calling Script or Engagement Form for your executives?

{% embed url="<https://youtu.be/KI7fZpLLi34>" %}

## What is an Engagement Form and how useful it is?

***

An engagement form in NeoDove is a **customizable form** that allows users to capture **important information** from leads or customers.&#x20;

{% hint style="success" %}
It's useful because it **streamlines** the data collection process, ensuring that all relevant details are **captured** accurately and efficiently.&#x20;
{% endhint %}

Users can tailor the form to their **specific needs**, making it adaptable to different types of interactions or campaigns.&#x20;

Additionally, the engagement form helps maintain **consistency** in data collection, ensuring that users have access to **comprehensive information** for effective follow-up and communication with leads.

{% hint style="success" %}
The NeoDove application enables you to create a **personalized script** for your executives, aiding them in their sales activities and facilitating the hassle-free recording of **customer information**.
{% endhint %}

## Steps:

***

1\. Go to **Pipeline** > **Type of Pipeline** > **Create Campaign.**&#x20;

<figure><img src="https://2103666731-files.gitbook.io/~/files/v0/b/gitbook-x-prod.appspot.com/o/spaces%2F-MJasmeOMeAJhTVh0M75%2Fuploads%2FpQAHXJHlMFryJ7m5Gy85%2FCreate%20Pipeline.png?alt=media&amp;token=318a22ba-3eae-4953-b516-6db67977a128" alt=""><figcaption></figcaption></figure>

2\. Fill in the '**Basic Details Form'** for the campaign. Click on the '**Create'** button to get the campaign created.

<figure><img src="https://2103666731-files.gitbook.io/~/files/v0/b/gitbook-x-prod.appspot.com/o/spaces%2F-MJasmeOMeAJhTVh0M75%2Fuploads%2FQT83hV5pzCEH0yHj5Cye%2FCreate%20Campaign.png?alt=media&amp;token=7dd184eb-1e9b-4905-8939-37db8f5ad674" alt=""><figcaption></figcaption></figure>

3\. Now, two options will be available including '**Upload Leads**' and '**Engagement** **Form**'. Here, the '**Engagement Form**' can be easily **customized** depending on the requirements.&#x20;

<figure><img src="https://2103666731-files.gitbook.io/~/files/v0/b/gitbook-x-prod.appspot.com/o/spaces%2F-MJasmeOMeAJhTVh0M75%2Fuploads%2FTmUrTEoIMmsZHdW7D1T4%2FEngagement%20Form.png?alt=media&amp;token=cc6c0e88-74d0-4e41-8e16-e02e4d7ff212" alt=""><figcaption></figcaption></figure>

4\. A new screen will appear with the **default questions**.

<figure><img src="https://2103666731-files.gitbook.io/~/files/v0/b/gitbook-x-prod.appspot.com/o/spaces%2F-MJasmeOMeAJhTVh0M75%2Fuploads%2Fgzo8EMCVqUg0RROvPbL9%2FQuestions.png?alt=media&amp;token=dd85fef3-d3f1-4808-807c-7a73c3f547cf" alt=""><figcaption></figcaption></figure>

5\. Then need to **delete** the questions which you doesn't require. Post that need to click on the '**Add Question**' button at the bottom of the screen to select the **type of question** you want to set.&#x20;

<figure><img src="https://2103666731-files.gitbook.io/~/files/v0/b/gitbook-x-prod.appspot.com/o/spaces%2F-MJasmeOMeAJhTVh0M75%2Fuploads%2FjWTGuqwlWNt1FQhQ0g3f%2FEngagements%20form.png?alt=media&amp;token=98b19195-6095-4e29-b008-6c269d9d774e" alt=""><figcaption></figcaption></figure>

6\. Let’s understand **every question type** in brief:-

***

* **Text -** With the text function, you can include the introductory line of the call in your script. For example: The introduction of your script may include who you are and the reason for your call, establishing clarity and context for the conversation.
* **Short Answer -** This section is designed for questions that require concise, one-line answers.&#x20;
* **Number -** This option allows you to ask questions related to numbers or numerical information.
* **Long Answer -** This section is designated for questions that require answers with multiple lines or more detailed responses. For example: Customer address and details
* **Date -** This section is suitable for questions where the executive might need to schedule a date for a future meeting or follow-up.
* **Time -** This section is appropriate for questions where the executive may need to schedule a follow-up or a meeting with a client at a convenient time of the day.
* **Multiple Choice -** Using this question type, the customer or lead is presented with options to choose from, and they can select only one option. For example: You can inquire about the client's approximate budget or the type of car they are interested in using this question type.
* **Checkbox -** With this question type, the customer or lead is provided with options to choose from, and they can select more than one option. For example: In this question type, customers can choose multiple options to indicate what they are looking for when buying a car.
* **Dropdown -** The dropdown serves as the substitute for the "Select one option" question type where all the options will be listed as a dropdown.&#x20;
* **Send message -** With this feature, you can generate pre-drafted messages for your customers/clients, and there's the flexibility to create as many templates as needed. It will allow the agents to send it across three mediums i.e., SMS, Email, and WhatsApp.
* **Attach File -** The "attach file" option allows agents to upload any document or image for the leads in the system.
* **Send Email -** The "send email" option empowers all agents to send emails to customers or leads using a centralized email ID.

<figure><img src="https://2103666731-files.gitbook.io/~/files/v0/b/gitbook-x-prod.appspot.com/o/spaces%2F-MJasmeOMeAJhTVh0M75%2Fuploads%2FnfQ58UyUpSOUURgQvh04%2FQuestionss.png?alt=media&amp;token=0327c589-a089-4c6e-8a83-643799a7c15e" alt=""><figcaption></figcaption></figure>

7\. Add the **question type** for your script by clicking on '**Add Question**' option at the below of every questions being set. Automatically the **second type of question** will get added in the script below that.

<figure><img src="https://2103666731-files.gitbook.io/~/files/v0/b/gitbook-x-prod.appspot.com/o/spaces%2F-MJasmeOMeAJhTVh0M75%2Fuploads%2FtfaNRMUcdVIGXFIgbc5K%2FAdd%20question.png?alt=media&amp;token=09a2ac27-05ea-46e9-9019-068840276df2" alt=""><figcaption></figcaption></figure>

8\. Next, you'll **customize** the questions for the selected question types to be included in the '**Engagement Form'** by manually editing it.

<figure><img src="https://2103666731-files.gitbook.io/~/files/v0/b/gitbook-x-prod.appspot.com/o/spaces%2F-MJasmeOMeAJhTVh0M75%2Fuploads%2Fc1EiuimzXcl6SxS6Nv1i%2FCustomize%20question.png?alt=media&amp;token=ded5794f-f175-49d9-b193-c4cd1ab6b254" alt=""><figcaption></figcaption></figure>

9\. Fill in the **details** for each question according to the **type** you are selecting.

***

* If it is a **multiple-choice question**, fill in the options under the options heading.
* Similarly, if you want to make a **question compulsory**, just push the toggle button available to the right.
* The script can be **multilingual** i.e. You can add questions in any language.
* Even the questions can also be **mapped** with the **Custom Contact Properties** to filter out the data as per the responses received.
* You can toggle on the **Allow Other as a option** to automatically add another option in multiple choice question types as '**Other**'.&#x20;
* For multiple choice questions, the options can be **redirected** to different sections post selection.

<figure><img src="https://2103666731-files.gitbook.io/~/files/v0/b/gitbook-x-prod.appspot.com/o/spaces%2F-MJasmeOMeAJhTVh0M75%2Fuploads%2FRHoxdgxyHfjcVWp5GrZQ%2FPreferences.png?alt=media&amp;token=0bfed0c5-f9ab-4900-b27a-4f6c562666d4" alt=""><figcaption></figcaption></figure>

&#x20;10\.  After completing the '**Engagement Form**', can check the '**Preview**' at the right hand side of the screen to see how the questions will appear from the **user perspective** and then click on the ‘**Save Changes**’ button present at the top right corner of the screen.&#x20;

<figure><img src="https://2103666731-files.gitbook.io/~/files/v0/b/gitbook-x-prod.appspot.com/o/spaces%2F-MJasmeOMeAJhTVh0M75%2Fuploads%2FhKEmg0hbfpQFga1l0OZU%2FSave%20changes.png?alt=media&amp;token=578dfa99-e9ed-488e-8a56-0c2e79a41cb8" alt=""><figcaption></figcaption></figure>

11. After clicking on the '**Save Changes**' option, all the question types selected for the engagement form will be **set** for this particular campaign.&#x20;

<figure><img src="https://2103666731-files.gitbook.io/~/files/v0/b/gitbook-x-prod.appspot.com/o/spaces%2F-MJasmeOMeAJhTVh0M75%2Fuploads%2F1MQLjq950m4LhUyD8ApA%2FChanges%20Applied.png?alt=media&amp;token=248b4e2d-6dc1-479c-b090-2dc810269fa3" alt=""><figcaption></figcaption></figure>

12. Post that can go back and click on '**Upload leads**' to get the leads added in this campaign for the users or agents to call.

<figure><img src="https://2103666731-files.gitbook.io/~/files/v0/b/gitbook-x-prod.appspot.com/o/spaces%2F-MJasmeOMeAJhTVh0M75%2Fuploads%2Fks5gI3E4sgcusahCLGTT%2FUpload%20Leads.png?alt=media&amp;token=52f7a5d2-3392-4432-bd0e-56c439eaa0e2" alt=""><figcaption></figcaption></figure>

{% hint style="success" %}
**Note:** This specific '**Engagement Form**' will be **accessible** to the Users or Agents in the User Portal when they are **engaged** in the calling process for this particular campaign.
{% endhint %}


# Creating Whatsapp Message Templates

Crafting Effective Whatsapp Message Templates

{% embed url="<https://youtu.be/vmDWYxx9Z5E>" %}

{% hint style="success" %}
Enhance customer communication efficiency by utilizing **pre-drafted message templates** through three mediums i.e., WhatsApp, Email, and SMS.
{% endhint %}

### This **feature** helps in:-

***

* Sending **personalized messages** to your leads.
* This not only improves customer communication but also enhances the chances of **converting prospects**.
* Send messages directly without the need to **save** the customer's number in your contact book, all with just **one click**.

## Steps to Create Template:

***

1\. **Log in** to your NeoDove account (<https://connect.neodove.com/>).                                                                                                                    2. Create a **campaign** (Go to Pipeline > Type of Pipeline > Create Campaign).                                                                                 3. Fill in the **Basic Details** Campaign Form.                                                                                                                                         4. Now, go to the **Engagement Form**.                                                                                                                                                                                                  5. Post that need to click on the '**Add Question**' button from the bottom of the screen.                                                                                                                                                                                                                                                                                                          6. All the question types will appear from there, then need to click on the '**Send Message**' option.

<figure><img src="https://2103666731-files.gitbook.io/~/files/v0/b/gitbook-x-prod.appspot.com/o/spaces%2F-MJasmeOMeAJhTVh0M75%2Fuploads%2FlL8R0X3sr9R9jmcBZF4N%2FSend%20Message.png?alt=media&amp;token=992f69fa-ec4e-4e37-aaf6-868ea1cd1b8d" alt=""><figcaption></figcaption></figure>

7. Post selecting, the '**Send Message**' section will get set in the Engagement Form and it will be visible in the **Preview section** as well to show how it will look like from an **user perspective**.
8. Now proceed to create your **Custom Message Template** based on your specific needs.

***

* Give the '**Send Message**' button a label. **For Example -** Company details, Car Quotation.
* Now **compose** a message that you wish your customers to receive, tailored to your requirements. You can also include **useful links** in your message.&#x20;
* Upon selecting the '**Send Message'** option, a **default message** appears along with it in the script form.
* The **default message** includes a greeting like "Hi, ({**Contact\_Name**})", followed by the body of the message, and concludes with "Regards, {(**User\_Name**}}". The format of {{**Contact\_Name**}} and {(**User\_Name**}} indicates variables that automatically **fetch** the required details from the database, which helps you send **personalised messages**.
* The '**Send Message**' option appears when the call is being disposed of as '**Yes, Connected**'. If you want to make the option visible for '**Not Connected**' calls as well, you need to enable the '**Display on Not Connected**' option.
* You can even **pre-attach a file**, including any document or image, in the '**Send Message**' option, up to **10 MB** that you will be able to find under the **Preference section.**

<figure><img src="https://2103666731-files.gitbook.io/~/files/v0/b/gitbook-x-prod.appspot.com/o/spaces%2F-MJasmeOMeAJhTVh0M75%2Fuploads%2FUMKyDKdFp7u8ptI2ur4M%2FSend%20Messages.png?alt=media&amp;token=77abd067-9ba0-47e5-8b7a-83839f74b180" alt=""><figcaption></figcaption></figure>

9. You can create **Multiple Message templates** based on your specific requirements. **For example**:  You can have a Message template for thanking customers for their time, or a Message template for sending quotations or brochures, and so on.
10. After creating the **Message templates**, click on the '**Save Changes**' button present below.

<figure><img src="https://2103666731-files.gitbook.io/~/files/v0/b/gitbook-x-prod.appspot.com/o/spaces%2F-MJasmeOMeAJhTVh0M75%2Fuploads%2FVbIVMzztJcOsCLOkjfb5%2FSend%20Messagess.png?alt=media&amp;token=49cc26c0-0b85-41d0-a3b8-f5574d2efff9" alt=""><figcaption></figcaption></figure>

{% hint style="success" %}
**Note:** Users or agents can easily access and utilize pre-drafted '**Send Message**' buttons created in the web portal during their mobile calling process, allowing them to efficiently send **relevant message templates** to customers based on the call's requirements.
{% endhint %}


# Edit a Campaign

Often, we need to make timely changes to the campaigns we have created.

{% hint style="success" %}
The '**Edit Campaign**' option proves useful in such cases, allowing for timely adjustments to campaigns.
{% endhint %}

## Steps:

***

1\. Go to **Pipeline** > **Type of Pipeline**.                                                                                                                                                              2. Just select the **Campaign** that you want to **edit**.                                                                                                                                          3. Inside the selected campaign, in the top right-hand corner, there is an "**Action**" button.

<figure><img src="https://2103666731-files.gitbook.io/~/files/v0/b/gitbook-x-prod.appspot.com/o/spaces%2F-MJasmeOMeAJhTVh0M75%2Fuploads%2FnC2x2CsWNTJr520NNiHW%2FAction.png?alt=media&amp;token=ed232b2a-8170-4d97-baf6-3581df47a974" alt=""><figcaption></figcaption></figure>

4. Once clicked on "**Action**" button, four more options will appear and from there we need to click on the "**Edit Campaign**" button.

<figure><img src="https://2103666731-files.gitbook.io/~/files/v0/b/gitbook-x-prod.appspot.com/o/spaces%2F-MJasmeOMeAJhTVh0M75%2Fuploads%2FhCWeyKgwws5qAUlh0UWP%2FEdit%20Campaign.png?alt=media&amp;token=2752a8f3-e56b-4e18-bd51-ea3e50e06231" alt=""><figcaption></figcaption></figure>

5. Once clicked on "**Edit Campaign**", a screen will appear with the **already setup details** and again an "**Edit**" option will appear to edit or customize the **setup** as per the new requirements.

<figure><img src="https://2103666731-files.gitbook.io/~/files/v0/b/gitbook-x-prod.appspot.com/o/spaces%2F-MJasmeOMeAJhTVh0M75%2Fuploads%2FHEIqbdx99B4hZnn1noJY%2FEdited%20details.png?alt=media&amp;token=8605c215-5999-4ca3-87c3-74b458193379" alt=""><figcaption></figcaption></figure>

6. You can now make the **modifications** to the 'Basic Details' of the campaign. After editing click on "**Update**" to get the edited details saved.

<figure><img src="https://2103666731-files.gitbook.io/~/files/v0/b/gitbook-x-prod.appspot.com/o/spaces%2F-MJasmeOMeAJhTVh0M75%2Fuploads%2FKOPCsKRpDXTe5YT9aHV2%2FEdit%20done.png?alt=media&amp;token=d711b7bd-4ba0-4fa2-9b95-0ed5fa55bca5" alt=""><figcaption></figcaption></figure>

7. Additionally, if necessary, you have the option to temporarily **pause a campaign** and **resume** it at your convenience.

<figure><img src="https://2103666731-files.gitbook.io/~/files/v0/b/gitbook-x-prod.appspot.com/o/spaces%2F-MJasmeOMeAJhTVh0M75%2Fuploads%2FPZX1jyzNFSmDlu1cpfBI%2FPause%20Campaign.png?alt=media&amp;token=22dc69e4-c365-40a9-8696-d66c17e356e8" alt=""><figcaption></figcaption></figure>


# Edit an Engagement Form

Often, we need to make timely changes to the Engagement Form we have created.

The '**Engagement Form**' option proves useful in such cases, allowing for timely adjustments to campaigns.

## Steps:

***

1\. Go to **Pipeline** > **Type of Pipeline**.                                                                                                                                                              2. Just select the **Campaign** that you want to **edit**.                                                                                                                                          3. Inside the selected campaign, in the top right-hand corner, there is an "**Action**" button.

<figure><img src="https://2103666731-files.gitbook.io/~/files/v0/b/gitbook-x-prod.appspot.com/o/spaces%2F-MJasmeOMeAJhTVh0M75%2Fuploads%2FnC2x2CsWNTJr520NNiHW%2FAction.png?alt=media&amp;token=ed232b2a-8170-4d97-baf6-3581df47a974" alt=""><figcaption></figcaption></figure>

4. Once clicked on "**Action**" button, four more options will appear and from there we need to click on the "**Engagement Form**" button.

<figure><img src="https://2103666731-files.gitbook.io/~/files/v0/b/gitbook-x-prod.appspot.com/o/spaces%2F-MJasmeOMeAJhTVh0M75%2Fuploads%2FxFjFZjdgyB9eNt9WljGG%2FEngagement%20Forms.png?alt=media&amp;token=9767c869-aafd-4d48-99e7-996a18a7cded" alt=""><figcaption></figcaption></figure>

5. Once clicked on "**Engagement Form**", a screen will appear with the **already setup details** and in order to **customize** the script form or engagement form, we need to drag and drop the particular **question type** to the right hand side under the **Section**.

<figure><img src="https://2103666731-files.gitbook.io/~/files/v0/b/gitbook-x-prod.appspot.com/o/spaces%2F-MJasmeOMeAJhTVh0M75%2Fuploads%2F3faZDiuT3a34qyjB8JhT%2Fef.png?alt=media&amp;token=a703b6cb-a1a1-4779-8b2b-2c03c7f21c45" alt=""><figcaption></figcaption></figure>

5. After editing, click on the "**Save Changes**" to get the changes made in **script form or engagement form** saved.

<figure><img src="https://2103666731-files.gitbook.io/~/files/v0/b/gitbook-x-prod.appspot.com/o/spaces%2F-MJasmeOMeAJhTVh0M75%2Fuploads%2FRAfV7dxHj80fipReIHMv%2Fef2.png?alt=media&amp;token=01cf8c19-5bde-48ff-88e0-08e921316883" alt=""><figcaption></figcaption></figure>

6. **Preview of Engagement Form:** On the right hand side the user can see the preview as well of the engagement form that is being created in a mobile view so that it is easy to imagine how is it going to look on the mobile view.


# How to do the HTML Email Setup

Lets discuss how to do the HTML Email Setup

The "**Send Email**" option from the engagement form is the same as setting up an **HTML Email**.

The "**Send Message**" option in the Customer Engagement Form allows users to send messages to customers through **three mediums**: WhatsApp, SMS, and email. However, the "**Send Email**" option only allows sending messages through a **centralized email account** that is set up from the admin portal.&#x20;

{% hint style="success" %}
This ensures that all messages sent by different users within a particular campaign where the "Send Email" setup is being done are **triggered** from the specified centralized email ID.
{% endhint %}

### Steps:

***

1. Log in to your **NeoDove account** ([ https://connect.neodove.com/](https://app.neodove.com/) )
2. Navigate to the **Settings option** located at the bottom-left corner of the screen on the **Dashboard**.

<figure><img src="https://2103666731-files.gitbook.io/~/files/v0/b/gitbook-x-prod.appspot.com/o/spaces%2F-MJasmeOMeAJhTVh0M75%2Fuploads%2FhbSPqZ0cFmpKuS7ueoMx%2FSettings%201.png?alt=media&amp;token=064dd8dc-7791-4b96-b06b-9c42220a6916" alt=""><figcaption></figcaption></figure>

3. A page will appear with **ten sections** out of which we need to click on the "**Preference**" option.

<figure><img src="https://2103666731-files.gitbook.io/~/files/v0/b/gitbook-x-prod.appspot.com/o/spaces%2F-MJasmeOMeAJhTVh0M75%2Fuploads%2Fdy9BtPkGYTP2JyfRC3Xb%2FHTML.png?alt=media&amp;token=9e7158f7-85c2-48e0-acd5-1291e31a30ee" alt=""><figcaption></figcaption></figure>

4. Then we need to click on the "**Select an email provider**" option from the bottom of the screen. Post that we need to select the **email provider** first for the particular email id which we want to set it up as a **centralized email id** for the triggering of messages from all the users or agents added in the particular campaign.

<figure><img src="https://2103666731-files.gitbook.io/~/files/v0/b/gitbook-x-prod.appspot.com/o/spaces%2F-MJasmeOMeAJhTVh0M75%2Fuploads%2Fvk7nzXvnBVwmXkPmIwGT%2FEmail.png?alt=media&amp;token=62ba3b81-8654-4a96-badf-52fb752043e0" alt=""><figcaption></figcaption></figure>

5. After selecting the email provider, we need to **put** the email id in the left hand side space and for the password we need to set it up **temporarily** from that particular email id only.

<figure><img src="https://2103666731-files.gitbook.io/~/files/v0/b/gitbook-x-prod.appspot.com/o/spaces%2F-MJasmeOMeAJhTVh0M75%2Fuploads%2FnxywUl55Vwdaq2uww4Hy%2FHTML%20Email.png?alt=media&amp;token=9652cba5-8fcb-4e54-b553-80646c4dd554" alt=""><figcaption></figcaption></figure>

6. Navigate to that **particular email id** which needs to be set as a centralized email for the triggering of messages for all the users added in the **particular campaign**.&#x20;

<figure><img src="https://2103666731-files.gitbook.io/~/files/v0/b/gitbook-x-prod.appspot.com/o/spaces%2F-MJasmeOMeAJhTVh0M75%2Fuploads%2F38uGpraH83PlwEl2Fb43%2FEmail%20id.png?alt=media&amp;token=10023140-49ea-4d84-949e-1fc3ac096e66" alt=""><figcaption></figcaption></figure>

7. Post that, we need to click on the top right corner of the email and then need to click on the "**Manage your Google Account**" option.

<figure><img src="https://2103666731-files.gitbook.io/~/files/v0/b/gitbook-x-prod.appspot.com/o/spaces%2F-MJasmeOMeAJhTVh0M75%2Fuploads%2FdO49TNDHOFe7xz9aoEyt%2FGoogle%20Account.png?alt=media&amp;token=379d9d13-0ea2-47a1-a86a-be59aa9e1c7a" alt=""><figcaption></figcaption></figure>

8. A new window will appear, there we need to click on the "**Security**" option from the left hand side of the screen.

<figure><img src="https://2103666731-files.gitbook.io/~/files/v0/b/gitbook-x-prod.appspot.com/o/spaces%2F-MJasmeOMeAJhTVh0M75%2Fuploads%2Fw1TvAXFSzRQraQxYUBca%2FSecurity.png?alt=media&amp;token=59816556-0c62-4d9e-901d-b32d8f71951b" alt=""><figcaption></figcaption></figure>

9. A new screen will appear where we need to scroll a bit down and need to switch on the **2-step verification** by clicking on that option.

<figure><img src="https://2103666731-files.gitbook.io/~/files/v0/b/gitbook-x-prod.appspot.com/o/spaces%2F-MJasmeOMeAJhTVh0M75%2Fuploads%2FwGQrJzUDNXxO83RYdnZp%2F2-Step.png?alt=media&amp;token=ba8982e2-2863-4d24-b2aa-29118069604d" alt=""><figcaption></figcaption></figure>

10. Then, we need to put our **actual password** for the particular email id and then need to click on the "**Next**" button to proceed further.

<figure><img src="https://2103666731-files.gitbook.io/~/files/v0/b/gitbook-x-prod.appspot.com/o/spaces%2F-MJasmeOMeAJhTVh0M75%2Fuploads%2F1mTQaTMxvG999IXK3vUO%2FPassword.png?alt=media&amp;token=a17cdfaa-26e9-4c5a-a881-640c268d74d7" alt=""><figcaption></figcaption></figure>

11. After that again a new screen will appear where we need to scroll a bit down and then need to click on "**App Passwords**" option at the extreme bottom of the screen.

<figure><img src="https://2103666731-files.gitbook.io/~/files/v0/b/gitbook-x-prod.appspot.com/o/spaces%2F-MJasmeOMeAJhTVh0M75%2Fuploads%2FD0XtynRNszaXUZQYZ2d0%2FApp%20Passwords.png?alt=media&amp;token=ec951716-e351-4a1f-8648-b81b0a060c48" alt=""><figcaption></figcaption></figure>

12. Post that, we need to put the name of the **software** for which we are trying to generate the **App** **password** that is NeoDove and then need to click on the "**Create**" option.&#x20;

<figure><img src="https://2103666731-files.gitbook.io/~/files/v0/b/gitbook-x-prod.appspot.com/o/spaces%2F-MJasmeOMeAJhTVh0M75%2Fuploads%2Ffy87tFzweODpSdvnsfi4%2FApp%20password.png?alt=media&amp;token=1e4ae1d6-e844-40f5-9a11-c0b388ee5dc0" alt=""><figcaption></figcaption></figure>

13. Once clicked on the "**Create**" option, a pop up will appear with a new temporary app password only for **NeoDove** specifically.

<figure><img src="https://2103666731-files.gitbook.io/~/files/v0/b/gitbook-x-prod.appspot.com/o/spaces%2F-MJasmeOMeAJhTVh0M75%2Fuploads%2FnSucpdny7JVEkUBUNCH3%2FNew%20Password.png?alt=media&amp;token=4c737eb6-fd17-49ed-97ca-de5e97a04c4a" alt=""><figcaption></figcaption></figure>

14. Then the new speciifc **App Password** for NeoDove to be **copied** from the Email section and need to be **pasted** in the Preference section under the **Settings Page** of NeoDove.

<figure><img src="https://2103666731-files.gitbook.io/~/files/v0/b/gitbook-x-prod.appspot.com/o/spaces%2F-MJasmeOMeAJhTVh0M75%2Fuploads%2FlJ4DnGTYz5cK1JgFyMl8%2FSave%20Changes.png?alt=media&amp;token=df63fb6e-3672-4f4a-a967-a573318dd19a" alt=""><figcaption></figcaption></figure>

15. After putting the password, then need to click on the "**Save Changes**" option from the top right corner of the screen to get the **centralized email id setup** done for the HTML Email setup or the Send Email setup from any of the **Engagement form** of any campaign.

<figure><img src="https://2103666731-files.gitbook.io/~/files/v0/b/gitbook-x-prod.appspot.com/o/spaces%2F-MJasmeOMeAJhTVh0M75%2Fuploads%2FAe3kGPcnwuujj3lmSCGz%2FSaved.png?alt=media&amp;token=5f4e647c-dabf-459f-8169-0e8fd0c0dc82" alt=""><figcaption></figcaption></figure>

{% hint style="success" %}
**Note:** After the HTML Email setup, we can do some **test and trial** from some specific users or agents device in order to trigger the message through the "**Send Email**" option to check whether the email is **getting triggered** to customers from that particular centralized email id or not whose **setup** has just been done.
{% endhint %}


# Upload Leads

Let's explore how to upload leads into a specific campaign.

{% hint style="success" %}
Instead of accessing **contacts** separately, data can be **uploaded** directly from within the campaign interface.
{% endhint %}

## Steps:

***

1\. Go to **Pipeline** > **Type of Pipeline**.                                                                                                                                                              2. Just select the **Campaign** that you want to **edit**.                                                                                                                                          3. Inside the selected campaign, in the top right-hand corner, there is an "**Action**" button.

<figure><img src="https://2103666731-files.gitbook.io/~/files/v0/b/gitbook-x-prod.appspot.com/o/spaces%2F-MJasmeOMeAJhTVh0M75%2Fuploads%2FnC2x2CsWNTJr520NNiHW%2FAction.png?alt=media&amp;token=ed232b2a-8170-4d97-baf6-3581df47a974" alt=""><figcaption></figcaption></figure>

4. Once clicked on "**Action**" button, four more options will appear and from there we need to click on the "**Upload Leads**" button.

<figure><img src="https://2103666731-files.gitbook.io/~/files/v0/b/gitbook-x-prod.appspot.com/o/spaces%2F-MJasmeOMeAJhTVh0M75%2Fuploads%2FzIoQgfPAD70qlNk2axMp%2FLeads%20Upload.png?alt=media&amp;token=ea7d6a04-d566-469d-aea4-027c8cd1e4ab" alt=""><figcaption></figcaption></figure>

5. Once clicked on "**Upload Leads**" button, a pop-up will appear which will allow us to **upload** the data in that **particular campaign**.

<figure><img src="https://2103666731-files.gitbook.io/~/files/v0/b/gitbook-x-prod.appspot.com/o/spaces%2F-MJasmeOMeAJhTVh0M75%2Fuploads%2FfsQrfkdZPxlHibTSDGZ3%2FData%20Browse.png?alt=media&amp;token=c6d8fb84-6409-407d-8d6a-c525e7be5f07" alt=""><figcaption></figcaption></figure>

{% hint style="info" %}
After selecting the **specific data**, the admin can follow the **same process** as uploading data through the **"Contacts"** option.
{% endhint %}


# View Tasks

To keep track of Tasks in a particular Campaign

Monitoring **tasks** within a campaign is essential to ensure that all assigned activities are efficiently tracked and completed.

Tracking tasks within a campaign involves keeping a **close eye** on assigned activities, ensuring that team members are on schedule, and addressing any challenges that may arise during the execution of these tasks.&#x20;

{% hint style="success" %}
This **comprehensive monitoring process** helps maintain efficiency and achieve campaign goals. Additionally, the ability to **filter tasks** based on different criteria, such as due dates or assignees, provides flexibility in managing and organizing the workflow effectively.
{% endhint %}

## Steps:

***

1\. Go to **Pipeline** > **Type of Pipeline**.                                                                                                                                                              2. Just select the **Campaign** that you want to **edit**.                                                                                                                                          3. Inside the selected campaign, in the top right-hand corner, there is an "**Action**" button.

<figure><img src="https://2103666731-files.gitbook.io/~/files/v0/b/gitbook-x-prod.appspot.com/o/spaces%2F-MJasmeOMeAJhTVh0M75%2Fuploads%2FnC2x2CsWNTJr520NNiHW%2FAction.png?alt=media&amp;token=ed232b2a-8170-4d97-baf6-3581df47a974" alt=""><figcaption></figcaption></figure>

4. Once clicked on "**Action**" button, four more options will appear and from there we need to click on the "**View Tasks**" button.

<figure><img src="https://2103666731-files.gitbook.io/~/files/v0/b/gitbook-x-prod.appspot.com/o/spaces%2F-MJasmeOMeAJhTVh0M75%2Fuploads%2FMc3NtxEqGO5bRc4gA96q%2FTasks.png?alt=media&amp;token=fb06c91d-bcc0-4c95-ac31-9f2a9f46c694" alt=""><figcaption></figcaption></figure>

5. Once clicked on "**View Tasks**" button, it will re-direct us to a new window which will show all the **pending tasks** of the organization irrespective of all the Users.

<figure><img src="https://2103666731-files.gitbook.io/~/files/v0/b/gitbook-x-prod.appspot.com/o/spaces%2F-MJasmeOMeAJhTVh0M75%2Fuploads%2FMpmOF2JlwcbKxD9U17pr%2FTask%20Report.png?alt=media&amp;token=6a6c356c-8493-4e35-b9a9-eee26503c66c" alt=""><figcaption></figcaption></figure>

{% hint style="success" %}
The **Task Report** provides comprehensive details of **pending tasks**, along with filter options to **refine** the view according to Admin preferences.
{% endhint %}


# Delete a Campaign

There are occasions when we need to delete one or more campaigns.

{% hint style="success" %}
The '**Delete Campaign**' option proves useful in such situations, allowing for the **removal** of one or more campaigns.
{% endhint %}

## Steps:

***

1\. Go to **Pipeline** > **Type of Pipeline.**                                                                                                                                 2. On the right-hand section, there is a **list** of all the **campaigns** you have created within that **specific type** or **category** of campaign.

<figure><img src="https://2103666731-files.gitbook.io/~/files/v0/b/gitbook-x-prod.appspot.com/o/spaces%2F-MJasmeOMeAJhTVh0M75%2Fuploads%2FvwS3ee2e3P7Q7QEJay6k%2FCampaignss.png?alt=media&amp;token=d7ff1320-23c5-4538-b83b-a86985f0aefb" alt=""><figcaption></figcaption></figure>

3\.  A  menu icon (**three dots**) is present against every campaign.                                                                                     4. Select the **menu icon** present against the campaign that you want to **Delete.**                                                                                    5. A tab will appear with **three options**: Copy, View Logs, and Delete.

<figure><img src="https://2103666731-files.gitbook.io/~/files/v0/b/gitbook-x-prod.appspot.com/o/spaces%2F-MJasmeOMeAJhTVh0M75%2Fuploads%2FlrCKRD7GgrHaoVHhTFqq%2FDeletes.png?alt=media&amp;token=deff502b-dcc6-411b-97ed-138da9677b9e" alt=""><figcaption></figcaption></figure>

6\. Select the '**Delete'** option.                                                                                                                                                                      7. A **menu bar** will appear.                                                                                                                                              8. Type '**DELETE'** in capital letters to **confirm.**                                                                                                                                                                                                      9. Now, select the '**Yes, I am Sure**' option to **confirm again.**

<figure><img src="https://2103666731-files.gitbook.io/~/files/v0/b/gitbook-x-prod.appspot.com/o/spaces%2F-MJasmeOMeAJhTVh0M75%2Fuploads%2FJsSOTmFttXewMehSYaZk%2FDelete.png?alt=media&amp;token=f0604c49-5260-4f65-946a-e5555f0e6872" alt=""><figcaption></figcaption></figure>

{% hint style="success" %}
**Note:** Once you **delete** a campaign, all the leads and other data present in that particular campaign will also be **deleted**.
{% endhint %}


# Copy a Campaign

There are occasions when we need to copy a campaign.

{% embed url="<https://youtu.be/yYv1NmYnlpI>" %}

Copying a campaign is essential as it allows for **the duplication of** all pertinent settings within the campaign, including the Engagement Form, Lead Distribution Settings, and Basic Details.&#x20;

{% hint style="success" %}
This streamlined process helps to **save** significant time and effort in order to create new campaigns with the **same settings**.&#x20;
{% endhint %}

## Steps:

***

1\. Go to **Pipeline** > **Type of Pipeline**.                                                                                                                                 2. On the right-hand section, there is a **list** of all the campaigns you have created within that **specific type** or **category** of campaign.

<figure><img src="https://2103666731-files.gitbook.io/~/files/v0/b/gitbook-x-prod.appspot.com/o/spaces%2F-MJasmeOMeAJhTVh0M75%2Fuploads%2FvwS3ee2e3P7Q7QEJay6k%2FCampaignss.png?alt=media&amp;token=d7ff1320-23c5-4538-b83b-a86985f0aefb" alt=""><figcaption></figcaption></figure>

3\. A  menu icon (**three dots**) is present against every campaign.                                                                                     4. Select the **menu icon** present against the campaign that you want to **Copy**.                                                                                   5. A tab will appear with **three options**: Copy, View Logs, and Delete.

<figure><img src="https://2103666731-files.gitbook.io/~/files/v0/b/gitbook-x-prod.appspot.com/o/spaces%2F-MJasmeOMeAJhTVh0M75%2Fuploads%2F5yddSu8l6pL9oX4zy8ZG%2FCopy%20Campaign.png?alt=media&amp;token=e6782e0c-565a-4407-90ea-0a55c1a9e624" alt=""><figcaption></figcaption></figure>

6\. Select the ‘**Copy**’ option.

7\. A menu bar will appear asking for ‘**Proceed To Copy Campaign**’.

<figure><img src="https://2103666731-files.gitbook.io/~/files/v0/b/gitbook-x-prod.appspot.com/o/spaces%2F-MJasmeOMeAJhTVh0M75%2Fuploads%2F3RLPSouyR2E3aww2S1xW%2FCopy%20a%20Campaign.png?alt=media&amp;token=db88f119-db08-4c11-b60b-cf8bf116336b" alt=""><figcaption></figcaption></figure>

8\. Click on ‘**Copy**’ to copy the **particular Campaign**.&#x20;

9\. Subsequently, a **new campaign** will be generated, inheriting all the settings **copied** from the previous campaign.

<figure><img src="https://2103666731-files.gitbook.io/~/files/v0/b/gitbook-x-prod.appspot.com/o/spaces%2F-MJasmeOMeAJhTVh0M75%2Fuploads%2FnNAZjL33hLeR11yNGtJo%2FCopied.png?alt=media&amp;token=e7e770e8-c5f0-49c7-8029-6c8bf0be9408" alt=""><figcaption></figcaption></figure>


# View Lead Summary

The 'View Leads' option in the campaigns section allows you to monitor and track the leads associated with a specific campaign.

{% embed url="<https://youtu.be/0_eWPpI3lKM>" %}

{% hint style="success" %}
Certainly! If you wish to keep track of leads within a campaign, the '**View Leads**' option in the **Campaigns** section is the ideal tool for monitoring and managing the leads associated with that specific campaign.
{% endhint %}

## To view leads in a campaign, follow these steps:

***

1. Go to the '**Pipeline'** section from the sidebar.

<figure><img src="https://2103666731-files.gitbook.io/~/files/v0/b/gitbook-x-prod.appspot.com/o/spaces%2F-MJasmeOMeAJhTVh0M75%2Fuploads%2FfNQcEivULW0YxO1v3P2h%2FPipelinessss.png?alt=media&amp;token=cc5cccc0-e17a-4534-b3ac-95407fb6cc9e" alt=""><figcaption></figcaption></figure>

2. Choose the **specific type** of pipeline you want to **explore**.

<figure><img src="https://2103666731-files.gitbook.io/~/files/v0/b/gitbook-x-prod.appspot.com/o/spaces%2F-MJasmeOMeAJhTVh0M75%2Fuploads%2Fax81X0REYtlEXkWftuiE%2FPipeline%20Type.png?alt=media&amp;token=3274e24f-dac9-4d3c-a4ae-707a174266f4" alt=""><figcaption></figcaption></figure>

3. All the available campaigns within that **specific type** or **category** will be visible.

<figure><img src="https://2103666731-files.gitbook.io/~/files/v0/b/gitbook-x-prod.appspot.com/o/spaces%2F-MJasmeOMeAJhTVh0M75%2Fuploads%2FW7QmbeIeAQkff46rrmy8%2FCampaignsss.png?alt=media&amp;token=54829248-f6db-41a5-a86d-68df86352be7" alt=""><figcaption></figcaption></figure>

4. Select the specific campaign for which you want to view the '**Lead Summary**'.

<figure><img src="https://2103666731-files.gitbook.io/~/files/v0/b/gitbook-x-prod.appspot.com/o/spaces%2F-MJasmeOMeAJhTVh0M75%2Fuploads%2FSMiYBnP0qmrgJDqmAYj6%2FSpecific%20Campaign.png?alt=media&amp;token=10d6c2a1-3f85-4a71-8d54-b2539e99c255" alt=""><figcaption></figcaption></figure>

5. Click on the '**View Leads**' option.

<figure><img src="https://2103666731-files.gitbook.io/~/files/v0/b/gitbook-x-prod.appspot.com/o/spaces%2F-MJasmeOMeAJhTVh0M75%2Fuploads%2FtjjDjdMdubfEvyNd3LJM%2FView%20Leads.png?alt=media&amp;token=48bbcb1f-967d-461a-9de2-372b41cf1f7c" alt=""><figcaption></figcaption></figure>

6. This will provide you with a **detailed overview** of all the leads associated with the selected campaign, allowing you to keep **track** of their information and status.

<figure><img src="https://2103666731-files.gitbook.io/~/files/v0/b/gitbook-x-prod.appspot.com/o/spaces%2F-MJasmeOMeAJhTVh0M75%2Fuploads%2FO4Sxe7DovSsuaXNKi7S6%2FLead%20Summary.png?alt=media&amp;token=b10e1611-eac1-4218-81ee-6662a5e60466" alt=""><figcaption></figcaption></figure>

7. Once clicked on any of the lead, the **lead details** (about the lead) and **timeline** (call history) gets showcased.&#x20;

{% hint style="success" %}
**Note:** The **'Timeline'** inside a particular lead refers to a **chronological record** of all activities, interactions, and changes associated with that lead.&#x20;

It provides a **detailed overview** of the lead's journey, including when they were added to the system, any updates or modifications made to their profile or status, interactions with sales representatives, communication history, and any other relevant events.
{% endhint %}

<figure><img src="https://2103666731-files.gitbook.io/~/files/v0/b/gitbook-x-prod.appspot.com/o/spaces%2F-MJasmeOMeAJhTVh0M75%2Fuploads%2FcjxneM0rqnQieG0UJdnM%2FTimeline.png?alt=media&amp;token=e6fd0e68-f351-45de-9940-b729766db8a9" alt=""><figcaption></figcaption></figure>

{% hint style="success" %}
**Note:** You can customize the **Lead Summary** by using the flexible **'Filters'** option, tailoring the data to your preferences. Once filtered, you have the option to '**Download**' the report that aligns with your **specific requirements**.
{% endhint %}

<figure><img src="https://2103666731-files.gitbook.io/~/files/v0/b/gitbook-x-prod.appspot.com/o/spaces%2F-MJasmeOMeAJhTVh0M75%2Fuploads%2FeUAMtzfggQbU41nTjDPH%2FFilter.png?alt=media&amp;token=9e7edd98-926d-47b7-8680-7f1fe9034a68" alt=""><figcaption></figcaption></figure>


# Bulk Actions

These options enable manipulation of the leads within a specific campaign.

{% hint style="success" %}
In the **Lead Summary**, the '**Bulk Actions**' option provides a collective approach for **modifying** multiple leads simultaneously.
{% endhint %}

## It majorly has 4 options:

***

1. Update
2. Delete
3. Move to Other Campaign
4. Close Leads

<figure><img src="https://2103666731-files.gitbook.io/~/files/v0/b/gitbook-x-prod.appspot.com/o/spaces%2F-MJasmeOMeAJhTVh0M75%2Fuploads%2FhsVnsT9wwqxGDe9EXtN9%2FBulk%20Actions.png?alt=media&amp;token=79c3a412-a165-4d40-8d3d-e85bf29823bf" alt=""><figcaption></figcaption></figure>

1. **Update:** The '**Update**' option allows you to change stages and tags, and set follow-up dates from the **Admin part**. It also provides the option to **Reassign Leads** from one user to another or from unassigned to someone else.

<figure><img src="https://2103666731-files.gitbook.io/~/files/v0/b/gitbook-x-prod.appspot.com/o/spaces%2F-MJasmeOMeAJhTVh0M75%2Fuploads%2FT5IstgC7j49Af3OSOSbC%2FBulk%20Actionss.png?alt=media&amp;token=12b09da5-1d36-4fab-8641-7323fd247a99" alt=""><figcaption></figcaption></figure>

After selecting the necessary changes, click on '**Update'** to apply the new changes to that particular lead.

***

2. **Delete:** This option allows you to **delete** the lead permanently, not only from the campaign but also from the system entirely.&#x20;

<figure><img src="https://2103666731-files.gitbook.io/~/files/v0/b/gitbook-x-prod.appspot.com/o/spaces%2F-MJasmeOMeAJhTVh0M75%2Fuploads%2Fd6uFQsPxoeudlgr1ZIzj%2FDeletess.png?alt=media&amp;token=5047eb61-2ce4-4c57-a2cd-154168cf9928" alt=""><figcaption></figcaption></figure>

Similarly, a **menu bar** will open to delete the lead. You then need to type '**Delete**' and click on the '**Yes, I'm Sure**' option to delete the lead permanently from the system.

***

3. **Move To Other Campaign:** This option allows you to **move** a lead from the existing campaign to another campaign, along with all the **history** and **details** of that particular lead.

<figure><img src="https://2103666731-files.gitbook.io/~/files/v0/b/gitbook-x-prod.appspot.com/o/spaces%2F-MJasmeOMeAJhTVh0M75%2Fuploads%2FSS59NUcEXbOWe4TBHijX%2FMove%20to%20another%20campaign.png?alt=media&amp;token=80637514-41bc-44fa-8827-e5552c564d47" alt=""><figcaption></figcaption></figure>

Once you click on the option to move it to another campaign, a **menu bar** will open, asking you to **select** the campaign where you want to move the lead.&#x20;

After selecting, it will provide an option to '**Move**'. Click on that option to **transfer** the lead to the new campaign.

***

4. **Close Leads:** This option enables you to **close** a lead, indicating whether it has been converted or lost. Closed leads are not included in the **call flow** for users but can only be viewed through the '**Filters**' option.

<figure><img src="https://2103666731-files.gitbook.io/~/files/v0/b/gitbook-x-prod.appspot.com/o/spaces%2F-MJasmeOMeAJhTVh0M75%2Fuploads%2FcXDEd0CoZu9SNgqrfp12%2FClose%20Leads.png?alt=media&amp;token=22318c80-8719-45ca-aa35-bed5d26c6a36" alt=""><figcaption></figcaption></figure>

After selecting the '**Close Lead**' option, a menu bar will open, prompting you to choose a **file** containing the **list** of leads you want to close, ensuring that your users don't receive them in their **call flow**.&#x20;

You can check the **sample file** and then **upload** the list of leads in the **specified format** to close them in that particular campaign.

***

{% hint style="success" %}
**Note:** Closing leads doesn't involve **deleting** them. The leads will remain in the system, but they won't appear in the **call flow** for users. You can still find them by using the '**Filters**' option.
{% endhint %}


# Advance Filters - Lead Summary

In the pipeline lead summary or campaign lead summary, you can filter out leads based on the following criteria

1. Lead details
2. Users
3. Status
4. Stages
5. Tags
6. Creation date
7. Assignment date
8. Contact source
9. Follow up
10. Call attempts

<figure><img src="https://2103666731-files.gitbook.io/~/files/v0/b/gitbook-x-prod.appspot.com/o/spaces%2F-MJasmeOMeAJhTVh0M75%2Fuploads%2FOr6NxN8AooA5Kr6hoXqx%2Ffi.png?alt=media&amp;token=dddcf457-35f2-4fd1-9240-7bda68149b06" alt=""><figcaption></figcaption></figure>

You can also save any specific view that you want to use again and again. for a filter that have to be put again and again to see the details, you can save that view by clicking on the "S**ave Filter**" button

<figure><img src="https://2103666731-files.gitbook.io/~/files/v0/b/gitbook-x-prod.appspot.com/o/spaces%2F-MJasmeOMeAJhTVh0M75%2Fuploads%2FbqVsdEJ0bhujigV2NEvt%2Ffi2.png?alt=media&amp;token=fc8e2f1a-e3e4-4069-a3be-b4de828971a3" alt=""><figcaption></figcaption></figure>

After clicking on the button you can save the filter view with the name you want


# View Call Logs

To keep track of Logs in a campaign

Monitoring a **Campaign's Call Logs** is crucial for tracking user activities and interactions in a campaign.

{% hint style="success" %}
It helps in **analyzing** call histories, assessing user performance, and ensuring effective communication with **leads**.&#x20;
{% endhint %}

By reviewing logs, administrators can gain **insights** into the overall effectiveness of a campaign, identify areas for improvement, and maintain a **comprehensive record** of communication for future reference.

## To view call logs in a campaign, follow these steps:

***

1. Go to the '**Pipeline'** section from the sidebar.

<figure><img src="https://2103666731-files.gitbook.io/~/files/v0/b/gitbook-x-prod.appspot.com/o/spaces%2F-MJasmeOMeAJhTVh0M75%2Fuploads%2FfNQcEivULW0YxO1v3P2h%2FPipelinessss.png?alt=media&amp;token=cc5cccc0-e17a-4534-b3ac-95407fb6cc9e" alt=""><figcaption></figcaption></figure>

2. Choose the **specific type** of pipeline you want to **explore**.

<figure><img src="https://2103666731-files.gitbook.io/~/files/v0/b/gitbook-x-prod.appspot.com/o/spaces%2F-MJasmeOMeAJhTVh0M75%2Fuploads%2Fax81X0REYtlEXkWftuiE%2FPipeline%20Type.png?alt=media&amp;token=3274e24f-dac9-4d3c-a4ae-707a174266f4" alt=""><figcaption></figcaption></figure>

3. All the available campaigns within that **specific type** or **category** will be visible.

<figure><img src="https://2103666731-files.gitbook.io/~/files/v0/b/gitbook-x-prod.appspot.com/o/spaces%2F-MJasmeOMeAJhTVh0M75%2Fuploads%2FW7QmbeIeAQkff46rrmy8%2FCampaignsss.png?alt=media&amp;token=54829248-f6db-41a5-a86d-68df86352be7" alt=""><figcaption></figcaption></figure>

4. Choose the specific campaign for which you want to view '**Call Logs**'.

<figure><img src="https://2103666731-files.gitbook.io/~/files/v0/b/gitbook-x-prod.appspot.com/o/spaces%2F-MJasmeOMeAJhTVh0M75%2Fuploads%2FSMiYBnP0qmrgJDqmAYj6%2FSpecific%20Campaign.png?alt=media&amp;token=10d6c2a1-3f85-4a71-8d54-b2539e99c255" alt=""><figcaption></figcaption></figure>

5. Click on the **'View Call** **Logs'** option.

<figure><img src="https://2103666731-files.gitbook.io/~/files/v0/b/gitbook-x-prod.appspot.com/o/spaces%2F-MJasmeOMeAJhTVh0M75%2Fuploads%2FtMDCAaFEEM1rDK0g2C6L%2FCall%20logs.png?alt=media&amp;token=1c3bf29d-6611-4d7b-8047-8cc2419bdb52" alt=""><figcaption></figcaption></figure>

6. This will provide you with a **detailed overview** of all the logs associated with the selected campaign, allowing you to **keep track** of the activities, interactions, and history related to that campaign.

<figure><img src="https://2103666731-files.gitbook.io/~/files/v0/b/gitbook-x-prod.appspot.com/o/spaces%2F-MJasmeOMeAJhTVh0M75%2Fuploads%2F2z2OXOE7D8ghRD2tPNmH%2FLogs.png?alt=media&amp;token=52810bb6-0359-411c-91c8-e916988201e7" alt=""><figcaption></figcaption></figure>

{% hint style="success" %}
**Note:** You have the flexibility to **filter call logs** based on date range, specific users, and call status, allowing you to **generate** a customized call logs report tailored to your preferences.&#x20;

Once customized, you can **download** the report for further analysis or documentation.
{% endhint %}

<figure><img src="https://2103666731-files.gitbook.io/~/files/v0/b/gitbook-x-prod.appspot.com/o/spaces%2F-MJasmeOMeAJhTVh0M75%2Fuploads%2FsEWHiMqo7hqxzxiIB8S8%2FLogs%20Search.png?alt=media&amp;token=0fb8094e-2416-46bb-833c-2817be735965" alt=""><figcaption></figcaption></figure>


# FAQs (Pipelines and Campaigns)

Lets understand few of the FAQs from Pipelines and Campaigns

1. **What is a pipeline in NeoDove?**
   * A pipeline in NeoDove refers to the predefined stages that a lead progresses through during the sales process. It represents the various steps involved from lead acquisition to conversion.
2. **How do I create a new pipeline?**
   * To create a new pipeline, navigate to the settings of your NeoDove account. Look for the option to "Pipelines" and click on it. Then, follow the prompts to add a new pipeline, including defining stages, tags and transitions.
3. **Can I customize the stages in a pipeline?**
   * Yes, you can customize the stages in a pipeline to align with your specific sales process. You can add, remove, or edit stages according to your requirements.
4. **What is a campaign in NeoDove?**
   * A campaign in NeoDove refers to a targeted marketing initiative aimed at acquiring or engaging leads. It encompasses activities such as outbound calling, messaging, and lead management within a specified timeframe and goal.
5. **How do I create a new campaign?**
   * To create a new campaign, navigate to the "Pipeline" section of your NeoDove account. Look for the option to create campaign inside a specific Pipeline and click on it. Then, provide details such as campaign name, campaign manager, agents, lead distribution, priority and lead duplicacy.
6. **Can I create multiple campaigns to a pipeline?**
   * Yes, you can create multiple campaigns to a pipeline if your one particular business process involves different campaigns for different types of leads or products/services.
7. **How can I track the performance of my campaigns?**
   * NeoDove provides analytics and reporting features to track the performance of your campaigns. You can monitor metrics from reports and trends sections which you will find from the left hand side of the screen.
8. **Can I pause or stop a campaign midway?**
   * Yes, you can pause or stop a campaign midway if needed. Simply access the particular campaign and then need to click on the Action button following click on Edit Campaign from the top right corner of the screen. Then accordingly you will get an option to pause or stop the campaign. This can be useful if you need to reassess your strategy or address any issues.

{% hint style="success" %}
**Note:** These **FAQs** should provide **insights** into pipelines and campaigns in NeoDove, helping admin or managers **navigate** these sections effectively.
{% endhint %}


# Move and Copy Leads - Campaigns

Leads can be moved across campaigns and can be copied from one campaign to another

### Move Leads

1. You can  move leads from one campaign to another.&#x20;
2. after selecting the leads to move, Click on the bulk action button for any one of the campaign
3. then click on the move leads option

<figure><img src="https://2103666731-files.gitbook.io/~/files/v0/b/gitbook-x-prod.appspot.com/o/spaces%2F-MJasmeOMeAJhTVh0M75%2Fuploads%2FooybdKDRpOIou2fXZ4yT%2Fmove%201.png?alt=media&amp;token=5c64e9fc-9641-4064-a5ef-0ff01f2ecb23" alt=""><figcaption></figcaption></figure>

4. Then select the destination campaign

<figure><img src="https://2103666731-files.gitbook.io/~/files/v0/b/gitbook-x-prod.appspot.com/o/spaces%2F-MJasmeOMeAJhTVh0M75%2Fuploads%2FAhanIbAlJSCrNUelToIE%2Fmove%202.png?alt=media&amp;token=358dfcf1-bd9d-45e2-9e28-9b5bd3414cd4" alt=""><figcaption></figcaption></figure>

5. Select the other feilds as well

<figure><img src="https://2103666731-files.gitbook.io/~/files/v0/b/gitbook-x-prod.appspot.com/o/spaces%2F-MJasmeOMeAJhTVh0M75%2Fuploads%2FhZRK0sF4PWRPfvB4BwoD%2Fmove%203.png?alt=media&amp;token=dbb499b0-84a3-4048-99ee-84319a30811d" alt=""><figcaption></figcaption></figure>

6. Click on the move button to succesfully move the leads

<figure><img src="https://2103666731-files.gitbook.io/~/files/v0/b/gitbook-x-prod.appspot.com/o/spaces%2F-MJasmeOMeAJhTVh0M75%2Fuploads%2FU6hRoTb66mQ67xsEETCw%2Fmove%205.png?alt=media&amp;token=70920e08-f641-4069-b0bf-e9a83bdd82cb" alt=""><figcaption></figcaption></figure>

7. In the destination campaign you can see that the leads are moved

<figure><img src="https://2103666731-files.gitbook.io/~/files/v0/b/gitbook-x-prod.appspot.com/o/spaces%2F-MJasmeOMeAJhTVh0M75%2Fuploads%2F26Ujd31k6gp5ht0BgwxE%2Fmove%206.png?alt=media&amp;token=de8b4f24-59fc-4b22-9b16-3c6edb66a5dd" alt=""><figcaption></figcaption></figure>

**When a lead is moved from one campaign to another then lead details, CCP and other details all information is moved to destination campaign**

### Copy Leads

1. You can copy leads from one campaign to another.&#x20;
2. after selecting the leads to copy, Click on the bulk action button for any one of the campaign
3. then click on the copy leads option

<figure><img src="https://2103666731-files.gitbook.io/~/files/v0/b/gitbook-x-prod.appspot.com/o/spaces%2F-MJasmeOMeAJhTVh0M75%2Fuploads%2FMOakqJhcShNuIS0lcHM9%2Fcopy%201.png?alt=media&amp;token=b438e9e0-611a-49cb-9cbe-319a9c8ef5d6" alt=""><figcaption></figcaption></figure>

4. Fill on the required fields and click on copy button

<figure><img src="https://2103666731-files.gitbook.io/~/files/v0/b/gitbook-x-prod.appspot.com/o/spaces%2F-MJasmeOMeAJhTVh0M75%2Fuploads%2FyYWyi9ilfgxpB0WuLdXd%2Fcopy%202.png?alt=media&amp;token=22f38de8-1352-44c0-9893-02d8047968dd" alt=""><figcaption></figcaption></figure>

5. You can see that the leads are copied in the destination campaign

<figure><img src="https://2103666731-files.gitbook.io/~/files/v0/b/gitbook-x-prod.appspot.com/o/spaces%2F-MJasmeOMeAJhTVh0M75%2Fuploads%2FzGzBz7PdpD7jQoCDmFhA%2Fcopy%203.png?alt=media&amp;token=74082a6b-4b43-4ac1-90c3-c5bf30e16c0f" alt=""><figcaption></figcaption></figure>

**When a lead is copied from one campaign to another then only lead details information is copied to destination campaign**


# Contacts

A Gateway to all Your Leads

{% embed url="<https://youtu.be/eNzCrspiWeI>" %}

{% hint style="success" %}
In NeoDove, the Contacts Section is like a hub for all your contacts. It lets you add leads, move them to campaigns, and store all their info.
{% endhint %}

You can see their history and change their details here. It's basically the place to manage all your leads in a central place. The Contacts dashboard in NeoDove lets you manage your contacts using three key methods:

***

1. **Basic:** You can find and view specific contacts in the Contacts dashboard by using their basic information, like their name and phone number. Additionally, you can also use any special details or custom properties that your organization's admin has added specifically for your organization's needs.
2. **Campaigns:** To explore contacts associated with specific campaigns, you can use the Campaigns feature. It allows you to choose the campaigns you're interested in exploring. You can select one or more campaigns to view the available contacts within those campaigns.
3. **Contact Source:** You can use Contact Source properties to filter contacts based on where they were originally uploaded from. These Contact Source properties typically include:

* File Upload
* Walk-in Lead
* Incoming IVR
* Integrations

<figure><img src="https://2103666731-files.gitbook.io/~/files/v0/b/gitbook-x-prod.appspot.com/o/spaces%2F-MJasmeOMeAJhTVh0M75%2Fuploads%2FqxEV19OFJr1oklAyWipw%2FContacts%201.png?alt=media&amp;token=45afa5f5-4049-41b6-9f81-be7cb0f25a3d" alt=""><figcaption></figcaption></figure>

## Exploring Contacts

***

### What properties do Contacts offer?

The Contacts section in NeoDove is like a detailed profile for each contact. It shows you everything about them, such as the campaigns they're in, their personal info, and their history of interactions.&#x20;

{% hint style="success" %}
It's like having a full record of each contact in one place.
{% endhint %}

<figure><img src="https://2103666731-files.gitbook.io/~/files/v0/b/gitbook-x-prod.appspot.com/o/spaces%2F-MJasmeOMeAJhTVh0M75%2Fuploads%2FbCf2Xk3M2ugYN61RZfg1%2FContacts%202.png?alt=media&amp;token=1150b602-3724-4613-a6d7-4f1ecebeb965" alt=""><figcaption></figcaption></figure>


# What are Custom Contact Properties ?

Custom Contact Properties (CCP) in NeoDove are essentially settings that enable you to use specific fields for filtering data from your database.

When you're importing **data** into NeoDove from various sources, it often comes with different fields or attributes linked to leads.

This means you're telling NeoDove to recognize and use that field for **filtering purposes**. It's a way to **customize** how you sort and access your data based on your unique needs.

**How to Enable it?**

1. **Log in** to your NeoDove account ( <https://connect.neodove.com/> )
2. Go to the **Contacts** Section.

<figure><img src="https://2103666731-files.gitbook.io/~/files/v0/b/gitbook-x-prod.appspot.com/o/spaces%2F-MJasmeOMeAJhTVh0M75%2Fuploads%2FXFgGaFMyQzUiuls8V6sB%2Fc1.png?alt=media&amp;token=78d0fdd8-0aa1-43e9-84c2-55316eedff26" alt=""><figcaption></figcaption></figure>

3. Click on the “**Custom Contact Properties**” option available at the top of the screen.

<figure><img src="https://2103666731-files.gitbook.io/~/files/v0/b/gitbook-x-prod.appspot.com/o/spaces%2F-MJasmeOMeAJhTVh0M75%2Fuploads%2FSZ1r4IsfBoe7ZfFmJI32%2Fc2.png?alt=media&amp;token=0f2f32d1-73d5-43e8-abc9-eb8ee49702ff" alt=""><figcaption></figcaption></figure>

4. After clicking on Custom Contact Properties the following page will be shown. From here the user will be able to see the already created properties and can add new property as well.

<figure><img src="https://2103666731-files.gitbook.io/~/files/v0/b/gitbook-x-prod.appspot.com/o/spaces%2F-MJasmeOMeAJhTVh0M75%2Fuploads%2FdEx3TByIu7sdvgdSniw1%2Fc3.png?alt=media&amp;token=f6e24493-e54c-46dd-8eb0-46620e83081c" alt=""><figcaption></figcaption></figure>

5. **Add CCP** - You can add properties by clicking on the " **Add Property**" button. Along with that you can select the data type of the CCP as well. Currently we have 3 types of CCP that are **text, date and number**. When selecting the date type CCP, you also need to select the type of date format from the dropdown. Mapping will be done only when the format selected here matches the format of date in your input file.

<figure><img src="https://2103666731-files.gitbook.io/~/files/v0/b/gitbook-x-prod.appspot.com/o/spaces%2F-MJasmeOMeAJhTVh0M75%2Fuploads%2FFlZ7hJoK9eQmt5OFKmTP%2Fc4.png?alt=media&amp;token=ff836617-7b62-4c7f-bc4c-df41ae65b507" alt=""><figcaption></figcaption></figure>

6. **Edit CCP -** You can also edit any CCP (only name) by clicking on the edit icon.

<figure><img src="https://2103666731-files.gitbook.io/~/files/v0/b/gitbook-x-prod.appspot.com/o/spaces%2F-MJasmeOMeAJhTVh0M75%2Fuploads%2FuOX4iIMEAEHaCm8VCGX7%2Fc5.png?alt=media&amp;token=515cd763-a2f0-4c63-b64e-874b9e3b2c9d" alt=""><figcaption></figcaption></figure>

7. **Delete CCP** -  You can delete a CCP by clicking on the delete icon. Deleting a CCP will permanently delete the data associated with that CCP.

<figure><img src="https://2103666731-files.gitbook.io/~/files/v0/b/gitbook-x-prod.appspot.com/o/spaces%2F-MJasmeOMeAJhTVh0M75%2Fuploads%2FngdOLiqE60fKMXTIL3Dp%2Fc6.png?alt=media&amp;token=6b089c0a-9ff2-46d4-9547-ab0d05f9505b" alt=""><figcaption></figcaption></figure>

8. **Activate and Deactivate a CCP -** You can activate or deactivate a CCP by just clicking on the toggle switch. When you deactivate a CCP, mapping will be stopped temporarily till the time you again reactivate the CCP back.

<figure><img src="https://2103666731-files.gitbook.io/~/files/v0/b/gitbook-x-prod.appspot.com/o/spaces%2F-MJasmeOMeAJhTVh0M75%2Fuploads%2FeCc6z0wweu95qSx3mAEC%2Fc7.png?alt=media&amp;token=89c64bb1-6e34-499a-91c6-0fe28dfdf2a9" alt=""><figcaption></figcaption></figure>

## **Searching and Filtering a CCP**

You can search or filter a CCP from filters that are provided in the lead summary page as well as contacts page.

<figure><img src="https://2103666731-files.gitbook.io/~/files/v0/b/gitbook-x-prod.appspot.com/o/spaces%2F-MJasmeOMeAJhTVh0M75%2Fuploads%2FmZGAI0i3QnrVXwAc1HDI%2Fc8.png?alt=media&amp;token=d29b1873-6ca9-449e-98aa-58a8dd97e788" alt=""><figcaption></figcaption></figure>


# How to Upload Contacts?

Uploading data or leads to the NeoDove Portal into different campaigns.

{% hint style="success" %}
The "**Uploading Contacts**" feature in the NeoDove portal serves the purpose of creating new campaigns and adding leads to them or rerouting leads to existing campaigns.&#x20;
{% endhint %}

This functionality simplifies the process of initiating new campaigns or integrating leads into ongoing ones, providing a streamlined approach to lead management and campaign creation.

### Steps:

***

1. **Log in** to your NeoDove account ( <https://connect.neodove.com/> )&#x20;
2. Go to the **Contacts** Section.

<figure><img src="https://2103666731-files.gitbook.io/~/files/v0/b/gitbook-x-prod.appspot.com/o/spaces%2F-MJasmeOMeAJhTVh0M75%2Fuploads%2FqxEV19OFJr1oklAyWipw%2FContacts%201.png?alt=media&amp;token=45afa5f5-4049-41b6-9f81-be7cb0f25a3d" alt=""><figcaption></figcaption></figure>

3. Click the "**Upload Contacts**" option available at the top of the screen.

<figure><img src="https://2103666731-files.gitbook.io/~/files/v0/b/gitbook-x-prod.appspot.com/o/spaces%2F-MJasmeOMeAJhTVh0M75%2Fuploads%2FIhtT1RWRczh3CkQyZJ8v%2FContacts%204.png?alt=media&amp;token=b7c7fb27-487d-493d-ae5a-ceaac9528417" alt=""><figcaption></figcaption></figure>

4. As soon as you click the button a **pop-up** will appear. Select your file containing all the leads.

<figure><img src="https://2103666731-files.gitbook.io/~/files/v0/b/gitbook-x-prod.appspot.com/o/spaces%2F-MJasmeOMeAJhTVh0M75%2Fuploads%2Fk55JjIcrR81hqEL0NzEA%2FUpload%20Contacts%202.png?alt=media&amp;token=31d59c82-09c9-4bdd-a27f-6b7fedebe860" alt=""><figcaption></figcaption></figure>

5. Once you have selected the file, this will redirect you to select the **campaign**. There are two ways:

* **Creating a new campaign -** If you intend to initiate a new campaign using a specific file, you should select the option to "**Create a New Campaign**" within the NeoDove portal.&#x20;

{% hint style="success" %}
This choice allows you to set up a **fresh campaign** specifically tailored to the leads contained in the file, ensuring an organized and targeted approach to your **campaign management**.
{% endhint %}

* **Add Leads in an Existing Campaign -** If your goal is to redirect the leads from the file to an **existing campaign**, you can choose this option within the NeoDove portal. During this process, you will be prompted to select the **specific campaign** to which you want these leads to be re-directed.&#x20;

{% hint style="success" %}
This option allows for efficient lead distribution and ensures that the leads seamlessly integrate into the **ongoing campaign** of your choice.
{% endhint %}

<figure><img src="https://2103666731-files.gitbook.io/~/files/v0/b/gitbook-x-prod.appspot.com/o/spaces%2F-MJasmeOMeAJhTVh0M75%2Fuploads%2FLE0rUxAQljjCTKXmK0vo%2FUpload%20Contacts%203.png?alt=media&amp;token=ba68e78f-9a70-47a5-a376-be003fd161aa" alt=""><figcaption></figcaption></figure>

6. Select the “**Campaign Type**”, if you want to create a new campaign while uploading the data.

<figure><img src="https://2103666731-files.gitbook.io/~/files/v0/b/gitbook-x-prod.appspot.com/o/spaces%2F-MJasmeOMeAJhTVh0M75%2Fuploads%2FAKsYUiVMbqIivcML1MhO%2FUpload%20Contacts%204.png?alt=media&amp;token=612fb1e0-e5cd-4856-877d-c9349707be27" alt=""><figcaption></figcaption></figure>

7. Select the “**Campaign Name**”, if you want to add the leads in an existing campaign. Then after selection, click on the **Next button** to continue.&#x20;

<figure><img src="https://2103666731-files.gitbook.io/~/files/v0/b/gitbook-x-prod.appspot.com/o/spaces%2F-MJasmeOMeAJhTVh0M75%2Fuploads%2F90unpydrvSHIPDkHs47d%2FUpdated%20Contacts%205.png?alt=media&amp;token=461baa51-bfef-4c06-a2b5-022548bfaae5" alt=""><figcaption></figcaption></figure>

8. You will now have to **map the fields** or the **columns** from the data with the particular fields of the system.

<figure><img src="https://2103666731-files.gitbook.io/~/files/v0/b/gitbook-x-prod.appspot.com/o/spaces%2F-MJasmeOMeAJhTVh0M75%2Fuploads%2Fah6qYQcofjO9xQdJOC8d%2FUpdated%20Contacts%206.png?alt=media&amp;token=3794685f-f64f-4fc1-a410-bfb11f1793ba" alt=""><figcaption></figcaption></figure>

9. Then select the "**Duplicacy Settings**" where there are four options to be chosen:

***

* **Ignore Duplicate -** All the duplicates will be ignored or deleted. It just won’t get uploaded.&#x20;
* **Merge Duplicate -** All the duplicates will get merged and will show as one lead only. In that particular lead, all the details will be visible collectively.
* **Create Duplicate Leads -** There will be no checking of duplicates. All leads, including duplicates, will get uploaded as is, as independent leads.
* **Merge Duplicate and Reopen Closed Leads -** In the case of any closed lead, if a fresh inquiry comes in once again then the duplicates (fresh inquiry and already closed leads) will get merged and it would gradually reopen again and get assigned to the Users as a fresh lea&#x64;**.**

10. After setting up the required **Duplicacy Settings**, then click on Next to proceed further.
11. Need to map the Custom Contact Properties **(CCP)** as well then with the fields from the data.

<figure><img src="https://2103666731-files.gitbook.io/~/files/v0/b/gitbook-x-prod.appspot.com/o/spaces%2F-MJasmeOMeAJhTVh0M75%2Fuploads%2Fy4jCKqdwFGjCK2c5lS1g%2FUpdated%20Contacts%207.png?alt=media&amp;token=f29b5748-d674-42d9-aa7f-305046d063b3" alt=""><figcaption></figcaption></figure>

12. After clicking on “**Submit**”, the data will get uploaded with a **push notification**.

<figure><img src="https://2103666731-files.gitbook.io/~/files/v0/b/gitbook-x-prod.appspot.com/o/spaces%2F-MJasmeOMeAJhTVh0M75%2Fuploads%2F1wTI19BcmzlAZCMXlvix%2FUpdated%20Contacts%208.png?alt=media&amp;token=51e503ea-915a-469a-bd8a-948aa3886a3d" alt=""><figcaption></figcaption></figure>


# How to Add Walk-In Leads?

"Walk-in leads" are contacts you add one by one, usually after receiving inquiries or interacting with them in person, and not by importing data or using automated methods.

{% hint style="success" %}
If the admin wishes to **manually** add individual leads to the database without using file uploads or integrations, they can do so using the "**Walk-In Leads**" option on the dashboard.&#x20;
{% endhint %}

They simply click on this option and provide basic details for the lead they want to add, enabling a one-by-one lead entry process.

### Steps:

***

1. **Log in** to your NeoDove account ( <https://connect.neodove.com/> )&#x20;
2. Go to the **Contacts** Section.

<figure><img src="https://2103666731-files.gitbook.io/~/files/v0/b/gitbook-x-prod.appspot.com/o/spaces%2F-MJasmeOMeAJhTVh0M75%2Fuploads%2F3ZDwgAU0PfwxPoQW0hum%2Fimage.png?alt=media&amp;token=fd2648ae-d0cd-47b6-9e4e-1c19a903e310" alt=""><figcaption></figcaption></figure>

3. Click on the "**+Add Lead**" option at the right bottom of the screen to add a **Walk-In Lead**.

<figure><img src="https://2103666731-files.gitbook.io/~/files/v0/b/gitbook-x-prod.appspot.com/o/spaces%2F-MJasmeOMeAJhTVh0M75%2Fuploads%2FPCGk9qwmetd3b4blYeFN%2FWalk-in%20lead%20new.png?alt=media&amp;token=616612b3-3cef-48fa-8595-114e0721cd26" alt=""><figcaption></figcaption></figure>

4. Put all the **required details** of the particular lead whom we want to add and then click on Submit to get it added to the database.&#x20;
5. Once the lead is added, it will give a push notification as the **Lead successfully created**.

<figure><img src="https://2103666731-files.gitbook.io/~/files/v0/b/gitbook-x-prod.appspot.com/o/spaces%2F-MJasmeOMeAJhTVh0M75%2Fuploads%2FgGr7xwb3NftlSDhuUwPa%2FWalk-in%20lead%202.png?alt=media&amp;token=79dea423-f224-488e-950c-e0dd7e859f08" alt=""><figcaption></figcaption></figure>


# FAQs (Contacts or Data Upload)

Here are some FAQs on contacts/data upload and adding a walk-in lead.

1. **How do I upload contacts or leads to NeoDove?**
   * To upload contacts or leads, navigate to the "Contacts" section in NeoDove, click on the "Upload Contacts" button, and follow the prompts to select the file containing your contact data. Ensure that the file format (CSV, XLS, XLSX, etc.) and column headers are compatible with NeoDove's requirements.
2. **What information should be included in the contact data file for successful upload?**
   * The contact data file should include essential information such as name, phone number, email address, and any other relevant details. Ensure that the data is properly formatted and organized in columns to facilitate smooth uploading. The first column and the first row should not be blank.&#x20;
3. **Can I add custom fields or additional information to contacts during upload?**
   * Yes, NeoDove allows you to add custom fields or additional information to contacts during the upload process. Simply include these fields in your data file and map them to the corresponding fields in NeoDove's interface during the upload.
4. **How do I ensure data accuracy and cleanliness before uploading?**
   * Before uploading data, it's crucial to review and clean the data to ensure accuracy and completeness. Remove duplicates, standardize formats, and verify contact details to prevent errors and inconsistencies in your database.
5. **What is a walk-in lead, and how can I add one in NeoDove?**
   * A walk-in lead refers to a new lead or contact that is added manually to NeoDove's database. To add a walk-in lead, navigate to the "Contacts" section, click on the "Add Lead" button from the right bottom of the screen, and fill in the required details such as name, phone number, campaign and which agents to be assigned.
6. **Can I categorize walk-in leads or assign them to specific campaigns during addition?**
   * Yes, you can categorize walk-in leads and assign them to specific campaigns or categories during addition. NeoDove allows you to tag leads with custom labels, assign campaigns, and segment them based on various criteria for targeted outreach and follow-up.

{% hint style="success" %}
These **FAQs** should help you understand the process of uploading contacts and adding walk-in leads in NeoDove more effectively. If you have any further questions or need assistance, feel free to reach out to our **support team**.
{% endhint %}


# Reports

Gain in-depth information about how your team and various campaigns are performing, allowing you to make informed decisions based on data and analytics.

{% embed url="<https://youtu.be/CiHrSgt-bLg>" %}

{% hint style="success" %}
Reports in NeoDove provide a straightforward method to assess your organization's **overall performance** by offering comprehensive data on users and campaigns, available in the reports section for your convenience.
{% endhint %}

<figure><img src="https://2103666731-files.gitbook.io/~/files/v0/b/gitbook-x-prod.appspot.com/o/spaces%2F-MJasmeOMeAJhTVh0M75%2Fuploads%2FKWlghgRiLOLRdBfjPB6m%2FReportsssss.png?alt=media&amp;token=574d36cc-adeb-4850-a07f-1119289dd8c2" alt=""><figcaption></figcaption></figure>

### In NeoDove, we offer **a few** types of reports. Those are:

***

1. User Report
2. User Activity Report
3. Lead Disposition Report
4. Message Activity Report
5. User Call Report
6. Followup Report
7. Login Report
8. Campaign Report
9. Campaign Lead Report
10. Campaign Stage Report

<figure><img src="https://2103666731-files.gitbook.io/~/files/v0/b/gitbook-x-prod.appspot.com/o/spaces%2F-MJasmeOMeAJhTVh0M75%2Fuploads%2FCBXjCHkyzlNVOrhosxHv%2FReportssss.png?alt=media&amp;token=bc73b340-323f-4779-801a-a2b5191358a0" alt=""><figcaption></figcaption></figure>

### After getting inside the Reports section, there are multiple options available at the top.&#x20;

***

1. **All Reports -** It showcases all the **reports available** in NeoDove along with their descriptions and categories of it.&#x20;

<figure><img src="https://2103666731-files.gitbook.io/~/files/v0/b/gitbook-x-prod.appspot.com/o/spaces%2F-MJasmeOMeAJhTVh0M75%2Fuploads%2FOVRC5s6Wnw5Ic5iXfpyZ%2FAll%20Reports.png?alt=media&amp;token=5ec10520-685f-4996-9968-4c9c80dc09cd" alt=""><figcaption></figcaption></figure>

2. **Recently Viewed -** It showcases the **recently viewed reports** in NeoDove.&#x20;

<figure><img src="https://2103666731-files.gitbook.io/~/files/v0/b/gitbook-x-prod.appspot.com/o/spaces%2F-MJasmeOMeAJhTVh0M75%2Fuploads%2FB5L8AJTkTLL79I8SbiBh%2FRecently%20Viewed.png?alt=media&amp;token=f0b13e7e-5376-4dcd-a118-a7b015b018ee" alt=""><figcaption></figcaption></figure>

3. **Favourites -** It showcases all the **favourite reports** marked, by enabling the **star mark** on the right hand side of each respective reports.

<figure><img src="https://2103666731-files.gitbook.io/~/files/v0/b/gitbook-x-prod.appspot.com/o/spaces%2F-MJasmeOMeAJhTVh0M75%2Fuploads%2FLfgXc714ty4pKQ3GRHQC%2FFavourites.png?alt=media&amp;token=2742ac31-7e0f-498d-ab94-56aecf79a670" alt=""><figcaption></figcaption></figure>

4. **Download Logs -** It showcases all the **requested download reports** along with the **download links** with it to get it downloaded.&#x20;

<figure><img src="https://2103666731-files.gitbook.io/~/files/v0/b/gitbook-x-prod.appspot.com/o/spaces%2F-MJasmeOMeAJhTVh0M75%2Fuploads%2FaqgE0CjkLmNW1yjABHkt%2FDownload%20Logs.png?alt=media&amp;token=9ddaf532-66a4-430c-8990-92732af0413d" alt=""><figcaption></figcaption></figure>

{% hint style="success" %}
Under the **status column**, need to click on the respective **Download Now link** to get that specific report downloaded.
{% endhint %}

<figure><img src="https://2103666731-files.gitbook.io/~/files/v0/b/gitbook-x-prod.appspot.com/o/spaces%2F-MJasmeOMeAJhTVh0M75%2Fuploads%2FsMkh3Bi9EuPTYiT2KvD3%2FDownloaded%20Logs.png?alt=media&amp;token=f1a06e56-4f05-4bd7-9f7a-85df5ed0fe77" alt=""><figcaption></figcaption></figure>

5. **Search Reports -** This option helps you to search the **specific report** in one go out of the whole lot of reports.&#x20;

<figure><img src="https://2103666731-files.gitbook.io/~/files/v0/b/gitbook-x-prod.appspot.com/o/spaces%2F-MJasmeOMeAJhTVh0M75%2Fuploads%2FBi3MmlCy5J0tTlRDCrQP%2FSearch%20Reports.png?alt=media&amp;token=aa57e374-e200-4fd3-b550-da68168fc164" alt=""><figcaption></figcaption></figure>

6. **New View -** Other than the **classic view**, NeoDove has a **new view** as well to showcase all the reports with the **detailed descriptions**.

<figure><img src="https://2103666731-files.gitbook.io/~/files/v0/b/gitbook-x-prod.appspot.com/o/spaces%2F-MJasmeOMeAJhTVh0M75%2Fuploads%2FvxcRZ6PKTJlCaVjPZ1t5%2FNew%20View%20Report.png?alt=media&amp;token=457703e9-4e47-41b9-84d9-58c3eca45800" alt=""><figcaption></figcaption></figure>


# User Report

Details of calling, dispositions and activity of each user are presented in this report

This report offers a **thorough analysis** of user-related metrics, including call history, disposition outcomes, and overall activity.&#x20;

By examining these elements, the report provides **valuable insights** into user behavior and performance trends, **enabling** informed decision-making and strategic planning.&#x20;

{% hint style="success" %}
The data presented **aims** to enhance understanding of user engagement, optimize resource allocation, and improve overall operational efficiency.
{% endhint %}

### To view the **User Report,** follow these steps:

***

1. Go to the "**Reports**" option from the left-hand tab of your screen.

<figure><img src="https://2103666731-files.gitbook.io/~/files/v0/b/gitbook-x-prod.appspot.com/o/spaces%2F-MJasmeOMeAJhTVh0M75%2Fuploads%2FNqgBFZO4wHyxneYlmSBw%2Fimage.png?alt=media&amp;token=30e198fe-dc01-471f-8b1e-4bcab053498a" alt=""><figcaption></figcaption></figure>

2. A new window will appear, where you need to **click** on the first option from the top that is the "**User Report**".&#x20;

<figure><img src="https://2103666731-files.gitbook.io/~/files/v0/b/gitbook-x-prod.appspot.com/o/spaces%2F-MJasmeOMeAJhTVh0M75%2Fuploads%2F3aRY5lQPZQnm6W60hRW8%2FUser%20Reportss.png?alt=media&amp;token=0b502ecd-81ba-4a08-b39c-0d603f230c03" alt=""><figcaption></figcaption></figure>

3. Then another window will appear with the complete **calling,** **disposition & activity details** of each and every users.&#x20;

<figure><img src="https://2103666731-files.gitbook.io/~/files/v0/b/gitbook-x-prod.appspot.com/o/spaces%2F-MJasmeOMeAJhTVh0M75%2Fuploads%2FA8VFE0i3RUwjXqLSyQf7%2FUsers%20Report.png?alt=media&amp;token=7e0e78ed-48df-4be3-b7d2-425f31403fa5" alt=""><figcaption></figcaption></figure>

### The data can be further filtered in multiple ways for better analysis:

***

1. **Date Wise:**

<figure><img src="https://2103666731-files.gitbook.io/~/files/v0/b/gitbook-x-prod.appspot.com/o/spaces%2F-MJasmeOMeAJhTVh0M75%2Fuploads%2FcSsVgq0pluw6VKMICjXf%2FUser%20Data%20Report.png?alt=media&amp;token=b34974f1-ced8-4c7c-8cb5-20fd7f5f0ed6" alt=""><figcaption></figcaption></figure>

2. **Reporting Manager Wise:**

<figure><img src="https://2103666731-files.gitbook.io/~/files/v0/b/gitbook-x-prod.appspot.com/o/spaces%2F-MJasmeOMeAJhTVh0M75%2Fuploads%2FWcCWzu19QBG7eMsNRK1B%2FReporting%20Manager.png?alt=media&amp;token=b3c4caac-3f2d-457a-954a-57ec3ebab6ca" alt=""><figcaption></figcaption></figure>

3. **Users Wise:**

<figure><img src="https://2103666731-files.gitbook.io/~/files/v0/b/gitbook-x-prod.appspot.com/o/spaces%2F-MJasmeOMeAJhTVh0M75%2Fuploads%2FMj62EiPISn82hjRVr2ov%2FUser%20Wise.png?alt=media&amp;token=8b6beb56-e7a0-4c1f-9a6f-fb7442ab5a8a" alt=""><figcaption></figcaption></figure>

### User Report View Option:

***

This option allows you to **customize the visibility** of specific columns on the dashboard for your analysis, downloading, or sharing.&#x20;

You can select or unselect particular columns based on the data you want to **focus** on in the report.&#x20;

This **flexibility** ensures that only the **relevant information** is displayed or shared, helping you tailor the report to **meet your specific needs**.&#x20;

By selecting columns according to your **requirements**, you can streamline your analysis and make data-driven decisions more efficiently.

<figure><img src="https://2103666731-files.gitbook.io/~/files/v0/b/gitbook-x-prod.appspot.com/o/spaces%2F-MJasmeOMeAJhTVh0M75%2Fuploads%2F0JlAtIETUjqWgwfIYQOH%2FUser%20View%20Report.png?alt=media&amp;token=91c91b1c-88a3-40cf-9011-8a1a6aaa5cca" alt=""><figcaption></figcaption></figure>


# User Activity Report

Comprehensive insights into the daily activities and productivity of agents

A user activity report provides a **comprehensive overview** of agents' daily activities and productivity.&#x20;

It offers **detailed insights** into key performance metrics, such as total productivity time, number of breaks taken, and active working hours.&#x20;

This report **helps monitor** individual and team efficiency by **highlighting trends** in work habits.&#x20;

It **enables** managers to assess how well agents **utilize** their time and **identify areas** for improvement.&#x20;

{% hint style="success" %}
Ultimately, it serves as a **valuable tool** for enhancing overall productivity and performance.
{% endhint %}

### To view the **User Activity Report,** follow these steps:

***

1. Go to the "**Reports**" option from the left-hand tab of your screen.

<figure><img src="https://2103666731-files.gitbook.io/~/files/v0/b/gitbook-x-prod.appspot.com/o/spaces%2F-MJasmeOMeAJhTVh0M75%2Fuploads%2FBuFa14ypZGSMs7Nn4J1w%2Fimage.png?alt=media&amp;token=1386cdbb-e80f-42d7-a944-585919a172c6" alt=""><figcaption></figcaption></figure>

2. A new window will appear, where you need to **click** on the second option from the top that is the "**User Activity Report**".&#x20;

<figure><img src="https://2103666731-files.gitbook.io/~/files/v0/b/gitbook-x-prod.appspot.com/o/spaces%2F-MJasmeOMeAJhTVh0M75%2Fuploads%2FWG1tHFcvhjlByee7jPWo%2FUser%20Activity%20Reports.png?alt=media&amp;token=cc65e19b-c70a-4780-9c02-44dd6cbfb52f" alt=""><figcaption></figcaption></figure>

3. Then another window will appear with the **complete activity and productivity** of each and every users.&#x20;

<figure><img src="https://2103666731-files.gitbook.io/~/files/v0/b/gitbook-x-prod.appspot.com/o/spaces%2F-MJasmeOMeAJhTVh0M75%2Fuploads%2FnATOb6Vw8BkVeui0dUVL%2FUser%20Activities%20Report.png?alt=media&amp;token=9518ecdd-8e12-4a0d-81ab-a9006a83fb91" alt=""><figcaption></figcaption></figure>

### The data can be further filtered in multiple ways for better analysis:

***

1. **Date Wise:**

<figure><img src="https://2103666731-files.gitbook.io/~/files/v0/b/gitbook-x-prod.appspot.com/o/spaces%2F-MJasmeOMeAJhTVh0M75%2Fuploads%2FRP8Nio0UhQpUoY2zewCg%2FDate%20wises.png?alt=media&amp;token=e66c70a7-5194-4e47-ad3e-516d18c2bf2e" alt=""><figcaption></figcaption></figure>

2. **Users Wise:**

<figure><img src="https://2103666731-files.gitbook.io/~/files/v0/b/gitbook-x-prod.appspot.com/o/spaces%2F-MJasmeOMeAJhTVh0M75%2Fuploads%2Fjj7xSbY9qLQ5wS8tJnsu%2FActivity.png?alt=media&amp;token=bcfe8b84-9e3f-461c-b4ac-faa00b405a05" alt=""><figcaption></figcaption></figure>

### User Activity Report Download or Share:

***

The data from the user activity report can also be **downloaded** for further analysis or record-keeping.&#x20;

It can be **shared** with others in **various formats**, such as Excel, PDF, JPG or CSV, making it convenient for collaboration and reporting.&#x20;

{% hint style="success" %}
This **flexibility** allows managers to **distribute insights** across teams or to higher management, facilitating informed decision-making.&#x20;
{% endhint %}

Additionally, it ensures that the **performance metrics** can be reviewed or audited as needed.

<figure><img src="https://2103666731-files.gitbook.io/~/files/v0/b/gitbook-x-prod.appspot.com/o/spaces%2F-MJasmeOMeAJhTVh0M75%2Fuploads%2FBomK2vYwKv2I78ioo2VH%2FDownnload%20Activities.png?alt=media&amp;token=b6ca1dcf-d687-4d70-be7b-5694c851e8ce" alt=""><figcaption></figcaption></figure>

### User Activity Report View Option:

***

This option allows you to **customize the visibility** of specific columns on the dashboard for your analysis, downloading, or sharing.&#x20;

You can select or unselect particular columns based on the data you want to **focus** on in the report.&#x20;

This **flexibility** ensures that only the **relevant information** is displayed or shared, helping you tailor the report to **meet your specific needs**.&#x20;

By selecting columns according to your **requirements**, you can streamline your analysis and make data-driven decisions more efficiently.

<figure><img src="https://2103666731-files.gitbook.io/~/files/v0/b/gitbook-x-prod.appspot.com/o/spaces%2F-MJasmeOMeAJhTVh0M75%2Fuploads%2Fr8x2vR1xgxBgqpnqmQEg%2FView%20Activity.png?alt=media&amp;token=b8c09040-1835-4c75-b695-8eab90a12411" alt=""><figcaption></figcaption></figure>


# Lead Disposition Report

In-depth analysis of how leads are being handled and disposed of by each agent in the organization

A **comprehensive analysis** is required to understand how each agent in the organization handles and processes leads.&#x20;

This **involves** examining how leads are managed, tracked, and followed up on by every individual, as well as **evaluating** whether they are being effectively converted or discarded.&#x20;

By **assessing** the methods used for lead handling and disposal, the organization can gain **insights** into how leads are distributed and worked on, **determining** whether agents are maximizing their potential or missing opportunities for conversion.&#x20;

{% hint style="success" %}
The **goal** is to ensure that all agents are aligned in their approach to lead management, **improving** overall efficiency and success rates.
{% endhint %}

### To view the **Lead Disposition Report,** follow these steps:

***

1. Go to the "**Reports**" option from the left-hand tab of your screen.

<figure><img src="https://2103666731-files.gitbook.io/~/files/v0/b/gitbook-x-prod.appspot.com/o/spaces%2F-MJasmeOMeAJhTVh0M75%2Fuploads%2FYe2LCn951v5w75XuexPh%2Fimage.png?alt=media&amp;token=15836aaf-7013-4b05-bf5b-bd6f46b3b301" alt=""><figcaption></figcaption></figure>

2. A new window will appear, where you need to **click** on the third option from the top that is the "**Lead Disposition Report**".&#x20;

<figure><img src="https://2103666731-files.gitbook.io/~/files/v0/b/gitbook-x-prod.appspot.com/o/spaces%2F-MJasmeOMeAJhTVh0M75%2Fuploads%2FJJv68l0EWKTkHyNCzjIW%2FLead%20Disposition%20Reports.png?alt=media&amp;token=33ffe894-3d7e-427a-a4a4-47e5db1db54b" alt=""><figcaption></figcaption></figure>

3. Then another window will appear with the **disposition details** of each and every users.

<figure><img src="https://2103666731-files.gitbook.io/~/files/v0/b/gitbook-x-prod.appspot.com/o/spaces%2F-MJasmeOMeAJhTVh0M75%2Fuploads%2FwNwk7LByl1n15QqhAe26%2FDisposition%20Report.png?alt=media&amp;token=a4e58098-9a10-43a0-9da3-422a9bba5772" alt=""><figcaption></figcaption></figure>

### The data can be further filtered in multiple ways for better analysis:

***

1. **Date Wise:**

<figure><img src="https://2103666731-files.gitbook.io/~/files/v0/b/gitbook-x-prod.appspot.com/o/spaces%2F-MJasmeOMeAJhTVh0M75%2Fuploads%2FxWEIBpu5SgQOyz86cBCu%2FUser%20lead.png?alt=media&amp;token=001e44f0-fccd-4501-9705-ce316f1ffbbd" alt=""><figcaption></figcaption></figure>

2. **Users Wise:**

<figure><img src="https://2103666731-files.gitbook.io/~/files/v0/b/gitbook-x-prod.appspot.com/o/spaces%2F-MJasmeOMeAJhTVh0M75%2Fuploads%2F4GJIVN9uyWcfLs10xYUo%2FUser%20reportsss.png?alt=media&amp;token=a071e36b-0ab6-423b-a734-a26360a31bf7" alt=""><figcaption></figcaption></figure>

### Lead Disposition Report Download or Share:

***

The data from the lead disposition report can also be **downloaded** for further analysis or record-keeping.&#x20;

It can be **shared** with others in **various formats**, such as Excel, PDF, JPG or CSV, making it convenient for collaboration and reporting.&#x20;

{% hint style="success" %}
This **flexibility** allows managers to **distribute insights** across teams or to higher management, facilitating informed decision-making.&#x20;
{% endhint %}

Additionally, it ensures that the **performance metrics** can be reviewed or audited as needed.

<figure><img src="https://2103666731-files.gitbook.io/~/files/v0/b/gitbook-x-prod.appspot.com/o/spaces%2F-MJasmeOMeAJhTVh0M75%2Fuploads%2FiFxzpWiK3fBKREwXjN2P%2FShare%20Reports.png?alt=media&amp;token=dba2bfe7-8a04-4904-8849-06f0d090ad26" alt=""><figcaption></figcaption></figure>

### Lead Disposition Report View Option:

***

This option allows you to **customize the visibility** of specific columns on the dashboard for your analysis, downloading, or sharing.&#x20;

You can select or unselect particular columns based on the data you want to **focus** on in the report.&#x20;

This **flexibility** ensures that only the **relevant information** is displayed or shared, helping you tailor the report to **meet your specific needs**.&#x20;

By selecting columns according to your **requirements**, you can streamline your analysis and make data-driven decisions more efficiently.

<figure><img src="https://2103666731-files.gitbook.io/~/files/v0/b/gitbook-x-prod.appspot.com/o/spaces%2F-MJasmeOMeAJhTVh0M75%2Fuploads%2FF6RkIT1Ox6AvwrOBSI8g%2FLead%20View.png?alt=media&amp;token=42a8f0fb-34f5-48e4-9200-1b006fc92ab9" alt=""><figcaption></figcaption></figure>


# Message Activity Report

Comprehensive analysis of the messaging activities directed towards leads through various communication channels like Whatsapp, email, and SMS

A **comprehensive analysis** of messaging activities aimed at leads across **different communication channels**, such as WhatsApp, email, and SMS, **focuses on** understanding how each platform performs **in terms of** engagement and conversion rates.&#x20;

It **evaluates** the frequency, timing, and content of messages to **determine** which strategies are most effective **in capturing** the attention of potential customers.&#x20;

This **analysis** also considers the preferences of different target audiences and how they **respond** to each type of communication.&#x20;

Furthermore, it **examines** any correlations between messaging techniques and lead generation or conversion outcomes.&#x20;

{% hint style="success" %}
Ultimately, the **insights** gathered help **optimize** communication strategies for higher lead engagement and sales.
{% endhint %}

### To view the **Message Activity Report,** follow these steps:

***

1. Go to the "**Reports**" option from the left-hand tab of your screen.

<figure><img src="https://2103666731-files.gitbook.io/~/files/v0/b/gitbook-x-prod.appspot.com/o/spaces%2F-MJasmeOMeAJhTVh0M75%2Fuploads%2FTtr9ixcTTd5IUnsWMf3K%2Fimage.png?alt=media&amp;token=1f094754-3438-4614-a6ff-a206259ef534" alt=""><figcaption></figcaption></figure>

2. A new window will appear, where you need to **click** on the fourth option from the top that is the "**Message Activity Report**".

<figure><img src="https://2103666731-files.gitbook.io/~/files/v0/b/gitbook-x-prod.appspot.com/o/spaces%2F-MJasmeOMeAJhTVh0M75%2Fuploads%2FFzh7PnAqEJTIIdtf2RSD%2FMessage%20Activity%20Reports.png?alt=media&amp;token=ecea3894-b73e-45fd-b1c4-b20a8b50873c" alt=""><figcaption></figcaption></figure>

3. Then another window will appear with the **message activity details** of each and every users.

<figure><img src="https://2103666731-files.gitbook.io/~/files/v0/b/gitbook-x-prod.appspot.com/o/spaces%2F-MJasmeOMeAJhTVh0M75%2Fuploads%2F5qAmr3R4fcmK87ulO3i3%2FMessage%20Activities%20Report.png?alt=media&amp;token=faf87f40-6cda-4601-b49a-a239406ef18d" alt=""><figcaption></figcaption></figure>

### The data can be further filtered in multiple ways for better analysis:

***

1. **Date Wise:**

<figure><img src="https://2103666731-files.gitbook.io/~/files/v0/b/gitbook-x-prod.appspot.com/o/spaces%2F-MJasmeOMeAJhTVh0M75%2Fuploads%2F0dOuCVTWyiY5FkaI5I4n%2FMessage%20Date%20view.png?alt=media&amp;token=220b1261-48fe-4990-915f-167e893e4e73" alt=""><figcaption></figcaption></figure>

2. **Users Wise:**

<figure><img src="https://2103666731-files.gitbook.io/~/files/v0/b/gitbook-x-prod.appspot.com/o/spaces%2F-MJasmeOMeAJhTVh0M75%2Fuploads%2Fh7vR53KG57jfNpy6LWhQ%2FMessage%20User%20View.png?alt=media&amp;token=b5f5c278-8ef8-4c14-aab4-d0f41a097e8d" alt=""><figcaption></figcaption></figure>

### Message Activity Report Download or Share:

***

The data from the message activity report can also be **downloaded** for further analysis or record-keeping.&#x20;

It can be **shared** with others in **various formats**, such as Excel, PDF, JPG or CSV, making it convenient for collaboration and reporting.&#x20;

{% hint style="success" %}
This **flexibility** allows managers to **distribute insights** across teams or to higher management, facilitating informed decision-making.&#x20;
{% endhint %}

Additionally, it ensures that the **performance metrics** can be reviewed or audited as needed.

<figure><img src="https://2103666731-files.gitbook.io/~/files/v0/b/gitbook-x-prod.appspot.com/o/spaces%2F-MJasmeOMeAJhTVh0M75%2Fuploads%2F9N1pMGrFU6jMQuUfNiGa%2FMessage%20Shares.png?alt=media&amp;token=1de52a32-e1ec-4ba9-9c6e-4489b29e7d8e" alt=""><figcaption></figcaption></figure>

### Message Activity Report View Option:

***

This option allows you to **customize the visibility** of specific columns on the dashboard for your analysis, downloading, or sharing.&#x20;

You can select or unselect particular columns based on the data you want to **focus** on in the report.&#x20;

This **flexibility** ensures that only the **relevant information** is displayed or shared, helping you tailor the report to **meet your specific needs**.&#x20;

By selecting columns according to your **requirements**, you can streamline your analysis and make data-driven decisions more efficiently.

<figure><img src="https://2103666731-files.gitbook.io/~/files/v0/b/gitbook-x-prod.appspot.com/o/spaces%2F-MJasmeOMeAJhTVh0M75%2Fuploads%2FCfrwuPVz1e8wEoJCKbAo%2FMessage%20Activity%20Reportss.png?alt=media&amp;token=33bc590c-3249-4fae-b4fa-869916374d5a" alt=""><figcaption></figcaption></figure>


# User Call Report

Details the number of calls made, the types of calls, and call durations, offering valuable insights for each agent

Each agent's performance can be **assessed** by analyzing the number of calls they made, the types of calls handled, and the duration of those calls.&#x20;

The total number of calls **reflects** their workload, while the call types (e.g., inbound, outbound, support, sales) **provide insights** into their expertise and focus areas.&#x20;

Call duration **offers** an indication of efficiency, with shorter calls potentially **signaling** faster resolution and longer ones **suggesting** complex issues.&#x20;

Comparing these **metrics** across agents can help **identify** strengths and areas for improvement.&#x20;

{% hint style="success" %}
This data helps **optimize** resource allocation and improve overall team performance.
{% endhint %}

### To view the **User Call Report,** follow these steps:

***

1. Go to the "**Reports**" option from the left-hand tab of your screen.

<figure><img src="https://2103666731-files.gitbook.io/~/files/v0/b/gitbook-x-prod.appspot.com/o/spaces%2F-MJasmeOMeAJhTVh0M75%2Fuploads%2FjhfT9nJeiGwZRr1CG0WP%2Fimage.png?alt=media&amp;token=94c2e8c2-eae4-4a32-bdf3-8ac5ac08ec6b" alt=""><figcaption></figcaption></figure>

2. A new window will appear, where you need to **click** on the fifth option from the top that is the "**User Call Report**".

<figure><img src="https://2103666731-files.gitbook.io/~/files/v0/b/gitbook-x-prod.appspot.com/o/spaces%2F-MJasmeOMeAJhTVh0M75%2Fuploads%2FZzm7xUTcwMRTQR1O5c6E%2FUser%20Call%20Reports.png?alt=media&amp;token=d61fd1db-4a99-4e68-b2df-72782f19f493" alt=""><figcaption></figcaption></figure>

3. Then another window will appear with the **complete call details** of each and every users.

<figure><img src="https://2103666731-files.gitbook.io/~/files/v0/b/gitbook-x-prod.appspot.com/o/spaces%2F-MJasmeOMeAJhTVh0M75%2Fuploads%2FXmsbjbCIr5oMUQ7JPjkM%2FUser%20Calls%20Report.png?alt=media&amp;token=73d3d479-dae2-4215-a763-7c15ce19a77b" alt=""><figcaption></figcaption></figure>

### The data can be further filtered in multiple ways for better analysis:

***

1. **Date Wise:**

<figure><img src="https://2103666731-files.gitbook.io/~/files/v0/b/gitbook-x-prod.appspot.com/o/spaces%2F-MJasmeOMeAJhTVh0M75%2Fuploads%2F0b1ne9Kg32NKgUOMPwuR%2FDate%20Wisess.png?alt=media&amp;token=25c477fe-0588-4193-ba06-159757e15ac7" alt=""><figcaption></figcaption></figure>

2. **Users Wise:**

<figure><img src="https://2103666731-files.gitbook.io/~/files/v0/b/gitbook-x-prod.appspot.com/o/spaces%2F-MJasmeOMeAJhTVh0M75%2Fuploads%2Fzz7lfAmtQTLiyF2OYSAJ%2FUser%20wises.png?alt=media&amp;token=cf886330-1705-4a67-b802-e8fd0fa9b213" alt=""><figcaption></figcaption></figure>

### User Call Report Download or Share:

***

The data from the user call report can also be **downloaded** for further analysis or record-keeping.&#x20;

It can be **shared** with others in **various formats**, such as Excel, PDF, JPG or CSV, making it convenient for collaboration and reporting.&#x20;

{% hint style="success" %}
This **flexibility** allows managers to **distribute insights** across teams or to higher management, facilitating informed decision-making.&#x20;
{% endhint %}

Additionally, it ensures that the **performance metrics** can be reviewed or audited as needed.

<figure><img src="https://2103666731-files.gitbook.io/~/files/v0/b/gitbook-x-prod.appspot.com/o/spaces%2F-MJasmeOMeAJhTVh0M75%2Fuploads%2F7EpWwLyYc8A6ZXulKQWl%2FUser%20Share.png?alt=media&amp;token=e9f04dac-1e7d-499f-8451-ad22b0586225" alt=""><figcaption></figcaption></figure>

### User Call Report View Option:

***

This option allows you to **customize the visibility** of specific columns on the dashboard for your analysis, downloading, or sharing.&#x20;

You can select or unselect particular columns based on the data you want to **focus** on in the report.&#x20;

This **flexibility** ensures that only the **relevant information** is displayed or shared, helping you tailor the report to **meet your specific needs**.&#x20;

By selecting columns according to your **requirements**, you can streamline your analysis and make data-driven decisions more efficiently.

<figure><img src="https://2103666731-files.gitbook.io/~/files/v0/b/gitbook-x-prod.appspot.com/o/spaces%2F-MJasmeOMeAJhTVh0M75%2Fuploads%2FCkElcrakqygSNIpFU9tg%2FUser%20Call%20Report%20View.png?alt=media&amp;token=6ea1fba7-cac2-4913-9dcf-932a3f63134f" alt=""><figcaption></figcaption></figure>


# Follow-Up Report

Details like due and missed follow-ups by the user are presented in this report

The report **highlights** key details such as due and missed follow-ups by the user.&#x20;

It **tracks** upcoming follow-ups, **helping users** stay organized and meet deadlines.&#x20;

Missed follow-ups are flagged, **offering insight** into potential gaps in task management.&#x20;

This data **allows** users to prioritize their workload more effectively and improve accountability.&#x20;

{% hint style="success" %}
By **monitoring** **these metrics**, users can enhance their productivity and prevent missed opportunities.
{% endhint %}

### To view the **Follow-Up Report,** follow these steps:

***

1. Go to the "**Reports**" option from the left-hand tab of your screen.

<figure><img src="https://2103666731-files.gitbook.io/~/files/v0/b/gitbook-x-prod.appspot.com/o/spaces%2F-MJasmeOMeAJhTVh0M75%2Fuploads%2F2VHRLiy0F4LNeuosgeOJ%2Fimage.png?alt=media&amp;token=57215716-9ed3-41ed-89e7-c2593e6d465b" alt=""><figcaption></figcaption></figure>

2. A new window will appear, where you need to **click** on the sixth option from the top that is the "**Follow-Up Report**".

<figure><img src="https://2103666731-files.gitbook.io/~/files/v0/b/gitbook-x-prod.appspot.com/o/spaces%2F-MJasmeOMeAJhTVh0M75%2Fuploads%2FyYQfwcAugmGNqcdmRnJn%2FFollow-up%20Report.png?alt=media&amp;token=ce31a11c-ee9d-4f4f-a01a-4d994014fbaa" alt=""><figcaption></figcaption></figure>

3. Then another window will appear with the **due and missed follow-ups** of each and every users.

<figure><img src="https://2103666731-files.gitbook.io/~/files/v0/b/gitbook-x-prod.appspot.com/o/spaces%2F-MJasmeOMeAJhTVh0M75%2Fuploads%2FXmcygWdpduI3dg54lQUl%2FFollow-up%20Reports.png?alt=media&amp;token=126e3197-4aa1-4c98-a92b-702e8f2b19e0" alt=""><figcaption></figcaption></figure>

### The data can be further filtered in multiple ways for better analysis:

***

1. **Users Wise:**

<figure><img src="https://2103666731-files.gitbook.io/~/files/v0/b/gitbook-x-prod.appspot.com/o/spaces%2F-MJasmeOMeAJhTVh0M75%2Fuploads%2FrAESWWCtbjNO4BF16GeT%2FFollow-ups%20Report.png?alt=media&amp;token=8c7b6ccb-d16a-4252-84a2-88b5e9f585e6" alt=""><figcaption></figcaption></figure>

2. **Managers Wise:**

<figure><img src="https://2103666731-files.gitbook.io/~/files/v0/b/gitbook-x-prod.appspot.com/o/spaces%2F-MJasmeOMeAJhTVh0M75%2Fuploads%2FTN7tsKyD5PToRJUqJ1f1%2FFollows-up%20Report.png?alt=media&amp;token=0a43906c-f113-4a07-ab95-0e6006546598" alt=""><figcaption></figcaption></figure>

### Follow-Up Report View Option:

***

This option allows you to **customize the visibility** of specific columns on the dashboard for your analysis.

You can select or unselect particular columns based on the data you want to **focus** on in the report.&#x20;

This **flexibility** ensures that only the **relevant information** is displayed or shared, helping you tailor the report to **meet your specific needs**.&#x20;

By selecting columns according to your **requirements**, you can streamline your analysis and make data-driven decisions more efficiently.

<figure><img src="https://2103666731-files.gitbook.io/~/files/v0/b/gitbook-x-prod.appspot.com/o/spaces%2F-MJasmeOMeAJhTVh0M75%2Fuploads%2FtKUYDVSwgXOMdJbRKpGB%2FFollow-up%20report%20view.png?alt=media&amp;token=32f8a617-10f0-4651-8fcb-89e09fd0a56b" alt=""><figcaption></figcaption></figure>


# Login Report

Details like hourly report analysis are presented in this report

This report **provides** a detailed hourly analysis of user activity within the organization.&#x20;

It **tracks** the engagement and performance of each user **across** various time frames.&#x20;

The data **highlights** usage patterns, productivity levels, and key performance indicators.&#x20;

It also **offers insights** into peak hours of activity and identifies any potential trends or areas for improvement.&#x20;

{% hint style="success" %}
Overall, the report serves as a **comprehensive tool** for understanding user behavior on an hourly basis.
{% endhint %}

### To view the Login **Report,** follow these steps:

***

1. Go to the "**Reports**" option from the left-hand tab of your screen.

<figure><img src="https://2103666731-files.gitbook.io/~/files/v0/b/gitbook-x-prod.appspot.com/o/spaces%2F-MJasmeOMeAJhTVh0M75%2Fuploads%2F9e9I5PKTUlmX0n4bxjyJ%2Fimage.png?alt=media&amp;token=7f6f7278-e311-4657-8288-314d5a39f34c" alt=""><figcaption></figcaption></figure>

2. A new window will appear, where you need to **click** on the seventh option from the top that is the **"Login Report**".

<figure><img src="https://2103666731-files.gitbook.io/~/files/v0/b/gitbook-x-prod.appspot.com/o/spaces%2F-MJasmeOMeAJhTVh0M75%2Fuploads%2FeqVItc8RivJrQEaAneQ7%2FLogin%20Report.png?alt=media&amp;token=195fef08-717c-4433-8bdf-e0ae5d1905f9" alt=""><figcaption></figcaption></figure>

3. Then another window will appear with the **hourly report analysis** of each and every users.

<figure><img src="https://2103666731-files.gitbook.io/~/files/v0/b/gitbook-x-prod.appspot.com/o/spaces%2F-MJasmeOMeAJhTVh0M75%2Fuploads%2FW2l5S5snkqEgLNVX1xdx%2FLogin%20Reports.png?alt=media&amp;token=b39fb601-8b73-4820-b2ab-83121c4440e0" alt=""><figcaption></figcaption></figure>

### The data can be further filtered in multiple ways for better analysis:

***

1. **Users Wise:**

<figure><img src="https://2103666731-files.gitbook.io/~/files/v0/b/gitbook-x-prod.appspot.com/o/spaces%2F-MJasmeOMeAJhTVh0M75%2Fuploads%2FkirApWvdBDywUoUCVy5P%2FHourly.png?alt=media&amp;token=174fb04c-d796-4e51-a8e9-63f458416768" alt=""><figcaption></figcaption></figure>

2. **Date Wise:**

<figure><img src="https://2103666731-files.gitbook.io/~/files/v0/b/gitbook-x-prod.appspot.com/o/spaces%2F-MJasmeOMeAJhTVh0M75%2Fuploads%2Fpym4xroY8cy0xJmuDlg0%2FHourly%20date.png?alt=media&amp;token=6526ee82-6b90-4773-9820-19825fabad9a" alt=""><figcaption></figcaption></figure>

### Login Report Download:

***

The data from the login report can also be **downloaded** for further analysis or record-keeping.&#x20;

{% hint style="success" %}
This **flexibility** allows managers to **distribute insights** across teams or to higher management, facilitating informed decision-making.&#x20;
{% endhint %}

Additionally, it ensures that the **performance metrics** can be reviewed or audited as needed.

<figure><img src="https://2103666731-files.gitbook.io/~/files/v0/b/gitbook-x-prod.appspot.com/o/spaces%2F-MJasmeOMeAJhTVh0M75%2Fuploads%2FVFFW1a87mjg8jpBzScqB%2FDownload.png?alt=media&amp;token=74213aca-0601-474c-bec9-f42fb56af1c2" alt=""><figcaption></figcaption></figure>


# Campaign Report

Details the number of calls made, the types of calls, and call durations offering valuable insights for each campaign

This report **outlines** the number of calls made for each campaign, **providing** a breakdown by volume.&#x20;

It **categorizes** the calls based on their types, such as inbound, outbound, or follow-up.&#x20;

Additionally, the report **includes** the duration of each call, helping to **analyze** efficiency and engagement levels.&#x20;

These details offer **valuable insights** into the performance and effectiveness of individual campaigns.&#x20;

{% hint style="success" %}
By assessing this data, organizations can **identify** trends and areas for improvement in call handling.
{% endhint %}

### To view the Campaign **Report,** follow these steps:

***

1. Go to the "**Reports**" option from the left-hand tab of your screen.

<figure><img src="https://2103666731-files.gitbook.io/~/files/v0/b/gitbook-x-prod.appspot.com/o/spaces%2F-MJasmeOMeAJhTVh0M75%2Fuploads%2FWCtlsRR1vAgEIOXjRCE3%2Fimage.png?alt=media&amp;token=9f22daa3-629d-4b27-832a-ef56b798b806" alt=""><figcaption></figcaption></figure>

2. A new window will appear, where you need to **click** on the eighth option from the top that is the **"Campaign Report**".

<figure><img src="https://2103666731-files.gitbook.io/~/files/v0/b/gitbook-x-prod.appspot.com/o/spaces%2F-MJasmeOMeAJhTVh0M75%2Fuploads%2FYRXWG0cmhpP2FoQMZAc1%2FCampaign%20Reportss.png?alt=media&amp;token=544bc2bf-3993-425c-8e49-fb37252c0327" alt=""><figcaption></figcaption></figure>

3. Then another window will appear with the **complete call details** of each and every campaigns.

<figure><img src="https://2103666731-files.gitbook.io/~/files/v0/b/gitbook-x-prod.appspot.com/o/spaces%2F-MJasmeOMeAJhTVh0M75%2Fuploads%2F6AorPxPWaR02sCGlbAB0%2FCampaign%20Reportsss.png?alt=media&amp;token=6ed4c7b3-cb9b-4d4e-afbd-427fc9c67784" alt=""><figcaption></figcaption></figure>

### The data can be further filtered in multiple ways for better analysis:

***

1. **Date Wise:**

<figure><img src="https://2103666731-files.gitbook.io/~/files/v0/b/gitbook-x-prod.appspot.com/o/spaces%2F-MJasmeOMeAJhTVh0M75%2Fuploads%2FhyxohvD2lH2ftv66gaTn%2Fdate%20Campaign.png?alt=media&amp;token=0f3b691c-829a-4cc0-bd38-caa8e981c331" alt=""><figcaption></figcaption></figure>

2. **Pipeline Wise:**

<figure><img src="https://2103666731-files.gitbook.io/~/files/v0/b/gitbook-x-prod.appspot.com/o/spaces%2F-MJasmeOMeAJhTVh0M75%2Fuploads%2FF4zUrNBkmBrfioSEi684%2FPipeline%20wise.png?alt=media&amp;token=e4b4b60b-42ad-4581-80fc-40ba6ed12310" alt=""><figcaption></figcaption></figure>

3. **Campaign Wise:**

<figure><img src="https://2103666731-files.gitbook.io/~/files/v0/b/gitbook-x-prod.appspot.com/o/spaces%2F-MJasmeOMeAJhTVh0M75%2Fuploads%2FIwSfPVhLUA4E4oBziDzr%2FCampaign%20Wise.png?alt=media&amp;token=980198d1-cd1a-48db-bd5f-5750f8cb1d70" alt=""><figcaption></figcaption></figure>

4. **Campaign Status Wise:**

<figure><img src="https://2103666731-files.gitbook.io/~/files/v0/b/gitbook-x-prod.appspot.com/o/spaces%2F-MJasmeOMeAJhTVh0M75%2Fuploads%2FCx7fpHZjvvqnNETwy8Lc%2FCampaign%20Status.png?alt=media&amp;token=c5bc87d0-54e8-4e98-92cb-28c2c2445f3e" alt=""><figcaption></figcaption></figure>

### Campaign Report Download or Share:

***

The data from the campaign report can also be **downloaded** for further analysis or record-keeping.&#x20;

It can be **shared** with others in **various formats**, such as Excel, PDF, JPG or CSV, making it convenient for collaboration and reporting.&#x20;

{% hint style="success" %}
This **flexibility** allows managers to **distribute insights** across teams or to higher management, facilitating informed decision-making.&#x20;
{% endhint %}

Additionally, it ensures that the **performance metrics** can be reviewed or audited as needed.

<figure><img src="https://2103666731-files.gitbook.io/~/files/v0/b/gitbook-x-prod.appspot.com/o/spaces%2F-MJasmeOMeAJhTVh0M75%2Fuploads%2FARIyXSQGKdrPTgEz8Frk%2FCampaign%20Share%20Report.png?alt=media&amp;token=9f42e6e2-d3fd-404c-997d-e83cf9740ced" alt=""><figcaption></figcaption></figure>

### Campaign Report View Option:

***

This option allows you to **customize the visibility** of specific columns on the dashboard for your analysis.

You can select or unselect particular columns based on the data you want to **focus** on in the report.&#x20;

This **flexibility** ensures that only the **relevant information** is displayed or shared, helping you tailor the report to **meet your specific needs**.&#x20;

By selecting columns according to your **requirements**, you can streamline your analysis and make data-driven decisions more efficiently.

<figure><img src="https://2103666731-files.gitbook.io/~/files/v0/b/gitbook-x-prod.appspot.com/o/spaces%2F-MJasmeOMeAJhTVh0M75%2Fuploads%2FLpwtjoFZqrrjMGivRs0K%2FCampaign%20Report%20View.png?alt=media&amp;token=6e2df1a6-81f4-4330-adca-8e010e2332ce" alt=""><figcaption></figcaption></figure>


# Campaign Lead Report

Details like how leads are moving through different statuses for each campaign are presented in this report

This report provides **insights** into the progression of leads across various statuses for each campaign.&#x20;

It **tracks** how leads advance from one stage to another, **highlighting trends** in movement.&#x20;

By **analyzing** this data, the report **reveals** which campaigns are most effective in converting leads.&#x20;

It also **identifies** potential bottlenecks where leads may be stalling.&#x20;

{% hint style="success" %}
Ultimately, the report helps in **optimizing campaign performance** by offering a clear picture of lead transitions.
{% endhint %}

### To view the Campaign **Lead Report,** follow these steps:

***

1. Go to the "**Reports**" option from the left-hand tab of your screen.

<figure><img src="https://2103666731-files.gitbook.io/~/files/v0/b/gitbook-x-prod.appspot.com/o/spaces%2F-MJasmeOMeAJhTVh0M75%2Fuploads%2FlWyEhjp9QGDd0OekPch8%2Fimage.png?alt=media&amp;token=56b3bf44-484f-4fbe-8cdc-89925761bad8" alt=""><figcaption></figcaption></figure>

2. A new window will appear, where you need to **click** on the second last option from the top that is the **"Campaign Lead Report**".

<figure><img src="https://2103666731-files.gitbook.io/~/files/v0/b/gitbook-x-prod.appspot.com/o/spaces%2F-MJasmeOMeAJhTVh0M75%2Fuploads%2FDzXg7pZA8OXMdN6dsn3t%2FCampaign%20Lead%20Report.png?alt=media&amp;token=5bdc691b-16d3-4fa5-b434-4c737c13d6cf" alt=""><figcaption></figcaption></figure>

3. Then another window will appear with the **complete lead status details** of each and every campaigns.

<figure><img src="https://2103666731-files.gitbook.io/~/files/v0/b/gitbook-x-prod.appspot.com/o/spaces%2F-MJasmeOMeAJhTVh0M75%2Fuploads%2FLOHvMtbAmmXOqi1JRusG%2FCampaign%20Lead%20Status.png?alt=media&amp;token=db6214bb-5388-4736-81fd-f80652ed94f5" alt=""><figcaption></figcaption></figure>

### The data can be further filtered for better analysis:

***

1. **Campaign Wise:**

<figure><img src="https://2103666731-files.gitbook.io/~/files/v0/b/gitbook-x-prod.appspot.com/o/spaces%2F-MJasmeOMeAJhTVh0M75%2Fuploads%2F6z6Wgj4mmSoV9TqUhcGh%2FCampaign%20Wise%20lead.png?alt=media&amp;token=15ba29bf-69c5-4348-9f04-7b31a7f866c2" alt=""><figcaption></figcaption></figure>

### Campaign Lead Report Download or Share:

***

The data from the campaign lead report can also be **downloaded** for further analysis or record-keeping.&#x20;

It can be **shared** with others in **various formats**, such as Excel, PDF, JPG or CSV, making it convenient for collaboration and reporting.&#x20;

{% hint style="success" %}
This **flexibility** allows managers to **distribute insights** across teams or to higher management, facilitating informed decision-making.&#x20;
{% endhint %}

Additionally, it ensures that the **performance metrics** can be reviewed or audited as needed.

<figure><img src="https://2103666731-files.gitbook.io/~/files/v0/b/gitbook-x-prod.appspot.com/o/spaces%2F-MJasmeOMeAJhTVh0M75%2Fuploads%2F567yjAM0gdvlXlRfZnzF%2FCampaign%20Lead%20Report%20Share.png?alt=media&amp;token=854dcc14-5f94-4cc4-bf19-6c81f10e2890" alt=""><figcaption></figcaption></figure>

### Campaign Lead Report View Option:

***

This option allows you to **customize the visibility** of specific columns on the dashboard for your analysis.

You can select or unselect particular columns based on the data you want to **focus** on in the report.&#x20;

This **flexibility** ensures that only the **relevant information** is displayed or shared, helping you tailor the report to **meet your specific needs**.&#x20;

By selecting columns according to your **requirements**, you can streamline your analysis and make data-driven decisions more efficiently.

<figure><img src="https://2103666731-files.gitbook.io/~/files/v0/b/gitbook-x-prod.appspot.com/o/spaces%2F-MJasmeOMeAJhTVh0M75%2Fuploads%2F2ugNh8X4IJtoRX9m6db8%2FCampaign%20Lead%20Report%20View.png?alt=media&amp;token=c82be5fd-ff9e-4e5c-aefc-656cbb3448ba" alt=""><figcaption></figcaption></figure>


# Campaign Stage Report

Stage wise count and details of leads for each campaign is presented in this report

This report **presents** a breakdown of leads by stage for each campaign.&#x20;

It **shows** the number of leads at each stage, **offering** a detailed view of their distribution.&#x20;

The report **highlights** how leads are progressing through different stages within each campaign.&#x20;

By examining this data, you can **identify patterns** in lead movement and assess campaign effectiveness.&#x20;

{% hint style="success" %}
The **stage-wise analysis** helps in understanding where leads are concentrated or may require more attention.
{% endhint %}

### To view the Campaign **Stage Report,** follow these steps:

***

1. Go to the "**Reports**" option from the left-hand tab of your screen.

<figure><img src="https://2103666731-files.gitbook.io/~/files/v0/b/gitbook-x-prod.appspot.com/o/spaces%2F-MJasmeOMeAJhTVh0M75%2Fuploads%2FjRnI24dzuWgwJPRu42iv%2Fimage.png?alt=media&amp;token=fcfa4624-e405-448b-a58a-049f2a460bab" alt=""><figcaption></figcaption></figure>

2. A new window will appear, where you need to **click** on the last option from the top that is the **"Campaign Stage Report**".

<figure><img src="https://2103666731-files.gitbook.io/~/files/v0/b/gitbook-x-prod.appspot.com/o/spaces%2F-MJasmeOMeAJhTVh0M75%2Fuploads%2F4e82MGaDiaW6VF2t5A0j%2FCampaign%20Stage%20Reports.png?alt=media&amp;token=189c888d-ebcd-4bed-8470-7a6117d5f3e4" alt=""><figcaption></figcaption></figure>

3. Then another window will appear with the **complete stage wise details of leads** of each and every campaigns.

<figure><img src="https://2103666731-files.gitbook.io/~/files/v0/b/gitbook-x-prod.appspot.com/o/spaces%2F-MJasmeOMeAJhTVh0M75%2Fuploads%2FEysmMSE771riATMejmf2%2FCampaign%20Stage%20Reportss.png?alt=media&amp;token=b1947de4-8e38-4060-9038-be1f1ab8debd" alt=""><figcaption></figcaption></figure>

### The data can be further filtered for better analysis:

***

1. **Pipeline Wise:**

<figure><img src="https://2103666731-files.gitbook.io/~/files/v0/b/gitbook-x-prod.appspot.com/o/spaces%2F-MJasmeOMeAJhTVh0M75%2Fuploads%2FZJr2a3PSt8gRIiXdYeUj%2FPipeline.png?alt=media&amp;token=fd5a8bb3-6a76-446b-8d58-4e8ec9ea0fc0" alt=""><figcaption></figcaption></figure>

2. **Campaign Wise:**

<figure><img src="https://2103666731-files.gitbook.io/~/files/v0/b/gitbook-x-prod.appspot.com/o/spaces%2F-MJasmeOMeAJhTVh0M75%2Fuploads%2FjmHyANfX0CsY8GtyjXk6%2FCampaign%20Wise%20stage%20report.png?alt=media&amp;token=3d8ecccf-378a-4e80-8f68-1634617d06e3" alt=""><figcaption></figcaption></figure>

### Campaign Stage Report View Option:

***

This option allows you to **customize the visibility** of specific columns on the dashboard for your analysis.

You can select or unselect particular columns based on the data you want to **focus** on in the report.&#x20;

This **flexibility** ensures that only the **relevant information** is displayed or shared, helping you tailor the report to **meet your specific needs**.&#x20;

By selecting columns according to your **requirements**, you can streamline your analysis and make data-driven decisions more efficiently.

<figure><img src="https://2103666731-files.gitbook.io/~/files/v0/b/gitbook-x-prod.appspot.com/o/spaces%2F-MJasmeOMeAJhTVh0M75%2Fuploads%2FCEDFCmp4lZhvn2XN2Qk8%2FCampaign%20Stage%20View.png?alt=media&amp;token=5cf00753-166e-4201-9e82-66921b4bd310" alt=""><figcaption></figcaption></figure>


# FAQs

Here are some FAQs on the reports section of NeoDove.

1. **What types of reports are available in NeoDove?**
   * NeoDove offers various types of reports, including user call reports, user login reports, pending follow-up reports, campaign progress reports, lead summary reports, log reports and many more. Each report provides insights into different aspects of your sales and marketing activities.
2. **How do I access reports in NeoDove?**
   * To access reports in NeoDove, navigate to the "Reports" section from the dashboard menu. From there, you can select the type of report you want to view and customize the parameters to generate specific insights.
3. **Can I customize reports to fit my specific requirements?**
   * Yes, NeoDove allows you to customize reports by adjusting parameters such as date range, user activity, campaign filters, and more. You can tailor reports to focus on specific metrics or performance indicators relevant to your business goals.
4. **What insights can I gain from call reports?**
   * Call reports in NeoDove provide insights into call activity, including the number of calls made, duration of calls, call outcomes and caller details. These insights help you track calling performance and identify areas for improvement.
5. **How do lead reports help in tracking lead progress?**
   * Lead reports in NeoDove track the progress of leads through the sales pipeline, including lead sources, stages, conversion rates, and follow-up activities. By analyzing lead reports, you can identify trends, prioritize leads, and optimize your sales strategies.
6. **What metrics are included in user activity reports?**
   * User activity reports in NeoDove track the performance of individual users or agents, including call activity, lead interactions, follow-up tasks, and overall productivity. These reports help managers assess user performance, identify top performers, and provide targeted coaching or support.
7. **Can I export reports from NeoDove for further analysis?**
   * Yes, NeoDove allows you to export reports in CSV format for further analysis or sharing with stakeholders. Exported reports can be used for deeper insights, presentations, or documentation purposes.

{% hint style="success" %}
**Note:** These **FAQs** should help you understand the **capabilities** and **benefits** of the reports section in NeoDove. If you have any specific questions or need further assistance, feel free to reach out to our **support team**.
{% endhint %}


# Trends

Let us have clarity towards Trends.

{% embed url="<https://youtu.be/8hT5KR7AQq0>" %}

{% hint style="success" %}
"**Trends**" in NeoDove refer to **graphical representations** of various reports, enabling admin to visualize data trends over time.&#x20;
{% endhint %}

These trends **help** admin or managers understand patterns and changes in their data, aiding in informed **decision-making**.

## Lets understand the benefits of Trends:

***

1. **Identify Patterns:** Trends enable admin or managers to recognize recurring patterns or fluctuations in data, providing insights into customer behavior, lead conversions, and campaign performance.
2. **Monitor Performance:** By tracking trends, admin or managers can monitor the performance of their sales activities, marketing campaigns, and lead engagement over time. This allows for timely adjustments and optimizations to improve overall performance.
3. **Make Informed Decisions:** Visualizing data trends facilitates data-driven decision-making by providing a clear understanding of past performance and predicting future outcomes. This enables admin or managers to make informed decisions about sales strategies, resource allocation, and campaign adjustments.
4. **Track Progress:** Trends help admin or managers track progress towards their goals and objectives by visualizing changes in key metrics over time. This allows for the assessment of progress and the identification of areas for improvement.

Overall, trends play a vital role in **enhancing** data analysis, **facilitating** performance monitoring, and **supporting** strategic decision-making within the **NeoDove platform**.

### Steps:

1. **Log in** to your NeoDove account ([ https://connect.neodove.com/](https://app.neodove.com/) )
2. Go to the **Trends section**, from the left-hand tab on your screen.&#x20;

<figure><img src="https://2103666731-files.gitbook.io/~/files/v0/b/gitbook-x-prod.appspot.com/o/spaces%2F-MJasmeOMeAJhTVh0M75%2Fuploads%2FGT2AqQoJ3zXncTdzWkam%2FTrends.png?alt=media&amp;token=0b744dd7-19fb-42a6-8951-c2dd1472f7b2" alt=""><figcaption></figcaption></figure>

3. Once clicked, it will redirect us to a new window where the complete **graphical representation** of reports would be visible.
4. There are **2 categories** of trends available&#x20;

<figure><img src="https://2103666731-files.gitbook.io/~/files/v0/b/gitbook-x-prod.appspot.com/o/spaces%2F-MJasmeOMeAJhTVh0M75%2Fuploads%2FRxWUPMnU7BFpAhCujkF6%2FTrends_options.png?alt=media&amp;token=3684d735-2a0b-475a-bba1-0290cd34067d" alt=""><figcaption></figcaption></figure>

### Business Trends

There are **multiple pre-developed charts** available within the Trends section:

* Call Attempted V/s Call Connected
* Total Call Duration
* Total leads closed vs Total leads converted
* Leads Added
* Lead Sources
* Lost Leads

### **User Trends**

There are **multiple pre-developed charts** available within the Trends section:

* Call Attempted V/s Call Connected
* Total leads closed vs Total leads converted
* Total Call Duration
* Average Break Time per Day
* Average Number of Breaks per Day
* Lost Leads

5. Add widgets to trends page for quick insights and analytics

Widgets help you gain quick insights on your business and user performance. There are 4 pre-selected widgets on each dashboard visible.&#x20;

<figure><img src="https://2103666731-files.gitbook.io/~/files/v0/b/gitbook-x-prod.appspot.com/o/spaces%2F-MJasmeOMeAJhTVh0M75%2Fuploads%2FZqUJ4stUjLdSCmbPgQf8%2FTrendss.png?alt=media&amp;token=100558fa-f8cb-470d-9da3-c3af1b8045eb" alt=""><figcaption></figcaption></figure>

5. There are **filter options** at the top of the screen along with **beside** every charts as well to get the **filtered graphical representation** as per our preference.&#x20;

<figure><img src="https://2103666731-files.gitbook.io/~/files/v0/b/gitbook-x-prod.appspot.com/o/spaces%2F-MJasmeOMeAJhTVh0M75%2Fuploads%2FMmbSZjp9jIcHUQHOXPYa%2FTrends%20Filter.png?alt=media&amp;token=79efe95d-8d33-47a8-8461-894d4def893d" alt=""><figcaption></figcaption></figure>

{% hint style="success" %}
**Note:**  At a time, only 4 charts and 4 widgets can be **populated** in the dashboard so in order to check other graphs or widgets we need to go to the **"Graph & Widget"** filter option from the top of the screen and then need to select that **specific 4 graphs or widgets** which we want a visualization on.
{% endhint %}

<figure><img src="https://2103666731-files.gitbook.io/~/files/v0/b/gitbook-x-prod.appspot.com/o/spaces%2F-MJasmeOMeAJhTVh0M75%2Fuploads%2FDdpQZTQwpBt1o3gQ69Ob%2FGraphs.png?alt=media&amp;token=8bd58842-7837-469f-97b1-1255e88806df" alt=""><figcaption></figcaption></figure>

There is another unique option called "**Request Graph**" which will allow you to put your **request** or **suggestion** regarding any new graph whatever might be useful or crucial for your business perspectives.

Accordingly, our **NeoDove Product Team** will analyze and understand the **crux** of the requirement and then accordingly will do a **meeting** with you.&#x20;

Then, accordingly we will start working on the same request if it seems like a **great feature addition** in our Product for future run.&#x20;

<figure><img src="https://2103666731-files.gitbook.io/~/files/v0/b/gitbook-x-prod.appspot.com/o/spaces%2F-MJasmeOMeAJhTVh0M75%2Fuploads%2FebLI7Ke5d3aT5XKDqRns%2FRequest%20Graph.png?alt=media&amp;token=c275c5c4-2ef3-4d17-8109-366f9f2cb0fb" alt=""><figcaption></figcaption></figure>


# Integrations

Integrate NeoDove with third-party applications to automate the sales process

## What is Integration?

***

Integration refers to the act of **linking** a SaaS platform with other software services or platforms. This **facilitates** the sharing of data and automation of workflows.&#x20;

Integration is particularly important for **cloud-based software solutions** accessed via the internet, as it **enhances** their functionality and **expands** their usefulness.

### **Few functionalities of integration are as follows :-**

***

1. **Data Sharing :-**\
   Integration enables the **seamless sharing** of data between different online platforms and applications. **For instance**, you can transfer lead data from NeoDove to your server or another platform to **update details**, or vice versa. This facilitates efficient data management and synchronization across various systems.
2. **Functionality Exchange :-**\
   Integration grants access to the **functionality** of other platforms using the resources of your application. **For example**, you can automate WhatsApp or email templates for leads in NeoDove by integrating your WhatsApp or email marketing tools. This **streamlines** communication and enhances efficiency in lead management.
3. **Workflow Automation :-**\
   Integration enables workflow automation to boost productivity. **For instance**, you can automate lead transfers to internal teams based on **lead status** in NeoDove. This **streamlines** operations and ensures efficient lead management.&#x20;
4. **Real-Time Updates :-**\
   Integrations **facilitate** real-time update notifications and reporting through **collaborative tools**. This enhances communication and ensures timely insights for **informed decision-making**.
5. **Third Party Integrations :-** \
   Integration empowers businesses to **streamline** their processes by connecting third-party applications. **For instance**, in the real estate industry, integrating platforms allows **seamless** transfer of leads from real estate portals to NeoDove Telecalling CRM in real-time, **enhancing** efficiency and effectiveness.

### Integration in NeoDove&#x20;

***

NeoDove's partnerships and integrations with various third-party platforms **facilitate** the seamless acquisition of leads from diverse sources across industries.&#x20;

Once these **integrations** are set up, leads from these sources are **automatically** added to NeoDove campaigns and assigned to your team.&#x20;

This ensures that NeoDove **operates** smoothly, almost autonomously, **eliminating** the need for manual lead uploads and enabling agents to focus on **productive tasks**.

&#x20;                                                                                                                                                       &#x20;

### How to go to the Integration Page on NeoDove Panel?

***

1. **Log in** to your NeoDove account ([ https://connect.neodove.com/](https://app.neodove.com/) )
2. Go to the "**Integrations"** option, from the left-hand tab on your screen.&#x20;

<figure><img src="https://2103666731-files.gitbook.io/~/files/v0/b/gitbook-x-prod.appspot.com/o/spaces%2F-MJasmeOMeAJhTVh0M75%2Fuploads%2FnoINXfuWnrCEe8lOZwUt%2FIntegration.png?alt=media&amp;token=ab2db7c7-1db2-4039-975c-2d81a323c108" alt=""><figcaption></figcaption></figure>

### How can you see and manage your active integrations?

***

1. **Log in** to your NeoDove account ([ https://connect.neodove.com/](https://app.neodove.com/) )
2. Go to the "**Integrations"** option, from the left-hand tab on your screen.&#x20;

<figure><img src="https://2103666731-files.gitbook.io/~/files/v0/b/gitbook-x-prod.appspot.com/o/spaces%2F-MJasmeOMeAJhTVh0M75%2Fuploads%2FnoINXfuWnrCEe8lOZwUt%2FIntegration.png?alt=media&amp;token=ab2db7c7-1db2-4039-975c-2d81a323c108" alt=""><figcaption></figcaption></figure>

3. Click on the "**View Active Integration**" button on the top right corner of the screen.

<figure><img src="https://2103666731-files.gitbook.io/~/files/v0/b/gitbook-x-prod.appspot.com/o/spaces%2F-MJasmeOMeAJhTVh0M75%2Fuploads%2FcbnPah01m5ZrdhBGewPm%2FView%20Integration.png?alt=media&amp;token=e56488c8-8033-495e-ad11-6e4d5612fefc" alt=""><figcaption></figcaption></figure>

4. Once clicked, you will **redirect** to a new window where you can **view** and **manage** your active integrations, and if required also delete, applying conditions.

<figure><img src="https://2103666731-files.gitbook.io/~/files/v0/b/gitbook-x-prod.appspot.com/o/spaces%2F-MJasmeOMeAJhTVh0M75%2Fuploads%2FFrjLhizchu4op6Flyf3f%2FActive%20Integrations.png?alt=media&amp;token=9de5427a-2b48-4afc-adcc-8d78ccfc0841" alt=""><figcaption></figcaption></figure>

5. Post that, you can come back to the **previous page** where you will be able to access another option that is the "**View Logs**" option.

<figure><img src="https://2103666731-files.gitbook.io/~/files/v0/b/gitbook-x-prod.appspot.com/o/spaces%2F-MJasmeOMeAJhTVh0M75%2Fuploads%2FbG25gaErw9wS03vzVksW%2FView%20Logs.png?alt=media&amp;token=607add4a-5a90-4c21-8518-f14f44196f52" alt=""><figcaption></figcaption></figure>

6. Enhanced logging now provides **detailed records** of lead creation, merging, and failures in file uploads and Google Sheet syncs, **improving** visibility and traceability.

<figure><img src="https://2103666731-files.gitbook.io/~/files/v0/b/gitbook-x-prod.appspot.com/o/spaces%2F-MJasmeOMeAJhTVh0M75%2Fuploads%2FtcWM0j5yPKAI05fdflse%2FView%20log.png?alt=media&amp;token=5d11d492-729d-4ffd-ae34-0efcf179c49a" alt=""><figcaption></figcaption></figure>

7. The Logs can further be filtered through **Campaign Wise**.&#x20;

<figure><img src="https://2103666731-files.gitbook.io/~/files/v0/b/gitbook-x-prod.appspot.com/o/spaces%2F-MJasmeOMeAJhTVh0M75%2Fuploads%2FqrgRzyFgDZauD6iEKo6l%2FCampaign%20Filter.png?alt=media&amp;token=fcd7cfdd-9397-4204-99c4-c66a444ea0cd" alt=""><figcaption></figcaption></figure>

8. Along with that, the logs can also be filtered through **Source Wise** as well.

<figure><img src="https://2103666731-files.gitbook.io/~/files/v0/b/gitbook-x-prod.appspot.com/o/spaces%2F-MJasmeOMeAJhTVh0M75%2Fuploads%2F1bxXS5aN7zESHakwv7zx%2FSource%20Filter.png?alt=media&amp;token=772a9cb7-c7d4-40d0-823d-c7ee5070dbb0" alt=""><figcaption></figcaption></figure>

9. After filtering; when the **exact data** will be visible, then at the extreme right hand side of any of the particular upload there is a "**View**" button which gives a complete visibility on a **lead level** whether it got created, merged or failed.

<figure><img src="https://2103666731-files.gitbook.io/~/files/v0/b/gitbook-x-prod.appspot.com/o/spaces%2F-MJasmeOMeAJhTVh0M75%2Fuploads%2FxtbxhaW6khwaO3se7WZf%2FLogs%20View.png?alt=media&amp;token=07c4581e-794e-4c40-b2bb-a2ed4fd0818a" alt=""><figcaption></figcaption></figure>

10. The **lead level visibility** for a particular upload can be filtered through **different status**.

<figure><img src="https://2103666731-files.gitbook.io/~/files/v0/b/gitbook-x-prod.appspot.com/o/spaces%2F-MJasmeOMeAJhTVh0M75%2Fuploads%2FesTDcIgfFTsYVPw9XZMf%2FLogs%20Status.png?alt=media&amp;token=6021216b-03ea-431c-9ccb-2efa5ee30c62" alt=""><figcaption></figcaption></figure>

{% hint style="success" %}
**Note:** The Logs are being maintained for a **maximum tenure** of last 30 days only.
{% endhint %}


# Google Sheets Integration

Learn how to integrate your NeoDove account with Google Sheets

## Introduction

***

In NeoDove, you have the option to **integrate** your Google Sheet, **streamlining** the process of importing data.&#x20;

By linking your sheet, you can easily **sync** new data directly into your NeoDove campaign with a single click, **eliminating** the need for manual uploads.

{% embed url="<https://youtu.be/Bbz3BJPVcpI?si=-4Pvgg8VtmcBwwmX>" %}

&#x20;                                                                                                                                                                                                                      &#x20;


# Steps to integrate Google Sheets

Integrate your Sheets in just 2 minutes

## Steps:

***

1. **Log in** to your NeoDove account (<https://connect.neodove.com/login>)  &#x20;
2. &#x20;Go to the **Integrations** section, present on the left side-bar of your **screen**.

<figure><img src="https://2103666731-files.gitbook.io/~/files/v0/b/gitbook-x-prod.appspot.com/o/spaces%2F-MJasmeOMeAJhTVh0M75%2Fuploads%2FnoINXfuWnrCEe8lOZwUt%2FIntegration.png?alt=media&amp;token=ab2db7c7-1db2-4039-975c-2d81a323c108" alt=""><figcaption></figcaption></figure>

3. Once clicked, then click on the “**Google Sheet**” integration.

<figure><img src="https://2103666731-files.gitbook.io/~/files/v0/b/gitbook-x-prod.appspot.com/o/spaces%2F-MJasmeOMeAJhTVh0M75%2Fuploads%2Fu91CpW3rdcTYc1CC2XDh%2FGoogle%20Sheet.png?alt=media&amp;token=37377358-b7ff-4152-b083-d5252abf6933" alt=""><figcaption></figcaption></figure>

4. Then a **pop-up** will appear where you need to add the **URL** of your Google Sheet.

<figure><img src="https://2103666731-files.gitbook.io/~/files/v0/b/gitbook-x-prod.appspot.com/o/spaces%2F-MJasmeOMeAJhTVh0M75%2Fuploads%2FYIa7cnl94F4VXMLplRz9%2FGoogle%20Sheets.png?alt=media&amp;token=85bd545f-9cf4-44a4-a16c-13766bb63da4" alt=""><figcaption></figcaption></figure>

* **Where can you find the Google Sheet link?**

<figure><img src="https://2103666731-files.gitbook.io/~/files/v0/b/gitbook-x-prod.appspot.com/o/spaces%2F-MJasmeOMeAJhTVh0M75%2Fuploads%2FWF4Osk1RPuiTjYcJXVmD%2FG-Sheets.png?alt=media&amp;token=0fe192d3-fa9e-4129-8e42-225f76eada1f" alt=""><figcaption></figcaption></figure>

* Now paste the same link on **NeoDove** and then need to click on the "**Upload Google Sheet**" option.

<figure><img src="https://2103666731-files.gitbook.io/~/files/v0/b/gitbook-x-prod.appspot.com/o/spaces%2F-MJasmeOMeAJhTVh0M75%2Fuploads%2FHRPLetQQMUJnaT5EzDJ5%2FG-Sheet%20Link.png?alt=media&amp;token=969c6e8d-5e1b-4b11-bd8d-259ccd22ba2a" alt=""><figcaption></figcaption></figure>

5. Add the Google Account and link it with your NeoDove Account.

<figure><img src="https://2103666731-files.gitbook.io/~/files/v0/b/gitbook-x-prod.appspot.com/o/spaces%2F-MJasmeOMeAJhTVh0M75%2Fuploads%2FT1V4DRB4yW1Un2FX21xM%2FG-Sheet%20Id.png?alt=media&amp;token=47750f4a-3a34-40ba-ac83-fc5ce7b42dde" alt=""><figcaption></figcaption></figure>

6. Allow the **necessary permission** to NeoDove to link your account.

<figure><img src="https://2103666731-files.gitbook.io/~/files/v0/b/gitbook-x-prod.appspot.com/o/spaces%2F-MJasmeOMeAJhTVh0M75%2Fuploads%2FM4ckHJJVzxY3Y5lfKasK%2FG-Sheet%20Allow.png?alt=media&amp;token=8cb3c9a1-5ce7-4cec-a209-37121de7e26a" alt=""><figcaption></figcaption></figure>

7. Now after linking your Google Account, you have to **Select a campaign** in NeoDove for your Data.

* If you want to add all the leads into a **New Campaign**, then select the 1st option and set a campaign.
* If you have **already a campaign** for Google Sheet data, then select the second option and select your **existing campaign** from the dropdown.

<figure><img src="https://2103666731-files.gitbook.io/~/files/v0/b/gitbook-x-prod.appspot.com/o/spaces%2F-MJasmeOMeAJhTVh0M75%2Fuploads%2FnMjB5UYzneUZWE0EqFUX%2FUpload%20G-Sheet.png?alt=media&amp;token=ef0aec01-1322-406e-8709-64f95f48c0b6" alt=""><figcaption></figcaption></figure>

8. Then, map the **necessary fields of Google Sheet here in NeoDove**.

<figure><img src="https://2103666731-files.gitbook.io/~/files/v0/b/gitbook-x-prod.appspot.com/o/spaces%2F-MJasmeOMeAJhTVh0M75%2Fuploads%2FyTlApfDZYhPoM6SNmQzF%2FG-Sheet%20mapping.png?alt=media&amp;token=e15df518-ad2f-429b-a63d-a7feab346759" alt=""><figcaption></figcaption></figure>

* You have to **match** the fields against the same fields from the dropdown. Under dropdown you will get all the **options** of the fields you have in your Google Sheet as **columns**.
* You need to **map** “Contact Name” & “Contact Number”. All **other details** you have in your Google Sheet can be created with the lead **without mapping**.
* Then click on "**Submit**" and your leads will be uploaded into the campaign and **integration** is completed.

### How to get the new leads Synced of the integrated Sheet in NeoDove?

***

* **Just One Click:**  Go to the Integration Page of NeoDove and there you will see the **same added Integration** of your Google Sheet.&#x20;
* Go to the **Action button** (Three Dots) and client on **Sync.**

<figure><img src="https://2103666731-files.gitbook.io/~/files/v0/b/gitbook-x-prod.appspot.com/o/spaces%2F-MJasmeOMeAJhTVh0M75%2Fuploads%2FJiPl4PZbH1mmrQEPcgO2%2FSync%20G-Sheet.png?alt=media&amp;token=f47f1627-6e8e-4ee7-b232-4e5be32ccddc" alt=""><figcaption></figcaption></figure>

* **Your new leads will be synced into NeoDove.**


# Do’s and Don'ts of Google Sheet Integration.

Lets understand the dos and don'ts of Google Sheet Integration

### Don'ts :-&#x20;

***

1. Keep your Sheet in **normal Google Sheet format** and NOT in .XLS format.

<figure><img src="https://2103666731-files.gitbook.io/~/files/v0/b/gitbook-x-prod.appspot.com/o/spaces%2F-MJasmeOMeAJhTVh0M75%2Fuploads%2FNjulNtgonlkC1VUh9b0e%2FGoogle%20Sheet%209.png?alt=media&amp;token=b4103eff-cbdc-4b89-86da-743e69c7c433" alt="" width="563"><figcaption></figcaption></figure>

2. Don’t **apply** any formula on the headers or on the sheet where data is coming on the basis of the **formula**. Keep the sheet **clean**.
3. Keep the contact number in a **proper number format**. In one cell, keep only **one number** and not multiple numbers separated by commas.
4. **Avoid** giving gaps/blank cells in the **contact number column**, those leads will not be created.

<figure><img src="https://2103666731-files.gitbook.io/~/files/v0/b/gitbook-x-prod.appspot.com/o/spaces%2F-MJasmeOMeAJhTVh0M75%2Fuploads%2FhE1sEcQuh4BaAyzbWS71%2FGoogle%20Sheet%2010.png?alt=media&amp;token=a6cee241-7bcb-459b-8d4c-557666cfb8dc" alt="" width="563"><figcaption></figcaption></figure>

5. Don’t keep any **Header** of the column **blank** where you have the **data**, in any tab of that sheet.
6. Avoid **deleting** any integrated rows of the sheet because neodove reads the rows of the google sheet at the time of **syncing** the data. Every time you sync **NeoDove reads** the row after the **last synced row** of the Sheet.&#x20;

### Do’s :-&#x20;

***

1. Keep your sheet in the **normal sheet format**.
2. Make sure that you have **access** to the particular sheet you want to **upload**.
3. Make sure that you have a **Phone number column** in your data because in NeoDove, without a number **lead** will not be created.
4. Make sure the contact number is in **normal number format**.


# Common Scenarios for errors in Google Sheet Integration

Lets understand the common scenarios for errors

### **Scenario 1:** &#x20;

***

When the Error message is **“Row Header is not filled”.**

<figure><img src="https://2103666731-files.gitbook.io/~/files/v0/b/gitbook-x-prod.appspot.com/o/spaces%2F-MJasmeOMeAJhTVh0M75%2Fuploads%2FKUQGw0QZ7JIXRgwjBQWv%2FGoogle%20Sheet%20Sc%201A.png?alt=media&amp;token=a9ff5ed4-31b9-4b7f-893e-62769924cf6c" alt="" width="563"><figcaption><p>Error message on Integration Page</p></figcaption></figure>

{% hint style="success" %}
**Answer :-**&#x20;

1. This issue comes when the Header of the columns is not filled.
2. This issue comes when the data is there but the header is not there on the 1st row irrespective of the Tabs of that sheet.&#x20;
   {% endhint %}

**For Example -**

<figure><img src="https://2103666731-files.gitbook.io/~/files/v0/b/gitbook-x-prod.appspot.com/o/spaces%2F-MJasmeOMeAJhTVh0M75%2Fuploads%2F9ky1Krk2qVoK2KP8E5ep%2FGoogle%20Sheet%20Sc%201B.png?alt=media&amp;token=7f0876bf-0893-48eb-81ba-aa56da220faa" alt="" width="563"><figcaption><p>Here Headers are blank.</p></figcaption></figure>

In this sheet **headers** which is the first row is **blank**. Also if your sheet has multiple tabs and any of them has **empty header** it will show the **same error**.

### **Scenario 2:**&#x20;

***

When the error is **“The Google-Server encountered an error”.**

<figure><img src="https://2103666731-files.gitbook.io/~/files/v0/b/gitbook-x-prod.appspot.com/o/spaces%2F-MJasmeOMeAJhTVh0M75%2Fuploads%2FNoKCOU8ylAioUdohU082%2FGoogle%20Sheet%20Sc%202.png?alt=media&amp;token=9c275c87-bec8-48f2-85c2-912c22fddd38" alt="" width="563"><figcaption><p>Error message on Integration Page</p></figcaption></figure>

{% hint style="success" %}
**Answer :-**

In this case when the user has made the google sheet by **importing** an excel file, it is created in **XLS format** and hence, the error and the integration does not **respond**.&#x20;

So in this case, you have to make a new sheet by **copy** and **paste**.&#x20;
{% endhint %}

**For Example -**

<figure><img src="https://2103666731-files.gitbook.io/~/files/v0/b/gitbook-x-prod.appspot.com/o/spaces%2F-MJasmeOMeAJhTVh0M75%2Fuploads%2FiwPcyIIgD8ZuzWMI49z5%2FGoogle%20Sheet%209.png?alt=media&amp;token=49702cfd-ac37-480e-be94-8762dbaad9ee" alt="" width="563"><figcaption><p>Here sheet is in XLS format</p></figcaption></figure>

### **Scenario 3:**&#x20;

***

Sometimes when you click on the “**SYNC**” button it will show the error as **“Your request is in-progress.”**

{% hint style="success" %}
**Answer** :-&#x20;

1. Try to do it from **other system**.
2. If still, it doesn't works then please **reach out** to the NeoDove Team for further assistance.
   {% endhint %}

### **Scenario 4:**&#x20;

***

When you have done the **Integration** but the leads have **not been created** into the campaign.

{% hint style="success" %}
**Answer :-**

1. Check if you have done the **mapping** of the Contact Number column **correctly** in NeoDove.
2. Check if your **data** in the Contact Number column which you have mapped has a **phone number** and not any text.
3. If these things are correct and still the data is not created, then **refer** to the notification bell once to check the **notification update** to know more about your **upload activity**.
   {% endhint %}

### **Scenario 5:**&#x20;

***

**New Leads** are not being created on **Sync**.

{% hint style="success" %}
**Answer :-**&#x20;

1. Please make sure that you are not **deleting** the already synced rows on the sheet. NeoDove **reads** the rows of the sheet, so if you delete the **already synced rows** and add the lead again on the same row, it will **not get synced** again.
2. Please check if you have by mistake left an **empty row** and entered data into some random row not below your **data sequence** of the sheet. Because then it will get synced till that row and since those empty rows above that **random row** are already synced, it will **not sync again**.
   {% endhint %}


# FAQs on Google Sheet Integration

Lets explore the FAQs of Google Sheet Integration

1. **Will all the new leads flow into NeoDove automatically after integration?**\
   \
   **Answer:** No. Currently we have a “Sync” button on the integration page. Once you click on sync, all the new leads will be created under NeoDove.<br>
2. **If I make any changes in any lead on a sheet which is already synced, will it get updated on NeoDove as well?**\
   \
   **Answer:** No, once a lead is synced it will not get updated on the basis of changes made in the sheet on syncing.\
   **Note -** This can be done through chargeable automation.<br>
3. **If any lead is Deleted from the sheet will it get deleted from NeoDove or vice-versa?**\
   \
   **Answer:** No<br>
4. **Can I upload all tabs of a sheet at once?**\
   \
   **Answer:** No, sheet will be uploaded “Tab” wise into the campaign, so that we can do segregation better into different campaigns.<br>
5. **Do I need to integrate the sheet every time?**\
   \
   **Answer:** No, it is better than excel because you can simply sync the new data.

{% hint style="success" %}
In the case of any other questions, please write us on "**<hello@neodove.com>**". Our team will help you.
{% endhint %}


# Facebook integration

Learn how to integrate your NeoDove account with Facebook ads

{% embed url="<https://youtu.be/qI3t4rYl9zc?si=WW1PHa0xiwgTlFlF>" %}
Tutorial Video
{% endembed %}

{% hint style="success" %}
This Facebook integration enables you to **integrate** your Facebook account with NeoDove.
{% endhint %}

You’ll be able to view all the leads generated from Facebook lead forms on NeoDove.

## Features that come with Facebook integration

***

* **Make every lead count -** Any lead who enquires for your services on Facebook lead form Ads gets captured automatically into your NeoDove campaign, ensuring zero lead leakage.
* **Stop entering leads manually -**  Lead gets captured and mapped automatically, thereby eliminating the effort of entering each lead detail manually.                                                                                                                   &#x20;


# Steps to Integrate Facebook Ads

Lets explore the steps to integrate the Facebook Lead Ad Forms

{% hint style="success" %}
With the **Facebook Integration** you can get all of your leads coming from **Facebook Ads** in NeoDove Campaigns on **real time**.
{% endhint %}

### Steps:

***

1. **Log in** to your NeoDove account (<https://connect.neodove.com/login>)  &#x20;
2. &#x20;Go to the **Integrations** section, present on the left side-bar of your **screen**.

<figure><img src="https://2103666731-files.gitbook.io/~/files/v0/b/gitbook-x-prod.appspot.com/o/spaces%2F-MJasmeOMeAJhTVh0M75%2Fuploads%2Fe1RZfWNQSWDafRxfEUOx%2FIntegrations.png?alt=media&amp;token=3e86f09f-1d31-44e8-a9e1-c061fd86c6ff" alt=""><figcaption></figcaption></figure>

3. Once clicked, then need to click on the **"Facebook & Integration"** option.

<figure><img src="https://2103666731-files.gitbook.io/~/files/v0/b/gitbook-x-prod.appspot.com/o/spaces%2F-MJasmeOMeAJhTVh0M75%2Fuploads%2FPqlzAI8XDLLW8H3WGGT3%2FFacebook.png?alt=media&amp;token=2dad04d0-ff5e-44af-9cd9-02072ee781b2" alt=""><figcaption></figcaption></figure>

4. Select your **NeoDove Campaign** and then Click on "**Continue with Facebook**" as shown in the screenshot below.

<figure><img src="https://2103666731-files.gitbook.io/~/files/v0/b/gitbook-x-prod.appspot.com/o/spaces%2F-MJasmeOMeAJhTVh0M75%2Fuploads%2Fmk71xnFfp8uZXmzi7hjo%2FFacebooks.png?alt=media&amp;token=55d54128-856d-49f3-a561-4d48302e5090" alt=""><figcaption></figcaption></figure>

5. **Login** into your Facebook Account.

<figure><img src="https://2103666731-files.gitbook.io/~/files/v0/b/gitbook-x-prod.appspot.com/o/spaces%2F-MJasmeOMeAJhTVh0M75%2Fuploads%2FySTLLEFkcfa8nGYaBxVy%2FLogin.png?alt=media&amp;token=a4e82ad3-a276-4d99-aca2-4a3c9aa2cd5d" alt=""><figcaption></figcaption></figure>

{% hint style="success" %}
If you have already **logged in** on your Facebook account on the same browser then it will **detect** the account **automatically**.
{% endhint %}

6. Click on "**Continue**" with your connected **Facebook account**.

<figure><img src="https://2103666731-files.gitbook.io/~/files/v0/b/gitbook-x-prod.appspot.com/o/spaces%2F-MJasmeOMeAJhTVh0M75%2Fuploads%2F2q1pW4kZoBZ6kJF90ITG%2FFacebookss.png?alt=media&amp;token=b4080b0f-1f0a-4dce-a3a3-07a17241d3ac" alt=""><figcaption></figcaption></figure>

7. Select your **Facebook Page** from the first option.

<figure><img src="https://2103666731-files.gitbook.io/~/files/v0/b/gitbook-x-prod.appspot.com/o/spaces%2F-MJasmeOMeAJhTVh0M75%2Fuploads%2F0hk8YxvzYEHWX2MF9qFO%2FPage.png?alt=media&amp;token=c8eb5a7b-c443-4edc-9451-39b8fef2d9db" alt=""><figcaption></figcaption></figure>

8. Then select the **particular Lead Form** from where the lead should get **populated** in NeoDove.

<figure><img src="https://2103666731-files.gitbook.io/~/files/v0/b/gitbook-x-prod.appspot.com/o/spaces%2F-MJasmeOMeAJhTVh0M75%2Fuploads%2Fz0OPUbAaKM6E2lNcCKPg%2FLead%20Forms.png?alt=media&amp;token=8f3ce426-a234-4808-86e6-44d4a9ac5275" alt=""><figcaption></figcaption></figure>

9. It will **connect** your account and **integration** will created on **Active Integrations Page**.

<figure><img src="https://2103666731-files.gitbook.io/~/files/v0/b/gitbook-x-prod.appspot.com/o/spaces%2F-MJasmeOMeAJhTVh0M75%2Fuploads%2FTvZkcEEbKai17vlvOp84%2FIntegrationss.png?alt=media&amp;token=6f49adcb-6c85-4877-b0c5-0aa015a6c649" alt=""><figcaption></figcaption></figure>

{% hint style="success" %}
After **following** these steps, your integration will be **successfully connected**.
{% endhint %}


# How to test your Facebook Integration?

Lets understand how to test the Integration got successful or not

## For **testing** the integrations with Facebook&#x20;

***

META does have a **lead-ads testing tool** through which one can create a **test lead** and track it on the **connected applications** with Facebook Account.

{% hint style="success" %}
**Page Link -** <https://developers.facebook.com/tools/lead-ads-testing>
{% endhint %}

### **Steps:**

***

1. Go to the **Testing Page** by clicking on the above mentioned link.

<figure><img src="https://2103666731-files.gitbook.io/~/files/v0/b/gitbook-x-prod.appspot.com/o/spaces%2F-MJasmeOMeAJhTVh0M75%2Fuploads%2F5QLBosIlrIOV9UxcZWVw%2FFB%20Test%201.png?alt=media&amp;token=99b7f1c5-34e2-4ebd-9a80-c215d4fea2a6" alt="" width="563"><figcaption></figcaption></figure>

{% hint style="success" %}
On this page, select your **Facebook Page** and **Lead form** which is used on your **Facebook Ads**.
{% endhint %}

2. After **selecting** the Page and form here and click on “**Preview Form**”.

<figure><img src="https://2103666731-files.gitbook.io/~/files/v0/b/gitbook-x-prod.appspot.com/o/spaces%2F-MJasmeOMeAJhTVh0M75%2Fuploads%2FA4ctQUJnkm1GFHps3vuR%2FFB%20Test%202.png?alt=media&amp;token=cfc6fa49-aaed-449c-bbf3-84e88cf15b68" alt="" width="563"><figcaption></figcaption></figure>

Through the preview form button your **Lead form** will be opened. Now you have to **fill in** the details for creating a **test lead** and then click on "**Next**".

3. Click on "**Submit**".

<figure><img src="https://2103666731-files.gitbook.io/~/files/v0/b/gitbook-x-prod.appspot.com/o/spaces%2F-MJasmeOMeAJhTVh0M75%2Fuploads%2FnJTVseDZpfnciXLJqZX5%2FFB%20Test%203.png?alt=media&amp;token=a80cb575-73b7-470b-8e44-4853276c2c47" alt="" width="563"><figcaption></figcaption></figure>

4. Track "**Status**"

<figure><img src="https://2103666731-files.gitbook.io/~/files/v0/b/gitbook-x-prod.appspot.com/o/spaces%2F-MJasmeOMeAJhTVh0M75%2Fuploads%2FB2NcVj3JrFzQWxOtriFu%2FFB%20Test%204.png?alt=media&amp;token=4c817ba5-fb78-49e8-b7a1-2986d4afde69" alt="" width="563"><figcaption></figcaption></figure>

Once you have clicked on **submit form**, a new button will appear which is "**Track Status**". You have to **click** on it to get the **status** of test lead submission.

5. Status will reflect as "**Success**".

<figure><img src="https://2103666731-files.gitbook.io/~/files/v0/b/gitbook-x-prod.appspot.com/o/spaces%2F-MJasmeOMeAJhTVh0M75%2Fuploads%2FaqLQ6nAW7wtfI2I16xnG%2FFB%20Test%205.png?alt=media&amp;token=c9a01716-3e7f-41d8-93b1-3fb4b72374a2" alt="" width="563"><figcaption></figcaption></figure>

After the **Success** result, go to your NeoDove campaign and **check** for your lead.

{% hint style="success" %}

1. You have to make multiple attempts on "**Track Status**" button if the result is coming as **pending.**&#x20;
2. Here in the above screenshot you can see there are **multiple app ids**, this means that there are **multiple tools** integrated with your Facebook Account.&#x20;
3. For NeoDove, the **App ID** starts from “**5999**”.
   {% endhint %}


# How to Segregate the leads of different Facebook Ad Campaign in NeoDove?

Learn how to apply conditions in Facebook Integration.

## **Steps:**

***

1. After the integration, click on the three dots “**Action button**” of the added Facebook Integration.

<figure><img src="https://2103666731-files.gitbook.io/~/files/v0/b/gitbook-x-prod.appspot.com/o/spaces%2F-MJasmeOMeAJhTVh0M75%2Fuploads%2FsqjhIjVY6Dj5PMrCLdh4%2FAction.png?alt=media&amp;token=8361234b-a580-496a-a70d-3820b71d69f2" alt=""><figcaption></figcaption></figure>

2. Select the “**Edit**” button.

<figure><img src="https://2103666731-files.gitbook.io/~/files/v0/b/gitbook-x-prod.appspot.com/o/spaces%2F-MJasmeOMeAJhTVh0M75%2Fuploads%2FLrCJQNDym3xhn6dIRCac%2FEdits.png?alt=media&amp;token=1b61f494-4ec2-4e08-a0be-059c5ed0068f" alt=""><figcaption></figcaption></figure>

3. Set the **conditions** here on this page for **segregation** of the leads according to the **details** coming from Facebook.

<figure><img src="https://2103666731-files.gitbook.io/~/files/v0/b/gitbook-x-prod.appspot.com/o/spaces%2F-MJasmeOMeAJhTVh0M75%2Fuploads%2F888rn6ZxWD94OIAdCTsg%2FCondition.png?alt=media&amp;token=d24dd455-39e5-4726-b1ea-4e761c9d796a" alt=""><figcaption></figcaption></figure>

{% hint style="success" %}
**Segregation** of the leads can be done on the basis of **Form IDs** of the Facebook lead forms appearing in the **lead details** in NeoDove as well.
{% endhint %}

4. Click on "**Submit**" to save the **conditions**.


# Common Scenarios for errors in Facebook Integration

Know the common cases when leads from Facebook will not be created under NeoDove.

### **Scenario 1 :-**&#x20;

***

Multiple integration of the **Facebook same page.**

{% hint style="success" %}
**Answer ->**&#x20;

In NeoDove for **Facebook Integration** you connect a Facebook Page.&#x20;

All the leads coming through the **Ads** of selected **Facebook page** will be created in NeoDove through the **single integration**.&#x20;

If you create **multiple integration** using same Facebook Page then the **leads** will not be created under **NeoDove campaign**.
{% endhint %}

### **Scenario 2 :-**&#x20;

***

On the **Testing Page**, error is coming as **“Lead Access has been revoked”** while testing the integration.

<figure><img src="https://2103666731-files.gitbook.io/~/files/v0/b/gitbook-x-prod.appspot.com/o/spaces%2F-MJasmeOMeAJhTVh0M75%2Fuploads%2FXCsZMsueYkYaiVYxJqP8%2FFacebook%20Int.%2010.png?alt=media&amp;token=e74005cd-1e97-4b14-9d30-59987d346937" alt="" width="563"><figcaption><p>Allow access to any CRM on Facebook</p></figcaption></figure>

{% hint style="success" %}
**Answer ->**

1. Then go to the “**Meta Business Suite**” of your Facebook account.
2. Go to the **Settings** on the bottom.
3. Go to the **Business Settings**.
4. Click on the “**Integration option**” on the left side Menu.
5. Click on the “**Lead Access**” option.
6. Then go to the option “**CRMs**”
7. Then select “**NeoDove**” and allow.
   {% endhint %}

### **Scenario 3 :-**&#x20;

***

**Custom Questions** in the Facebook Lead Form.

1. Check the **Form** under Facebook which is **active** on FB Ad. [Click here](https://business.facebook.com/latest/instant_forms/forms/)
2. Check the “**Question Type**” of the form.

<figure><img src="https://2103666731-files.gitbook.io/~/files/v0/b/gitbook-x-prod.appspot.com/o/spaces%2F-MJasmeOMeAJhTVh0M75%2Fuploads%2Fof38s1aYIQovvHsdaAuP%2FFacebook%20Int.%2011.png?alt=media&amp;token=7518bb35-bd45-4e4b-b5fb-68e2923cdb9d" alt="" width="563"><figcaption></figcaption></figure>

3. If you are using the **custom questions** for collecting "name" & "phone number" then the **field name** of these questions will be **different** which NeoDove accepts by **default**.

<figure><img src="https://2103666731-files.gitbook.io/~/files/v0/b/gitbook-x-prod.appspot.com/o/spaces%2F-MJasmeOMeAJhTVh0M75%2Fuploads%2FhwAiriDrbmfs8aD6IlXY%2FFacebook%20Int.%2012.png?alt=media&amp;token=6d403e7c-3263-4cdc-a963-c27ae670d1de" alt="" width="563"><figcaption><p>Field name of the questions in your Facebook lead forms</p></figcaption></figure>

4. Then you have to do the Facebook Integration with the “**Custom Form Field Names**” feature and **map** the same field name according to your **FB lead form**.

**Image 1**

<figure><img src="https://2103666731-files.gitbook.io/~/files/v0/b/gitbook-x-prod.appspot.com/o/spaces%2F-MJasmeOMeAJhTVh0M75%2Fuploads%2FwkxbR6Ctgoc9XFwUVABZ%2FForm%20Field%20Names.png?alt=media&amp;token=ddcc0599-2a65-4b29-820f-dc7df109c9f4" alt=""><figcaption></figcaption></figure>

**Image 2**

<figure><img src="https://2103666731-files.gitbook.io/~/files/v0/b/gitbook-x-prod.appspot.com/o/spaces%2F-MJasmeOMeAJhTVh0M75%2Fuploads%2FNVaZtlzMfKXWlxOJckpn%2FField%20Mapping.png?alt=media&amp;token=3ed63a74-b961-4170-b203-2aa5112a3383" alt=""><figcaption></figcaption></figure>

### **Scenario 4 :-**&#x20;

***

Different **form field names** on Facebook Lead Form.

1. Check the **Form** under Facebook which is **active** on FB Ad. [Click here](https://business.facebook.com/latest/instant_forms/forms/)
2. Check the “**Settings**” of the form.
3. Go to the **field names**.

<figure><img src="https://2103666731-files.gitbook.io/~/files/v0/b/gitbook-x-prod.appspot.com/o/spaces%2F-MJasmeOMeAJhTVh0M75%2Fuploads%2FAPayx2ESZinczjrhYAhx%2FFacebook%20Int.%2012.png?alt=media&amp;token=8524bece-2ddc-4ef0-8a32-acc245fdb0b4" alt="" width="563"><figcaption></figcaption></figure>

4. Check if there is any other **text** or **language** for the “Name” & “Phone Number” **question field**.
5. In this case you have to do the Facebook Integration with the “**Custom Contact field**” feature. (**Refer to the images of Scenario 3 > Point 4**).


# FAQs on Facebook Integration

Lets explore few of the FAQs on Facebook Integration

1. **What is Facebook Ads Manager?**

**Answer:** It is an option provided by META to each account to manage the paid marketing on Facebook.

2. **What is FB lead form?**

**Answer:** This is a form for capturing the leads on FB which is being attached to the FB ADS which you are running.

3. **From where can we find the FB lead form under Facebook Account?**

**Answer:** You can open it from two places.

* **From Meta Business Suite** :- Go to the META Business Suite > Then go to the “All tools” > Then go to the “Instant forms”.
* **From Facebook add manager** :- Go to the Active campaign (on it you will get an edit option) > Click on the Ad > Scroll down and you will see the form which is attached to the ads.

**Note**:- For opening any form you have to duplicate the existing form and see the required details.

&#x20;

4. **What is Facebook Ad Campaign?**

**Answer:** You can create an Ad campaign on the Facebook Ad manager for running ads according to your needs. Under a campaign you attach an Ad set.&#x20;

**For e.g.,** You want to run a campaign to target the audience of North India, so you can create a campaign for this.

5. **What is a Facebook Ad Set?**

**Answer:** You can create a set of few ads under a campaign mainly for covering all the variables/diversity of your target audience.

**For e.g**., You are targeting a Ad for North India people. But you can create various ads targeting people according to age, occupation, etc. This is an Ad set. &#x20;

6. **Can I get the leads on NeoDove through Facebook Comments and Facebook Inbox messages?**

**Answer:** No, in this case leads can not be created through integration because the comments and inbox messages does not contain Phone numbers as field.

7. **Can I get the leads on NeoDove through the "Call" or "WhatsApp" button on my Facebook Ads?**

**Answer:** No, leads can be captured only through Facebook Lead Form ads.&#x20;

**Note -** In case of "**WhatsApp button**" if your using WA API then it depends on the possibility of     the WA API integration which you are using.<br>

{% hint style="success" %}
In the case of any other questions, please write us on "**<hello@neodove.com>**". Our team will help you.
{% endhint %}


# Google Ads Integration

Learn how to integrate your NeoDove account with Google Ads

{% hint style="success" %}
Google ads integration can be used by your organization if you are using **Google Ads Lead Form** for generating leads.&#x20;
{% endhint %}

If you are using Google Ads to redirect leads to your website, then its better to explore **Custom Integration** to connect with website form of your choice. <br>

### Follow these steps to integrate your Google Ads Lead Form with NeoDove to create leads in NeoDove in real-time:

***

1. Go to NeoDove on the **Integrations Page** and click on Google Ads.<br>

   <figure><img src="https://lh7-us.googleusercontent.com/Q2lJP19dTF8ebj4gxZ21ikgwhuy8abZJPY4VONMuSRt1R3F6KPPeNMvKIDPZ3G7Zoip6caBNh1jGiE8PCCKj6eRRvbAPGX2W8jGa3E6VSt_fa1EL_2sqpNpgyFVs_rGT-5HycbbgmKslvz2eug2uzPU" alt=""><figcaption></figcaption></figure>
2. Now select which **campaign** you want the new leads to get created in<br>

   <figure><img src="https://lh7-us.googleusercontent.com/KOD1RitWy6F_P4RBT1IxcVeAgHbd6s22GHByrLDqpf_xoeVSYo-Likz4ngN9fZkJnp2kxGco87QMI6WqLwTVONbd8Xw2G95R6HG_MZXBOhaMdh0zTXWI9gcX_deZes0FKEU4EQZQu5eCo0RZdNixqqk" alt=""><figcaption></figcaption></figure>
3. Once the **integration** is created, you will land on this page where you will be able to see an **Endpoint** and **Key** as marked in the image below. These **two details** will be later required when integrating.<br>

   <figure><img src="https://lh7-us.googleusercontent.com/npYtdYnrZqy6E4V-7cpIw28QOXvn7wMN73j3JGfYqO0lw4iKbVUJ2ryJKlQiMImQz_LEuGINPNI4kC6mvv9-sH2n_CjByb00ZctzRpWu5diT9NAdNCHLuf520pVBIj39uE7YDD5pLHg-NpzSrbWPPdk" alt=""><figcaption></figcaption></figure>
4. Now lets head over to **ads.google.com**, click on Campaigns, then in the menu click on **Assets** and in the sub menu click on **Assets again**. Then on the right side window, click on **lead form** and click on the lead form you want to **integrate** with NeoDove.<br>

   <figure><img src="https://lh7-us.googleusercontent.com/5PFzbP9c9BHrwPYEVOJNpfg0BInXYKycgEQDfVXCbREdcBLZjU6yjcchX9pK05U8VAa5XquLJrUnfhS4L2-ooq0Saclk2GTa9Yb0QPUR3LytCRgoTn9nLgwrPdtFbPJdC94lqhEswgR5EpLUxbRqNEE" alt=""><figcaption></figcaption></figure>
5. After clicking on the **lead form**, you will be able to see details about that lead form. On this page scroll down and find **Export Leads** from Google Ads. Expand that tab and here inside **Webhook URL** paste the Endpoint from step 3 and against **key** copy paste the key you saw in step 3<br>

   <figure><img src="https://lh7-us.googleusercontent.com/XnQE-SkbLuzLAsPXcORw3sw9a-KRAz3rN9fl5iCU-FpFl94apXboKqA46ozUSNZKMnqmDK3CGBKdi0maenCuC_ojqz5I4j0o0bSGoEESc_NTqcy3s23_7RtSBNPee2Q1ULvHRYKUsegIwU9Yn6Jb8Zo" alt=""><figcaption></figcaption></figure>
6. Click on **save** and any lead from this form hereafter will automatically get **created** on NeoDove as well.


# Google Form Integration

Learn how to integrate your NeoDove account with Google Form

{% hint style="success" %}
You can easily **integrate** your Google Forms with NeoDove to **create leads** in NeoDove in real time as soon as the form is filled.&#x20;
{% endhint %}

### Check out the video tutorial to see the steps:

***

{% embed url="<https://www.youtube.com/watch?v=FfF5CqoE-tQ>" %}

## Features that come with Google Form integration

***

* **Make every lead count -** Any lead who enquires for your services by filling up the Google Form gets captured automatically into your NeoDove campaign, ensuring zero lead leakage.
* **Stop entering leads manually -**  Lead gets captured and mapped automatically, thereby eliminating the effort of entering each lead detail manually.

### Steps:

***

1. **Log in** to your NeoDove account (<https://connect.neodove.com/login>)  &#x20;
2. &#x20;Go to the **Integrations** section, present on the left side-bar of your **screen**.

<figure><img src="https://2103666731-files.gitbook.io/~/files/v0/b/gitbook-x-prod.appspot.com/o/spaces%2F-MJasmeOMeAJhTVh0M75%2Fuploads%2FnoINXfuWnrCEe8lOZwUt%2FIntegration.png?alt=media&amp;token=ab2db7c7-1db2-4039-975c-2d81a323c108" alt=""><figcaption></figcaption></figure>

3. Once clicked, then need to click on the **"Google Form"** option.

<figure><img src="https://2103666731-files.gitbook.io/~/files/v0/b/gitbook-x-prod.appspot.com/o/spaces%2F-MJasmeOMeAJhTVh0M75%2Fuploads%2Fa8lvdgq4rN3rYggE7BAN%2FGoogle%20Forms.png?alt=media&amp;token=9b398499-8e2f-465c-8e9b-4095768543ed" alt=""><figcaption></figcaption></figure>

4. A menu bar will appear, select the **campaign** for which you want to integrate **Google Form.**

<figure><img src="https://2103666731-files.gitbook.io/~/files/v0/b/gitbook-x-prod.appspot.com/o/spaces%2F-MJasmeOMeAJhTVh0M75%2Fuploads%2FLpwdDoYoGopFnMJma9GU%2FGoogle%20Formss.png?alt=media&amp;token=8e6de093-5827-4bfc-bfe8-ddb914a9f074" alt=""><figcaption></figcaption></figure>

5. Now, click on the **Submit** button. The integration has been **created** in NeoDove successfully.
6. The **details** of this integration are present under this integration on **Active Integration page**. Just click on the created integration to **view the details.**

<figure><img src="https://2103666731-files.gitbook.io/~/files/v0/b/gitbook-x-prod.appspot.com/o/spaces%2F-MJasmeOMeAJhTVh0M75%2Fuploads%2FbSaCZ4hddpysUDmNKGgU%2FActive%20Integration.png?alt=media&amp;token=13d743a4-ce37-48c3-a045-ca1d10a68d7d" alt=""><figcaption></figcaption></figure>

7. Then, go to your **Google Form** which you want to integrate with NeoDove and click on the top right corner **three dots option** and then click on the **Get add-ons** option.&#x20;

{% hint style="success" %}
We need to install the **add-ons** with Google Form of that particular software which we want to integrate including **NeoDove** as well.
{% endhint %}

<figure><img src="https://2103666731-files.gitbook.io/~/files/v0/b/gitbook-x-prod.appspot.com/o/spaces%2F-MJasmeOMeAJhTVh0M75%2Fuploads%2FtuQ5sKiRmXnFysKwFxFp%2FGoogle%20Form%20add-onss.png?alt=media&amp;token=7459193e-057a-4273-818f-def814133505" alt=""><figcaption></figcaption></figure>

8. You will be **redirected** to the Google Workplace Management and there at the top there will be a **search button** where you need to search for NeoDove CRM.

<figure><img src="https://2103666731-files.gitbook.io/~/files/v0/b/gitbook-x-prod.appspot.com/o/spaces%2F-MJasmeOMeAJhTVh0M75%2Fuploads%2FBeQRXZCPNwswQRcUv3Dp%2FGWMs.png?alt=media&amp;token=0fb4f5b7-f6d9-441b-8c26-c266f254766c" alt=""><figcaption></figcaption></figure>

9. Once the NeoDove CRM **icon** will be visible then needs to click on it.

<figure><img src="https://2103666731-files.gitbook.io/~/files/v0/b/gitbook-x-prod.appspot.com/o/spaces%2F-MJasmeOMeAJhTVh0M75%2Fuploads%2F7Jq6W1nVOxmLvQZ72mvE%2FNeoDOve%20crms.png?alt=media&amp;token=1b3fb184-c3c1-4d10-8caa-3a28189904b1" alt=""><figcaption></figcaption></figure>

10. It will **redirect** you to the NeoDove add-ons option and then need to click on **Install** to install it as an add-on software for Google Form.&#x20;

<figure><img src="https://2103666731-files.gitbook.io/~/files/v0/b/gitbook-x-prod.appspot.com/o/spaces%2F-MJasmeOMeAJhTVh0M75%2Fuploads%2Fafk3iIBR2OskrPU6RSqV%2FInstall.png?alt=media&amp;token=27aa02aa-52c5-473d-b12c-986fadac0a42" alt=""><figcaption></figcaption></figure>

11. Once, the NeoDove add-on gets installed need to click on click on "**Done**".

<figure><img src="https://2103666731-files.gitbook.io/~/files/v0/b/gitbook-x-prod.appspot.com/o/spaces%2F-MJasmeOMeAJhTVh0M75%2Fuploads%2FxqRWMhDeDAi9nN7PyEV1%2FInstalled.png?alt=media&amp;token=70d38c4b-d58c-42a5-b03e-c36c1f83d086" alt=""><figcaption></figcaption></figure>

12. It will then automatically get **redirected** to the Google Form page, then need to click on the top **Add-ons** option.

<figure><img src="https://2103666731-files.gitbook.io/~/files/v0/b/gitbook-x-prod.appspot.com/o/spaces%2F-MJasmeOMeAJhTVh0M75%2Fuploads%2FyebONPvjnHvlG8igFCoc%2FAdd-ons.png?alt=media&amp;token=8cb6770a-a4da-43fc-9bb7-c6f705d8e51f" alt=""><figcaption></figcaption></figure>

13. Once clicked on the **Add-ons** option then, **NeoDove icon** will be visible and then need to click on it.&#x20;

<figure><img src="https://2103666731-files.gitbook.io/~/files/v0/b/gitbook-x-prod.appspot.com/o/spaces%2F-MJasmeOMeAJhTVh0M75%2Fuploads%2FZciaDwRx5BS2pAF4Ie6D%2FNeoDove%20CRMss.png?alt=media&amp;token=85524c70-cf25-4c3e-b48a-a1ac584ad4fe" alt=""><figcaption></figcaption></figure>

14. Once NeoDove CRM will **appear** at the top, then need to click on the **Configure Notifications**.

<figure><img src="https://2103666731-files.gitbook.io/~/files/v0/b/gitbook-x-prod.appspot.com/o/spaces%2F-MJasmeOMeAJhTVh0M75%2Fuploads%2F3OXCvxQiyNVn4zqutI25%2FConfigure%20Notification.png?alt=media&amp;token=bc9bd78e-7d4c-4a8a-8ab9-26dc0f778f00" alt=""><figcaption></figcaption></figure>

15. Post that, a new window will **appear** which will ask you to put the **Endpoint URL** or the API along with the **fields** to map in order to create the lead in NeoDove.

<figure><img src="https://2103666731-files.gitbook.io/~/files/v0/b/gitbook-x-prod.appspot.com/o/spaces%2F-MJasmeOMeAJhTVh0M75%2Fuploads%2FMfeKp0ZETCHPxHSo7ZLF%2FNeoDove%20CRM%20endpoint.png?alt=media&amp;token=1714b85c-2ab4-4e3d-b7dd-c07f1077645f" alt=""><figcaption></figcaption></figure>

16. In the Endpoint, need to put the **API** or the **webhook** from the NeoDove campaign which we can find it from the **View Integrations Page** of NeoDove.&#x20;
17. Along with that need to **map** the questions of the Google Form with the **Mapping fields** in order to create the **lead** in NeoDove.&#x20;

{% hint style="success" %}
In the **Mapping fields**, the Mobile Number is **mandatory** to map as without the contact number or mobile number a lead **can not** get created in NeoDove CRM.
{% endhint %}

18. After putting the Endpoint and mapping the fields, need to click on '**Save**' button. Post that, we need to wait till the time it will give us a **Saved Successfully** pop-up.

<figure><img src="https://2103666731-files.gitbook.io/~/files/v0/b/gitbook-x-prod.appspot.com/o/spaces%2F-MJasmeOMeAJhTVh0M75%2Fuploads%2Fsa2Dk44PoyhD1O3wfPRG%2FSaved%20Succesfully.png?alt=media&amp;token=36eb3f3e-b69b-4e1f-b288-40fdb12cea87" alt=""><figcaption></figcaption></figure>

19. By this way, the integration will be **successfully completed** and post that whenever a form will be filled, a lead will get **created** in NeoDove campaigns automatically.&#x20;


# JustDial Integration

Learn how to integrate your NeoDove account with Justdial

{% hint style="success" %}
This Justdial integration enables you to **integrate** your JustDial account with NeoDove.
{% endhint %}

You’ll be able to **view** all the leads **generated** from JustDial on NeoDove.

## Features that come with JustDial integration

***

* **Make every lead count -** Any lead who enquires for your services on JustDial.com gets captured automatically into your NeoDove campaign, ensuring zero lead leakage.
* **Stop entering leads manually -**  Lead gets captured and mapped automatically, thereby eliminating the effort of entering each lead detail manually.

### Steps:

***

1. **Log in** to your NeoDove account (<https://connect.neodove.com/login>)  &#x20;
2. &#x20;Go to the **Integrations** section, present on the left side-bar of your **screen**.

<figure><img src="https://2103666731-files.gitbook.io/~/files/v0/b/gitbook-x-prod.appspot.com/o/spaces%2F-MJasmeOMeAJhTVh0M75%2Fuploads%2FnoINXfuWnrCEe8lOZwUt%2FIntegration.png?alt=media&amp;token=ab2db7c7-1db2-4039-975c-2d81a323c108" alt=""><figcaption></figcaption></figure>

3. Once clicked, then need to click on the **"JustDial"** option.

<figure><img src="https://2103666731-files.gitbook.io/~/files/v0/b/gitbook-x-prod.appspot.com/o/spaces%2F-MJasmeOMeAJhTVh0M75%2Fuploads%2FAozunWhdpDETmZNRgqFG%2FJustDial.png?alt=media&amp;token=c5b9a3f2-7959-4690-93d8-3dad7fae6250" alt=""><figcaption></figcaption></figure>

4. A menu bar will appear, select the **campaign** for which you want to integrate **Justdial.**

<figure><img src="https://2103666731-files.gitbook.io/~/files/v0/b/gitbook-x-prod.appspot.com/o/spaces%2F-MJasmeOMeAJhTVh0M75%2Fuploads%2FuUO41jGI6GvcWUgViH6J%2FJustDials.png?alt=media&amp;token=9f4c811a-18b4-4bdf-9d2c-9099957ba1a4" alt=""><figcaption></figcaption></figure>

5. Now, click on the **Submit** button. The integration has been **created** in NeoDove successfully.
6. To **activate** this integration, you need to send some details via e-mail to the **Justdial** team.
7. The **details** of this integration are present under this integration on **Active Integration page**. Just click on the created integration to **view the details.**

<figure><img src="https://2103666731-files.gitbook.io/~/files/v0/b/gitbook-x-prod.appspot.com/o/spaces%2F-MJasmeOMeAJhTVh0M75%2Fuploads%2FQsOJbFbXvNBcTSOZ1igh%2FJustDial%203.png?alt=media&amp;token=8482e1a6-c45f-4565-a484-d2880401d7c4" alt=""><figcaption></figcaption></figure>

8. Details will appear, Copy these details and you need to send these complete details to your **Justdial team** to send the lead details on **NeoDove API**.
9. Your integration will be **activated** by the Justdial team.


# Sulekha Integration

Learn how to integrate your NeoDove account with Sulekha

{% hint style="success" %}
This Sulekha integration enables you to **integrate** your Sulekha account with NeoDove.
{% endhint %}

You’ll be able to **view** all the leads **generated** from Sulekha on NeoDove.

## Features that come with Sulekha integration

***

* **Make every lead count -** Any lead who enquires for your services on Sulekha.com gets captured automatically into your NeoDove campaign, ensuring zero lead leakage.
* **Stop entering leads manually -**  Lead gets captured and mapped automatically, thereby eliminating the effort of entering each lead detail manually.

### Steps:

***

1. **Log in** to your NeoDove account (<https://connect.neodove.com/login>)  &#x20;
2. &#x20;Go to the **Integrations** section, present on the left side-bar of your **screen**.

<figure><img src="https://2103666731-files.gitbook.io/~/files/v0/b/gitbook-x-prod.appspot.com/o/spaces%2F-MJasmeOMeAJhTVh0M75%2Fuploads%2FnoINXfuWnrCEe8lOZwUt%2FIntegration.png?alt=media&amp;token=ab2db7c7-1db2-4039-975c-2d81a323c108" alt=""><figcaption></figcaption></figure>

3. Once clicked, then need to click on the **"Sulekha"** option.

<figure><img src="https://2103666731-files.gitbook.io/~/files/v0/b/gitbook-x-prod.appspot.com/o/spaces%2F-MJasmeOMeAJhTVh0M75%2Fuploads%2F29B5ZS2IX3oqQzK54OZ9%2FSulekha.png?alt=media&amp;token=4d34cb5b-cbfc-4d5e-9943-8cf347fffe3c" alt=""><figcaption></figcaption></figure>

4. A menu bar will appear, select the **campaign** for which you want to integrate **Sulekha.**

<figure><img src="https://2103666731-files.gitbook.io/~/files/v0/b/gitbook-x-prod.appspot.com/o/spaces%2F-MJasmeOMeAJhTVh0M75%2Fuploads%2F4SeKrPhSHE85DIjMRgtm%2FSulekhas.png?alt=media&amp;token=031dc0dd-e9f2-4085-8a37-4ccc283d33c5" alt=""><figcaption></figcaption></figure>

5. Now, click on the **Submit** button. The integration has been **created** in NeoDove successfully.
6. To **activate** this integration, you need to send some details via e-mail to the **Sulekha** team.
7. The **details** of this integration are present under this integration on **Active Integration page**. Just click on the created integration to **view the details.**

<figure><img src="https://2103666731-files.gitbook.io/~/files/v0/b/gitbook-x-prod.appspot.com/o/spaces%2F-MJasmeOMeAJhTVh0M75%2Fuploads%2FhiBuGv4DNIRcrxVoqCyQ%2FSulekha%20Integration.png?alt=media&amp;token=28614bfb-0db1-4afe-838d-4a0310ba58d1" alt=""><figcaption></figcaption></figure>

8. Details will appear, Copy these details and you need to send these complete details to your **Sulekha** **team** to send the lead details on **NeoDove API**.
9. Your integration will be **activated** by the Sulekha team.


# Sarv Integration

Learn how to integrate your NeoDove account with Sarv

{% hint style="success" %}
This Sarv integration enables you to **integrate** your Sarv account with NeoDove.
{% endhint %}

You’ll be able to **view** all the leads **generated** from Sarv on NeoDove.

## Features that come with Sarv integration

***

* **Make every lead count -** Any lead who enquires for your services on Sarv.com gets captured automatically into your NeoDove campaign, ensuring zero lead leakage.
* **Stop entering leads manually -**  Lead gets captured and mapped automatically, thereby eliminating the effort of entering each lead detail manually.

### Steps:

***

1. **Log in** to your NeoDove account (<https://connect.neodove.com/login>)  &#x20;
2. &#x20;Go to the **Integrations** section, present on the left side-bar of your **screen**.

<figure><img src="https://2103666731-files.gitbook.io/~/files/v0/b/gitbook-x-prod.appspot.com/o/spaces%2F-MJasmeOMeAJhTVh0M75%2Fuploads%2FnoINXfuWnrCEe8lOZwUt%2FIntegration.png?alt=media&amp;token=ab2db7c7-1db2-4039-975c-2d81a323c108" alt=""><figcaption></figcaption></figure>

3. Once clicked, then need to click on the **"Sarv"** option.

<figure><img src="https://2103666731-files.gitbook.io/~/files/v0/b/gitbook-x-prod.appspot.com/o/spaces%2F-MJasmeOMeAJhTVh0M75%2Fuploads%2FQSsAC8919y93cpC8xBMu%2FSarv.png?alt=media&amp;token=ba8d3ffc-d0d7-429e-95de-fdffdd363bc0" alt=""><figcaption></figcaption></figure>

4. A menu bar will appear, select the **campaign** for which you want to integrate **Sarv.**

<figure><img src="https://2103666731-files.gitbook.io/~/files/v0/b/gitbook-x-prod.appspot.com/o/spaces%2F-MJasmeOMeAJhTVh0M75%2Fuploads%2F6MeOXKRsk4jqMSVBbwuE%2FSarvs.png?alt=media&amp;token=a1468951-7032-4e72-a456-8b0efa6b03d4" alt=""><figcaption></figcaption></figure>

5. Now, click on the **Submit** button. The integration has been **created** in NeoDove successfully.
6. To **activate** this integration, you need to send some details via e-mail to the **Sarv** team.
7. The **details** of this integration are present under this integration on **Active Integration page**. Just click on the created integration to **view the details.**

<figure><img src="https://2103666731-files.gitbook.io/~/files/v0/b/gitbook-x-prod.appspot.com/o/spaces%2F-MJasmeOMeAJhTVh0M75%2Fuploads%2FKTpQlwnlWMBVd0ZcA5cA%2FSarv%20Integration.png?alt=media&amp;token=219e979e-f087-4a45-b696-5428d55034be" alt=""><figcaption></figcaption></figure>

8. Details will appear, Copy these details and you need to send these complete details to your **Sarv team** to send the lead details on **NeoDove API**.
9. Your integration will be **activated** by the Sarv team.


# HubSpot Integration

Learn how to integrate your NeoDove account with HubSpot

{% hint style="success" %}
This HubSpot integration enables you to **integrate** your HubSpot account with NeoDove.
{% endhint %}

You’ll be able to **view** all the leads **generated** from HubSpot on NeoDove.

## Features that come with HubSpot integration

***

* **Make every lead count -** Any lead who enquires for your services on HubSpot.com gets captured automatically into your NeoDove campaign, ensuring zero lead leakage.
* **Stop entering leads manually -**  Lead gets captured and mapped automatically, thereby eliminating the effort of entering each lead detail manually.

### Steps:

***

1. **Log in** to your NeoDove account (<https://connect.neodove.com/login>)  &#x20;
2. &#x20;Go to the **Integrations** section, present on the left side-bar of your **screen**.

<figure><img src="https://2103666731-files.gitbook.io/~/files/v0/b/gitbook-x-prod.appspot.com/o/spaces%2F-MJasmeOMeAJhTVh0M75%2Fuploads%2FnoINXfuWnrCEe8lOZwUt%2FIntegration.png?alt=media&amp;token=ab2db7c7-1db2-4039-975c-2d81a323c108" alt=""><figcaption></figcaption></figure>

3. Once clicked, then need to click on the **"HubSpot"** option.

<figure><img src="https://2103666731-files.gitbook.io/~/files/v0/b/gitbook-x-prod.appspot.com/o/spaces%2F-MJasmeOMeAJhTVh0M75%2Fuploads%2F4OGOJqbPT6rhZywtFIgF%2FHubspot.png?alt=media&amp;token=bc96a58e-0e9c-441d-8d60-33fc441ac5a8" alt=""><figcaption></figcaption></figure>

4. A menu bar will appear, which will ask you to put the **Access Token** of your HubSpot account in order to **integrate** with NeoDov&#x65;**.**

<figure><img src="https://2103666731-files.gitbook.io/~/files/v0/b/gitbook-x-prod.appspot.com/o/spaces%2F-MJasmeOMeAJhTVh0M75%2Fuploads%2FXVLW8oLE0D6PbbqjjyMr%2FAccess%20Token.png?alt=media&amp;token=6ea399eb-72a8-4c14-9260-44f74761021b" alt=""><figcaption></figcaption></figure>

5. Then, in order to get the **Access Token** from the HubSpot account, we need to **login** to our HubSpot account with our **credentials.**

<figure><img src="https://2103666731-files.gitbook.io/~/files/v0/b/gitbook-x-prod.appspot.com/o/spaces%2F-MJasmeOMeAJhTVh0M75%2Fuploads%2FmiicwWPClzheeUhAGoK5%2Fhubspot.png?alt=media&amp;token=662e09b0-0164-47d4-b4aa-9a6bcbf8f84b" alt=""><figcaption></figcaption></figure>

6. Post login, you need to click on the '**Settings**' option at the top of the screen.

<figure><img src="https://2103666731-files.gitbook.io/~/files/v0/b/gitbook-x-prod.appspot.com/o/spaces%2F-MJasmeOMeAJhTVh0M75%2Fuploads%2FobgpOMtFz1xF4y4Ka7YY%2FSettings.png?alt=media&amp;token=f509b224-44d3-474a-ac60-915c0d9e6337" alt=""><figcaption></figcaption></figure>

7. Then you need to click on the '**Integrations**' option from the left side of the screen.&#x20;

<figure><img src="https://2103666731-files.gitbook.io/~/files/v0/b/gitbook-x-prod.appspot.com/o/spaces%2F-MJasmeOMeAJhTVh0M75%2Fuploads%2FtW7GZDOuXqjgO3gm3HJF%2FIntegration.png?alt=media&amp;token=7549d639-39ac-4f17-9dd7-61a998cd5f96" alt=""><figcaption></figcaption></figure>

8. Post that, you need to click on the '**Private Apps**' option.

<figure><img src="https://2103666731-files.gitbook.io/~/files/v0/b/gitbook-x-prod.appspot.com/o/spaces%2F-MJasmeOMeAJhTVh0M75%2Fuploads%2F6ym3OHjdvi61X2Tx0UdR%2FPrivate%20Apps.png?alt=media&amp;token=5ca1a825-1d6c-4a4b-8437-d9901c30140b" alt=""><figcaption></figcaption></figure>

9. Then, you need to click on '**Create a private app**' option.

<figure><img src="https://2103666731-files.gitbook.io/~/files/v0/b/gitbook-x-prod.appspot.com/o/spaces%2F-MJasmeOMeAJhTVh0M75%2Fuploads%2FXLRsdKpLJ0LJbQXvYdse%2FPrivate%20App.png?alt=media&amp;token=ab779615-32b0-458b-9574-c7448c1388da" alt=""><figcaption></figcaption></figure>

10. After that, it will **redirect** you to an another page asking you to put the **basic details** of that particular software which you want to **integrate**. So, here we need to put the **basic details** of NeoDove CRM as we want to **integrate** with NeoDove.

<figure><img src="https://2103666731-files.gitbook.io/~/files/v0/b/gitbook-x-prod.appspot.com/o/spaces%2F-MJasmeOMeAJhTVh0M75%2Fuploads%2FuoQBBgTrOOVugA1LJj8q%2FBasic%20Info.png?alt=media&amp;token=4981c4ff-0ca2-492f-8e95-d967ed3fc02c" alt=""><figcaption></figcaption></figure>

11. After putting the basic details, you need to click on '**Scopes**' option beside the '**Basic Info**' option. Post that need to click on the '**CRM**' option from left hand side of the screen.

<figure><img src="https://2103666731-files.gitbook.io/~/files/v0/b/gitbook-x-prod.appspot.com/o/spaces%2F-MJasmeOMeAJhTVh0M75%2Fuploads%2F09IWw0dqU69DSpth4h1e%2FScope.png?alt=media&amp;token=ffcad04f-6e24-43e6-9b01-01ec596355c1" alt=""><figcaption></figcaption></figure>

12. Post that, need to **select** a few of the **scopes** in order to create the app.&#x20;

{% hint style="success" %}
**Scopes:** The details that needs to be aligned with the **Leads Data** for managing and visibility purposes. The same details will get **populate** with the Lead's Details in NeoDove post integration.&#x20;
{% endhint %}

<figure><img src="https://2103666731-files.gitbook.io/~/files/v0/b/gitbook-x-prod.appspot.com/o/spaces%2F-MJasmeOMeAJhTVh0M75%2Fuploads%2FHkrAKs7UbLnAxzpMzQeo%2FScopes.png?alt=media&amp;token=9855a45f-763d-42df-8a5e-92e75d4fb298" alt=""><figcaption></figcaption></figure>

13. After **selecting** the Scopes, then you need to click on the '**Create App**' option from the top right corner of the **screen**.

<figure><img src="https://2103666731-files.gitbook.io/~/files/v0/b/gitbook-x-prod.appspot.com/o/spaces%2F-MJasmeOMeAJhTVh0M75%2Fuploads%2FJGVc89ldOWaSUNWvxyUK%2FCreate%20App.png?alt=media&amp;token=251527b3-0e20-4848-8abc-2d11dba89e65" alt=""><figcaption></figcaption></figure>

14. Post that, a pop-up will come to **reassure** in order to create the private app or not.&#x20;

<figure><img src="https://2103666731-files.gitbook.io/~/files/v0/b/gitbook-x-prod.appspot.com/o/spaces%2F-MJasmeOMeAJhTVh0M75%2Fuploads%2FR7YGVsIbEr2fu61Fw4D9%2FCreate.png?alt=media&amp;token=dc747e02-8824-4822-8bc4-53ebcf43b3b9" alt=""><figcaption></figcaption></figure>

15. After **creation** of the NeoDove private app, then you will be able to get the **Access Token** which can be copied and then pasted on **NeoDove CRM** in the Integrations section.

<figure><img src="https://2103666731-files.gitbook.io/~/files/v0/b/gitbook-x-prod.appspot.com/o/spaces%2F-MJasmeOMeAJhTVh0M75%2Fuploads%2FK8Soz5T3EEYjWrCSNNUT%2FPrivate.png?alt=media&amp;token=1cfa28ee-d635-4cb7-b1b7-9b53a3ce99ac" alt=""><figcaption></figcaption></figure>

16. Then, you need to go to the **NeoDove Integration page** and paste the **Access Token** under the HubSpot account section and click on '**Next**'.

<figure><img src="https://2103666731-files.gitbook.io/~/files/v0/b/gitbook-x-prod.appspot.com/o/spaces%2F-MJasmeOMeAJhTVh0M75%2Fuploads%2FuXQl9Q0jgi0ESRh20BPS%2FHubspots.png?alt=media&amp;token=cc96c9b2-e0b9-4b0d-b40a-2934ea441926" alt=""><figcaption></figcaption></figure>

17. Post that, you need to select a **Campaign** with which you are integrating your **HubSpot Account**. Then accordingly, the leads will start **populating** in the NeoDove campaign from your HubSpot account.&#x20;


# WIX Integration

Learn how to integrate your NeoDove account with WIX

{% hint style="success" %}
This WIX integration enables you to **integrate** your WIX account with NeoDove.
{% endhint %}

You’ll be able to **view** all the leads **generated** from WIX on NeoDove.

## Features that come with WIX integration

***

* **Make every lead count -** Any lead who enquires for your services on Wix.com gets captured automatically into your NeoDove campaign, ensuring zero lead leakage.
* **Stop entering leads manually -**  Lead gets captured and mapped automatically, thereby eliminating the effort of entering each lead detail manually.

### Steps:

***

1. **Log in** to your NeoDove account (<https://connect.neodove.com/login>)  &#x20;
2. &#x20;Go to the **Integrations** section, present on the left side-bar of your **screen**.

<figure><img src="https://2103666731-files.gitbook.io/~/files/v0/b/gitbook-x-prod.appspot.com/o/spaces%2F-MJasmeOMeAJhTVh0M75%2Fuploads%2FnoINXfuWnrCEe8lOZwUt%2FIntegration.png?alt=media&amp;token=ab2db7c7-1db2-4039-975c-2d81a323c108" alt=""><figcaption></figcaption></figure>

3. Once clicked, then need to click on the "**WIX"** option.

<figure><img src="https://2103666731-files.gitbook.io/~/files/v0/b/gitbook-x-prod.appspot.com/o/spaces%2F-MJasmeOMeAJhTVh0M75%2Fuploads%2FpFjucmoa8U1U1oWqadAR%2FWix%20Integration.png?alt=media&amp;token=ef4ae893-0fe0-42f4-8261-a73bd0c2040e" alt=""><figcaption></figcaption></figure>

4. A menu bar will appear, select the **campaign** for which you want to integrate **WIX.**

<figure><img src="https://2103666731-files.gitbook.io/~/files/v0/b/gitbook-x-prod.appspot.com/o/spaces%2F-MJasmeOMeAJhTVh0M75%2Fuploads%2Fi4FkSp73R5BwU1sB2Er8%2FWix.png?alt=media&amp;token=20687bd4-c0b2-434c-b82e-4b87b17e0aa4" alt=""><figcaption></figcaption></figure>

5. Now, click on the **Submit** button. The integration has been **created** in NeoDove successfully.
6. To **activate** this integration, you need to send some details via e-mail to the **WIX** team.
7. The **details** of this integration are present under this integration on the **Active Integration page**. Just click on the created integration to **view the details.** Once the integration is created, you will land on this page where you will be able to see an **Endpoint** as marked in the image below. This detail will be later required when integrating.

   <br>

   <figure><img src="https://2103666731-files.gitbook.io/~/files/v0/b/gitbook-x-prod.appspot.com/o/spaces%2F-MJasmeOMeAJhTVh0M75%2Fuploads%2F0ddb1M2HjRNLZYQHZw0E%2Fimage.png?alt=media&amp;token=b9168e3d-294a-48c7-9dee-dfdb4974abb2" alt=""><figcaption></figcaption></figure>
8. Now let's head over to <https://manage.wix.com/>, log in with the required credentials and as shown in the image below select your **website** to work on.

<figure><img src="https://lh7-us.googleusercontent.com/3HG_ptyGeHYHSGGbZQMT_-HxcZcEE-uU4Gu1J_4_w2e33g2BErnuFXP27fTWoWKn6YKagzKYTxVDWv1-YFE_m8DQYLpwQWGrS8eHHwCsFJnv1gExRGy8EUrmJQy0_Ev5oYtu6bn8sEq7XhS4oIXgVE4" alt=""><figcaption></figcaption></figure>

5. &#x20;Once you are redirected to the **admin page,** you can select the option called **Automations ,** from the left side pannel.the&#x20;

<figure><img src="https://lh7-us.googleusercontent.com/OaWqADJDx8wwIBpeuCVvHFZtSXus72kubNbp9jLrWwtttfn8QPdf9Uu-VAkNBNhrdL2_BoFVl0no205uFbllbUXwEkFvK0I_Nyj35MhD353rUbhD1XLygpZ4s-h-QoQdVVZLI7DiZzpftxslREg9sCo" alt=""><figcaption></figcaption></figure>

6. &#x20;Then click on the button saying **New Automation**.

<figure><img src="https://lh7-us.googleusercontent.com/g8Z8f-OR5Cawwx47fOzKj9lno3tTx70ebeaYek-FebG5kEWLcbd0reuA9J9kc1I5ZTyAjuiEinlKSqG9Szq-2IxPv8g6dNSeptRhcG9u_4lAMe6pMZCDwtaZHaNGacYQM6sI0vW8BVTMObFuWurGIZA" alt=""><figcaption></figcaption></figure>

7. Then afterwards find the option saying **Start from Scratch** over the newly opened page.

<figure><img src="https://lh7-us.googleusercontent.com/BJVupGTqiJ1QneBnABTgnt7MnKsTnwQHTZeE2ztgRCe1HHzoHWQjlcvJlMu1ZeaSjIRVaA-2-erPPMpA4V4asS3JLLo89lSJUXtmhv1ik0nM-q71V188SeUBz4STa0G9-RmoQ_diyhssHp1mVnhHjqs" alt=""><figcaption></figcaption></figure>

8. Once a new page is opened, you can name the automation, then select the option saying 1-**Wix Forms,** 2- **Form submitted,** 3- **Send via Webhook,**  4- **Target Url** (Endpoint from Neodove)**,** 5- **Customise Structure,** 6 - **Activate**.

   \ <br>

   <figure><img src="https://lh7-us.googleusercontent.com/Hpds5xLuiF2-5LxHL3Hrr4qK_Qwq5TNtPQSMCslMEwulxXfI2RME1dzyYymDN3pMCl3cj3w4Gf2ivrqBaJ9KG3oca9H96BC1JpW_CN1O5UwXtx1XDKjRut5COJQohjmNWSE1veEwsn_oMNdQAIH7jsw" alt="" width="563"><figcaption></figcaption></figure>

{% hint style="info" %}
**Customise Structures**:-  Here you have to map the body parameters according to the NeoDove and the form field.

<br>
{% endhint %}

<figure><img src="https://lh7-us.googleusercontent.com/e1tLFdSscFP6S1SSm8gYBCJX5QsnH3vmSWNNkLHrI43sGGiFs2NdoismUo8VGUSwb513SLWGdyJrCuV5lK9TdbTxo-olkr0YCMtB2qKTGUqeMHmppq2d116ml06o9Vx71WzgjQWHe_BmmMxkEi1C_fQ" alt=""><figcaption></figcaption></figure>

<figure><img src="https://lh7-us.googleusercontent.com/L_2y_skmaMemSzgFobEHQ2_1-iAwskuBE1A_h2fDtzCtVH7hNxTSEE_K3HCTXZLDCfaauzMwmsfdJy4ObQ2pUgXHHknFf70tEuBX3s5dPL2SXOjMzb9LgoJn9HvdxZQzJ6t-QFlCei6AOAXHW-fKmHA" alt=""><figcaption></figcaption></figure>


# WooCommerce Integration

Learn how to integrate your NeoDove account with WooCommerce

{% hint style="success" %}
This WooCommerce integration enables you to **integrate** your WooCommerce account with NeoDove.
{% endhint %}

You’ll be able to **view** all the leads **generated** from WooCommerce on NeoDove.

## Features that come with WooCommerce integration

***

* **Make every lead count -** Any lead who enquires for your services on WooCommerce.com gets captured automatically into your NeoDove campaign, ensuring zero lead leakage.
* **Stop entering leads manually -**  Lead gets captured and mapped automatically, thereby eliminating the effort of entering each lead detail manually.

### Steps:

***

1. **Log in** to your NeoDove account (<https://connect.neodove.com/login>)  &#x20;
2. &#x20;Go to the **Integrations** section, present on the left side-bar of your **screen**.

<figure><img src="https://2103666731-files.gitbook.io/~/files/v0/b/gitbook-x-prod.appspot.com/o/spaces%2F-MJasmeOMeAJhTVh0M75%2Fuploads%2FnoINXfuWnrCEe8lOZwUt%2FIntegration.png?alt=media&amp;token=ab2db7c7-1db2-4039-975c-2d81a323c108" alt=""><figcaption></figcaption></figure>

3. Once clicked, then need to click on the "**WooCommerce"** option.

<figure><img src="https://2103666731-files.gitbook.io/~/files/v0/b/gitbook-x-prod.appspot.com/o/spaces%2F-MJasmeOMeAJhTVh0M75%2Fuploads%2FztdXL4nbLqF5MaX03Vsv%2FWooCommerce.png?alt=media&amp;token=d3cc4378-9810-4547-8ad2-7b415184ab05" alt=""><figcaption></figcaption></figure>

4. A menu bar will appear, select the **campaign** for which you want to integrate **WooCommerce.**

<figure><img src="https://2103666731-files.gitbook.io/~/files/v0/b/gitbook-x-prod.appspot.com/o/spaces%2F-MJasmeOMeAJhTVh0M75%2Fuploads%2FcvigR6avM5LbFeUnMzkn%2FWoo.png?alt=media&amp;token=74ca96ea-296c-4da8-844f-6fa6d6a021f9" alt=""><figcaption></figcaption></figure>

5. Now, click on the **Submit** button. The integration has been **created** in NeoDove successfully.
6. To **activate** this integration, you need to send some details via e-mail to the **WooCommerce** team.
7. The **details** of this integration are present under this integration on **Active Integration page**. Just click on the created integration to **view the details.**

<figure><img src="https://2103666731-files.gitbook.io/~/files/v0/b/gitbook-x-prod.appspot.com/o/spaces%2F-MJasmeOMeAJhTVh0M75%2Fuploads%2FAXLWNJqMoap8iQxko6MJ%2FWoos.png?alt=media&amp;token=303973df-a27e-4e3e-84fe-78889fe4d5c3" alt=""><figcaption></figcaption></figure>

8. Details will appear, Copy these details and you need to send these complete details to your **WooCommerce team** to send the lead details on **NeoDove API**.
9. Your integration will be **activated** by the WooCommerce team.


# Razorpay Integration

Learn how to integrate your NeoDove account with Razorpay

{% hint style="success" %}
This Razorpay integration enables you to **integrate** your Razorpay account with NeoDove.
{% endhint %}

You’ll be able to **view** all the leads **generated** from Razorpay on NeoDove.

## Features that come with Razorpay integration

***

* **Make every lead count -** Any lead who enquires for your services on Razorpay.com gets captured automatically into your NeoDove campaign, ensuring zero lead leakage.
* **Stop entering leads manually -**  Lead gets captured and mapped automatically, thereby eliminating the effort of entering each lead detail manually.

### Steps:

***

1. **Log in** to your NeoDove account (<https://connect.neodove.com/login>)  &#x20;
2. &#x20;Go to the **Integrations** section, present on the left side-bar of your **screen**.

<figure><img src="https://2103666731-files.gitbook.io/~/files/v0/b/gitbook-x-prod.appspot.com/o/spaces%2F-MJasmeOMeAJhTVh0M75%2Fuploads%2FnoINXfuWnrCEe8lOZwUt%2FIntegration.png?alt=media&amp;token=ab2db7c7-1db2-4039-975c-2d81a323c108" alt=""><figcaption></figcaption></figure>

3. Once clicked, then need to click on the "**Razorpay"** option.

<figure><img src="https://2103666731-files.gitbook.io/~/files/v0/b/gitbook-x-prod.appspot.com/o/spaces%2F-MJasmeOMeAJhTVh0M75%2Fuploads%2FU4Wc6sTZnWOaI55PCyLo%2FRazorpay.png?alt=media&amp;token=e82f64a6-737f-49e9-a032-809c23c3a787" alt=""><figcaption></figcaption></figure>

4. A menu bar will appear, select the **campaign** for which you want to integrate **Razorpay.**

<figure><img src="https://2103666731-files.gitbook.io/~/files/v0/b/gitbook-x-prod.appspot.com/o/spaces%2F-MJasmeOMeAJhTVh0M75%2Fuploads%2F3MulLrzhVmnVDUJNqNIB%2FRazopay.png?alt=media&amp;token=d277ea21-c039-4687-ad3d-93f58b1211e4" alt=""><figcaption></figcaption></figure>

5. Now, click on the **Submit** button. The integration has been **created** in NeoDove successfully.
6. To **activate** this integration, you need to send some details via e-mail to the **Razorpay** team.
7. The **details** of this integration are present under this integration on **Active Integration page**. Just click on the created integration to **view the details.**

<figure><img src="https://2103666731-files.gitbook.io/~/files/v0/b/gitbook-x-prod.appspot.com/o/spaces%2F-MJasmeOMeAJhTVh0M75%2Fuploads%2FEicWDEv6tNmCEzPJZKAw%2FRazorpays.png?alt=media&amp;token=2934aa63-9b89-42e9-83da-de0a5e37c456" alt=""><figcaption></figcaption></figure>

8. Details will appear, Copy these details and you need to send these complete details to your **Razorpay team** to send the lead details on **NeoDove API**.
9. Your integration will be **activated** by the Razorpay team.


# Homeonline Integration

Learn how to integrate your NeoDove account with Homeonline

{% hint style="success" %}
The **Home Online** integration enables you to **integrate** your Home Online account with NeoDove.
{% endhint %}

You’ll be able to **view** all the leads generated from **Home Online** on NeoDove.

## Features that come with Home online integration

***

* **Make every lead count-** Any lead who enquires for your services on Homeonline.com gets captured automatically into your NeoDove campaign, ensuring zero lead leakage.
* **Stop entering leads manually-**  Lead gets captured and mapped automatically, thereby eliminating the effort of entering each lead detail manually.

### Steps:

***

1. **Log in** to your NeoDove account (<https://connect.neodove.com/login>).
2. Go to the **Integrations** section, present on the left side-bar of your **screen**.&#x20;

<figure><img src="https://2103666731-files.gitbook.io/~/files/v0/b/gitbook-x-prod.appspot.com/o/spaces%2F-MJasmeOMeAJhTVh0M75%2Fuploads%2FnoINXfuWnrCEe8lOZwUt%2FIntegration.png?alt=media&amp;token=ab2db7c7-1db2-4039-975c-2d81a323c108" alt=""><figcaption></figcaption></figure>

3. Once clicked, then need to click on the "**Home Online"** option.&#x20;

<figure><img src="https://2103666731-files.gitbook.io/~/files/v0/b/gitbook-x-prod.appspot.com/o/spaces%2F-MJasmeOMeAJhTVh0M75%2Fuploads%2F3pcUJnC2KdoNbNBMQDSo%2FHome%20Online.png?alt=media&amp;token=f56fd5a2-90a3-44b0-bd68-0bd8536f9a06" alt=""><figcaption></figcaption></figure>

4. A menu bar will appear, select the **campaign** for which you want to integrate **Home Online.**

<figure><img src="https://2103666731-files.gitbook.io/~/files/v0/b/gitbook-x-prod.appspot.com/o/spaces%2F-MJasmeOMeAJhTVh0M75%2Fuploads%2F1OiU28xgnqGKQKdVnBqw%2FHomeOnline.png?alt=media&amp;token=287ee287-9d42-4ab2-93b4-dfb23895b1dd" alt=""><figcaption></figcaption></figure>

5. Now, click on the **Submit** button. The integration has been **created** in NeoDove successfully.
6. To **activate** this integration, you need to send some details via e-mail to the **Home Online** **team**.
7. The **details** of this integration are present under this integration on **Active Integration page**. Just click on the created integration to **view the details.**

<figure><img src="https://2103666731-files.gitbook.io/~/files/v0/b/gitbook-x-prod.appspot.com/o/spaces%2F-MJasmeOMeAJhTVh0M75%2Fuploads%2FB9EgOKRzuwDl0l0kHYiT%2FHomeOnlines.png?alt=media&amp;token=df2d67cd-182f-4e98-b9e1-a0a331c8ee6b" alt=""><figcaption></figcaption></figure>

8. Details will appear, Copy these details and you need to send these complete details to your **Home Online team** to send the lead details on **NeoDove API**.
9. Your integration will be **activated** by the Home Online team.


# 99Acres Integration

Learn how to integrate your NeoDove account with 99acres

{% hint style="success" %}
This **99Acres integration** enables you to **integrate** your 99Acres account with NeoDove.
{% endhint %}

You’ll be able to view all the leads generated from 99Acres on NeoDove.

## Features that come with home online integration

***

* **Make every lead count-** Any lead who enquires for your services on 99Acres.com gets captured automatically into your NeoDove campaign, ensuring zero lead leakage.
* **Stop entering leads manually-**  Lead gets captured and mapped automatically, thereby eliminating the effort of entering each lead detail manually.

### Steps:

***

1. **Log in** to your NeoDove account (<https://connect.neodove.com/login>).
2. Go to the **Integrations** section, present on the left side-bar of your screen.&#x20;

<figure><img src="https://2103666731-files.gitbook.io/~/files/v0/b/gitbook-x-prod.appspot.com/o/spaces%2F-MJasmeOMeAJhTVh0M75%2Fuploads%2FnoINXfuWnrCEe8lOZwUt%2FIntegration.png?alt=media&amp;token=ab2db7c7-1db2-4039-975c-2d81a323c108" alt=""><figcaption></figcaption></figure>

3. Once clicked, then need to click on the "**99Acres**" option.

<figure><img src="https://2103666731-files.gitbook.io/~/files/v0/b/gitbook-x-prod.appspot.com/o/spaces%2F-MJasmeOMeAJhTVh0M75%2Fuploads%2Frz54wfKv7xtcAb3lfXXF%2F99Acres.png?alt=media&amp;token=cb4606ef-0cc4-4d15-8c8a-fd4f63bae620" alt=""><figcaption></figcaption></figure>

4. A menu bar will appear, select the **campaign** for which you want to integrate **99 Acres.**&#x20;

<figure><img src="https://2103666731-files.gitbook.io/~/files/v0/b/gitbook-x-prod.appspot.com/o/spaces%2F-MJasmeOMeAJhTVh0M75%2Fuploads%2F2r9um69NhPkn8r3URk4q%2F99Acres2.png?alt=media&amp;token=e61a8545-d56a-484e-8cbc-c8f84a01ef29" alt=""><figcaption></figcaption></figure>

5. Now, click on the **Submit** button. The integration has been **created** in NeoDove successfully.
6. To **activate** this integration, you need to send some details via e-mail to the **99 Acres** team.
7. The details of this **integration** are present under this integration on **Active Integration page**. Just click on the created integration to **view the details.**&#x20;

<figure><img src="https://2103666731-files.gitbook.io/~/files/v0/b/gitbook-x-prod.appspot.com/o/spaces%2F-MJasmeOMeAJhTVh0M75%2Fuploads%2FKeBhd9LiamTDIuYFL5WQ%2F99Acres3.png?alt=media&amp;token=091fe29a-15bb-4fb8-bc23-b2f275b242ac" alt=""><figcaption></figcaption></figure>

8. Details will appear, Copy these details and you need to **send** these complete details to your **99 Acres team** to send the lead details on **NeoDove API**.
9. Your integration will be activated by the **99 Acres** team.


# Housing.com Integration

Learn how to integrate your NeoDove account with Housing.com

{% hint style="success" %}
This **Housing.com** integration enables you to integrate your Housing.com account with NeoDove.
{% endhint %}

You’ll be able to view all the leads generated from Housing.com on NeoDove.‌

## Features that come with home online integration‌

* **Make every lead count-** Any lead who enquires for your services on Housing.com gets captured automatically into your NeoDove campaign, ensuring zero lead leakage.
* **Stop entering leads manually-** Lead gets captured and mapped automatically, thereby eliminating the effort of entering each lead detail manually.

### ‌

### Steps:

1. **Log in** to your NeoDove account (<https://connect.neodove.com/login>).
2. Go to the **Integrations** section, present on the left side-bar of your screen.&#x20;

<figure><img src="https://2103666731-files.gitbook.io/~/files/v0/b/gitbook-x-prod.appspot.com/o/spaces%2F-MJasmeOMeAJhTVh0M75%2Fuploads%2FnoINXfuWnrCEe8lOZwUt%2FIntegration.png?alt=media&amp;token=ab2db7c7-1db2-4039-975c-2d81a323c108" alt=""><figcaption></figcaption></figure>

3. Once clicked, then need to click on the "**Housing.com**" option.

<figure><img src="https://2103666731-files.gitbook.io/~/files/v0/b/gitbook-x-prod.appspot.com/o/spaces%2F-MJasmeOMeAJhTVh0M75%2Fuploads%2FOHnlC5uV7rnjwNQBvo8P%2FHousing.png?alt=media&amp;token=e9c9cb43-c006-453d-8277-f9d4b0fe0cfc" alt=""><figcaption></figcaption></figure>

4. Select the Integration type as "**PUSH**" and click on **Next**.

<figure><img src="https://2103666731-files.gitbook.io/~/files/v0/b/gitbook-x-prod.appspot.com/o/spaces%2F-MJasmeOMeAJhTVh0M75%2Fuploads%2FI6hBPAEGskj5DQqOcDOd%2FPush.png?alt=media&amp;token=644dfabd-daf5-4f58-98d4-4d8ae3830b10" alt=""><figcaption></figcaption></figure>

5. A menu bar will appear, select the **campaign** for which you want to integrate **Housing.com.**

<figure><img src="https://2103666731-files.gitbook.io/~/files/v0/b/gitbook-x-prod.appspot.com/o/spaces%2F-MJasmeOMeAJhTVh0M75%2Fuploads%2FfJBtIskFThl69ykrEuzV%2FHousing%202.png?alt=media&amp;token=07e9bc54-9d9f-4ca9-bab4-5689e58dc7ee" alt=""><figcaption></figcaption></figure>

6. Now, click on the **Submit** button. The integration has been **created** in NeoDove successfully.
7. To **activate** this integration, you need to send some details via e-mail to the **Housing.com** **team**.
8. The details of this integration are present under this integration on **Active Integration page**. Just click on the created integration to **view the details.**&#x20;

<figure><img src="https://2103666731-files.gitbook.io/~/files/v0/b/gitbook-x-prod.appspot.com/o/spaces%2F-MJasmeOMeAJhTVh0M75%2Fuploads%2FwK4V6lwtvwQklIGn3nw2%2FHousing%203.png?alt=media&amp;token=783f83a7-1fde-47d6-b9cc-79989a5dbdc2" alt=""><figcaption></figcaption></figure>

9. Details will appear, Copy these details and you need to send these complete details to your **Housing.com team** to send the lead details on **NeoDove API**.
10. Your integration will be activated by the **Housing.com** **team**.


# Magicbricks Integration

Learn how to integrate your NeoDove account with Magicbricks

{% hint style="success" %}
This **Magicbricks integration** enables you to **integrate** your Magicbricks account with NeoDove. You’ll be able to **view** all the leads generated from Magicbricks on NeoDove.
{% endhint %}

## Features that come with Magicbricks integration

***

* **Make every lead count-** Any lead who enquires for your services on Magicbricks.com gets captured automatically into your NeoDove campaign, ensuring zero lead leakage.
* **Stop entering leads manually-**  Lead gets captured and mapped automatically, thereby eliminating the effort of entering each lead detail manually.

### Steps:

***

1. **Log in** to your NeoDove account (<https://connect.neodove.com/login>).
2. Go to the **Integrations** section, present on the left side-bar of your screen.

<figure><img src="https://2103666731-files.gitbook.io/~/files/v0/b/gitbook-x-prod.appspot.com/o/spaces%2F-MJasmeOMeAJhTVh0M75%2Fuploads%2FnoINXfuWnrCEe8lOZwUt%2FIntegration.png?alt=media&amp;token=ab2db7c7-1db2-4039-975c-2d81a323c108" alt=""><figcaption></figcaption></figure>

3. Once clicked, then need to click on the "**MagicBricks**" option.

<figure><img src="https://2103666731-files.gitbook.io/~/files/v0/b/gitbook-x-prod.appspot.com/o/spaces%2F-MJasmeOMeAJhTVh0M75%2Fuploads%2FiQT7wsgECkx8ZiyfRTqB%2FMagic%20Bricks.png?alt=media&amp;token=84e82ef0-c019-44d9-933a-fa535309c913" alt=""><figcaption></figcaption></figure>

4. A menu bar will appear, select the **campaign** for which you want to integrate and write the name of your **Magic Bricks Project.**

<figure><img src="https://2103666731-files.gitbook.io/~/files/v0/b/gitbook-x-prod.appspot.com/o/spaces%2F-MJasmeOMeAJhTVh0M75%2Fuploads%2FPh9mIvo6v9GoWTZ57WLG%2FMagicbricks.png?alt=media&amp;token=d3be1666-2b97-4014-9dd9-2e952a5493f0" alt=""><figcaption></figcaption></figure>

5. Now, click on the **Submit** button. The integration has been created in NeoDove successfully.
6. To activate this integration, you need to send some details via e-mail to the **Magic Bricks** **team**.
7. The details of this integration are present under this integration on **Active Integration page**. Just click on the created integration to **view the details.**

<figure><img src="https://2103666731-files.gitbook.io/~/files/v0/b/gitbook-x-prod.appspot.com/o/spaces%2F-MJasmeOMeAJhTVh0M75%2Fuploads%2FMH5gA31FM0PjnI7dFUby%2FMagic%20Bricks%20Integration.png?alt=media&amp;token=2381e829-d174-47e0-919f-6747d9dae223" alt=""><figcaption></figcaption></figure>

8. **Details** will appear, Copy these details and you need to send these complete details to your **Magic Bricks team** to send the lead details on **NeoDove API**.
9. Your integration will be activated by the **Magic Bricks** **team.**


# Custom Integration

Learn how to integrate your NeoDove account with Custom Integrations

The Custom Integration module in NeoDove allows you to generate an **endpoint** to create leads in a specific campaign.

{% hint style="success" %}
This documentation **explains** how to create the **endpoint** and test it using **Postman**.
{% endhint %}

### Generating the Endpoint

***

1. **Access NeoDove Admin Portal**
   * Log in to NeoDove Admin Portal.
2. **Navigate to Integrations**

   * Click on "Integrations" in the Admin Portal.

   <figure><img src="https://2103666731-files.gitbook.io/~/files/v0/b/gitbook-x-prod.appspot.com/o/spaces%2F-MJasmeOMeAJhTVh0M75%2Fuploads%2FnoINXfuWnrCEe8lOZwUt%2FIntegration.png?alt=media&amp;token=ab2db7c7-1db2-4039-975c-2d81a323c108" alt=""><figcaption></figcaption></figure>
3. **Enable Custom Integration**
   * If the "Custom Integration" option is not enabled, please contact your Customer Success Manager (CSM) or the Support Team to enable it for you.
4. **Start the Integration**

   * Click on "Custom Integration" and proceed to the next step.

   <figure><img src="https://2103666731-files.gitbook.io/~/files/v0/b/gitbook-x-prod.appspot.com/o/spaces%2F-MJasmeOMeAJhTVh0M75%2Fuploads%2FBNPwQomroKzzlg8AM93c%2FCustom%20Integration.png?alt=media&amp;token=ef364ea6-456d-4cd0-a05f-1f3d2e4e04d1" alt=""><figcaption></figcaption></figure>
5. **Select the Parameter Type**

   * Select the Custom Integration Parameter Type.
   * Mostly, we select the Body Params rather than Query Params.

   <figure><img src="https://2103666731-files.gitbook.io/~/files/v0/b/gitbook-x-prod.appspot.com/o/spaces%2F-MJasmeOMeAJhTVh0M75%2Fuploads%2FcM0dVBshBjLHjdqVKU2a%2FParams.png?alt=media&amp;token=d0439168-3fd0-45e0-928e-dec595e00d96" alt=""><figcaption></figcaption></figure>
6. **Choose the Campaign**

   * Select the campaign where you want to create leads.

   <figure><img src="https://2103666731-files.gitbook.io/~/files/v0/b/gitbook-x-prod.appspot.com/o/spaces%2F-MJasmeOMeAJhTVh0M75%2Fuploads%2FYyi7GnW0vanStgZ3DxFB%2FCustom%20Integrations.png?alt=media&amp;token=549e4f94-0057-45e1-8d64-72933a4c31ab" alt=""><figcaption></figcaption></figure>
7. **Submit**
   * Click on "Submit" to generate the endpoint.
8. **Endpoint URL**

   * You will be taken to the Active Integrations Page, where you'll find the endpoint URL. Copy the URL against the key called "Endpoint."

   <figure><img src="https://2103666731-files.gitbook.io/~/files/v0/b/gitbook-x-prod.appspot.com/o/spaces%2F-MJasmeOMeAJhTVh0M75%2Fuploads%2FJY1jLnI9fIIQ4YKm55sS%2FCustom%20Details.png?alt=media&amp;token=01140744-a514-43ba-a110-9fa8b2188430" alt=""><figcaption></figcaption></figure>

### Testing the Endpoint Using Postman

***

1. **Open Postman**
   * Log in to Postman.
2. **Create a New Request**
   * In the Postman workspace, click on the "+" icon next to the "Overview" tab to create a new request.
3. **Configure the Request**
   * Change the method from GET to POST.
   * Paste the endpoint URL generated in NeoDove into the "Enter URL or paste text" box.
4. **Set Request Body**
   * In the request options, select "Body."
   * Under the Body options, choose "raw."
5. **Specify Data Format**
   * Change the drop-down from "Text" to "JSON" since NeoDove only accepts JSON format.
6. **Enter Data in JSON Format**

   * In the text area, enter your data in JSON format. Ensure that your JSON includes keys for "name," "mobile," and "email." Mobile is mandatory for lead creation. Other keys for additional data can have custom names.

   Sample of of JSON format is available in the next step.&#x20;
7. ```json
   {
     "name": "Test Name",
     "mobile": "1234567890",
     "email": "abc@neodove.com",
     "City": "Jaipur",
     "State": "Rajasthan"
   }
   ```
8. **Test the Endpoint**
   * Click the "SEND" button to test the endpoint.
9. **Verify Response**
   * In the "Response" tab at the bottom, you should see "OK" if the test is successful.
10. **Check NeoDove**
    * Return to NeoDove and navigate to the campaign to verify if a lead has been created with the details from the JSON data.

### Important Notes

***

* When copying the endpoint URL from NeoDove, make sure to select "Endpoint" (not "Endpoint(Update only)").
* The method for hitting the endpoint must be POST.
* Data should be sent in Raw JSON format.
* Ensure that the keys for the lead's name, mobile number, and email are named "name," "mobile," and "email." Other keys can have custom names.

{% hint style="success" %}
This documentation should **guide** you through the process of generating an **endpoint** and testing it using **Postman** for Custom Integration in NeoDove.&#x20;
{% endhint %}

If you have any further questions or require assistance, please don't hesitate to reach out to our **Product Team**. We are here to help you make the most of **NeoDove's capabilities**.


# IndiaMart Integration

Learn how to integrate your NeoDove account with IndiaMart

This **IndiaMart integration** enables you to **integrate** your IndiaMart's account with NeoDove. You’ll be able to **view** all the leads generated from IndiaMart on NeoDove.\
\
There are two ways you can connect your IndiaMart account with NeoDove. Either with a **PULL integration which fetches leads from IndiaMart every 10 minutes** or with a **PUSH integration which generates leads on NeoDove in real time.** \
\
However Push Integration on your IndiaMart Platform is subject to availability from IndiaMart's side. For more details you should connect with your account manager from IndiaMart.&#x20;

### Which leads are created from this integration?

***

IndiaMart integration can fetch all types of leads as mentioned below

<figure><img src="https://2103666731-files.gitbook.io/~/files/v0/b/gitbook-x-prod.appspot.com/o/spaces%2F-MJasmeOMeAJhTVh0M75%2Fuploads%2FkXX99ogo4L0qai9y6N9v%2FWhatsApp%20Image%202024-04-29%20at%2013.49.20_793e4408.jpg?alt=media&amp;token=4e3bae6c-deb0-4153-8323-1f275f9d1b19" alt=""><figcaption></figcaption></figure>

The leads created will have a value called QUERY\_TYPE as part of other details which you can use to distinguish between how this lead was created on IndiaMart platform.&#x20;

For example if a lead was created because someone filled a query on your sellers page, then the QUERY\_TYPE for that lead in NeoDove will say "W" since its a Direct Enquiry. <br>

### Pull Integration Steps:

***

1. **Login** on your IndiaMart Account.
2. **Navigate** to the left side Menu Bar on your account.
3. Under settings you will find "**CRM Key generation**" click on it.<br>

   <figure><img src="https://2103666731-files.gitbook.io/~/files/v0/b/gitbook-x-prod.appspot.com/o/spaces%2F-MJasmeOMeAJhTVh0M75%2Fuploads%2FxooeEtONRDxL5VuHkR7V%2FScreenshot%202022-02-24%20094547-1.png?alt=media&amp;token=03384693-e356-4cc8-ac4f-66662557a87a" alt=""><figcaption></figcaption></figure>
4. Then click on "**Generate Key**".<br>

   <figure><img src="https://2103666731-files.gitbook.io/~/files/v0/b/gitbook-x-prod.appspot.com/o/spaces%2F-MJasmeOMeAJhTVh0M75%2Fuploads%2FpYgbkEhPqkC5NHwGCNuy%2Fimage.png?alt=media&amp;token=aef7bc30-603a-499e-a991-42d6dafa1a85" alt=""><figcaption></figcaption></figure>
5. Copy the **key** which will appear.
6. Go to NeoDove and click on Integrations<br>

   <figure><img src="https://2103666731-files.gitbook.io/~/files/v0/b/gitbook-x-prod.appspot.com/o/spaces%2F-MJasmeOMeAJhTVh0M75%2Fuploads%2FAlNNqPVjW10PD45dU4k8%2Fimage.png?alt=media&amp;token=9d8a1905-c0a3-433e-9b3b-35f6bbc3bbe2" alt=""><figcaption></figcaption></figure>
7. On this page, click on IndiaMart and select PULL
8. Now add the registered phone number connected with IndiaMart against Phone Number and against Key, paste the value you copied in step 5<br>

   <figure><img src="https://2103666731-files.gitbook.io/~/files/v0/b/gitbook-x-prod.appspot.com/o/spaces%2F-MJasmeOMeAJhTVh0M75%2Fuploads%2FNyu73xvR6kjakxAl9rqc%2Fimage.png?alt=media&amp;token=b9cc1af0-f9d4-4bed-bc59-8bbff2b3ab9e" alt=""><figcaption></figcaption></figure>
9. Click Next and here setup which campaign should the leads be created in NeoDove from this integration and click on Submit<br>

   <figure><img src="https://2103666731-files.gitbook.io/~/files/v0/b/gitbook-x-prod.appspot.com/o/spaces%2F-MJasmeOMeAJhTVh0M75%2Fuploads%2FmaAKlvVJBbREF7ajdFDx%2Fimage.png?alt=media&amp;token=81f8714e-f22b-454a-a6c5-36a72adc3a5c" alt=""><figcaption></figcaption></figure>

### Push Integration Steps:

***

1. Go to IndiaMart portal and click on Lead manager<br>

   <figure><img src="https://2103666731-files.gitbook.io/~/files/v0/b/gitbook-x-prod.appspot.com/o/spaces%2F-MJasmeOMeAJhTVh0M75%2Fuploads%2FHVqLRtLRYuqP3uiD92iV%2Flms_navigate-1.png?alt=media&amp;token=eaaf3c27-641d-446d-92aa-9ec35ccfe220" alt=""><figcaption></figcaption></figure>
2. Click on three dots and click on Import/Export leads and then select IM Leads Push API<br>

   <figure><img src="https://2103666731-files.gitbook.io/~/files/v0/b/gitbook-x-prod.appspot.com/o/spaces%2F-MJasmeOMeAJhTVh0M75%2Fuploads%2FbMKeOrLCBn6CocOh0XyG%2F3-dot-menu.png?alt=media&amp;token=ee30c93c-3caa-4333-806f-592c574b888f" alt=""><figcaption></figcaption></figure>
3. In source, select NeoDove<br>

   <figure><img src="https://2103666731-files.gitbook.io/~/files/v0/b/gitbook-x-prod.appspot.com/o/spaces%2F-MJasmeOMeAJhTVh0M75%2Fuploads%2FZ1mHMUtg9WjbPwkPgOBm%2FDrop-Down.png?alt=media&amp;token=66d06cb8-5a97-4e6f-a940-6fbf14f708d3" alt=""><figcaption></figcaption></figure>
4. Click on Generate Key to generate a secret key<br>

   <figure><img src="https://2103666731-files.gitbook.io/~/files/v0/b/gitbook-x-prod.appspot.com/o/spaces%2F-MJasmeOMeAJhTVh0M75%2Fuploads%2F3cccBaXoZCfGwNPkdBRG%2FFinal-SS-1.png?alt=media&amp;token=e0701edc-8d80-4bb0-b64c-8fe46ffc0b4b" alt=""><figcaption></figcaption></figure>
5. Copy the value against Current Key
6. Go to NeoDove and click on Integrations<br>

   <figure><img src="https://2103666731-files.gitbook.io/~/files/v0/b/gitbook-x-prod.appspot.com/o/spaces%2F-MJasmeOMeAJhTVh0M75%2Fuploads%2FMnmJGXIA16pqFT5mlZUN%2Fimage.png?alt=media&amp;token=e349e42d-d9ce-4995-a35a-bc74f6dcd080" alt=""><figcaption></figcaption></figure>
7. Click On IndiaMart and select Push <br>

   <figure><img src="https://2103666731-files.gitbook.io/~/files/v0/b/gitbook-x-prod.appspot.com/o/spaces%2F-MJasmeOMeAJhTVh0M75%2Fuploads%2FbyA6xsJOf48MGr59dob3%2Fimage.png?alt=media&amp;token=2acb1677-72ae-4b92-90af-283e4438017a" alt=""><figcaption></figcaption></figure>
8. Now paste the key you copied from IndiaMart in step 5 and click on Next
9. On this last step, setup where you want the leads from this integration should get created and then click on Submit\ <br>

   <figure><img src="https://2103666731-files.gitbook.io/~/files/v0/b/gitbook-x-prod.appspot.com/o/spaces%2F-MJasmeOMeAJhTVh0M75%2Fuploads%2F56k51PH0Ivqzk3Wi8DsO%2Fimage.png?alt=media&amp;token=15aad9b0-07b1-4a7d-81b5-49a2bb8efff9" alt=""><figcaption></figcaption></figure>

### Common Scenarios of error in IndiaMart Integration

***

1. When the **secret key** you are entering is incorrect.

In this case, NeoDove will show you this **error** and the integration will not get **completed**.


# IndiaMart Integration Push Method

Let us understand the benefits of Integration Push Method

A **premium IndiaMart account** that generates leads can get **integrated** with Neodove and this integration ensures that inquiries from IndiaMart are **automatically reflected** in Neodove.&#x20;

Leads captured in IndiaMart will **seamlessly appear** in Neodove, aligned with any campaign you select for **integration**.&#x20;

This functionality allows users and agents to **access these leads** promptly, enabling calls and sales conversions.&#x20;

Previously, we have utilized the **IndiaMart Pull method** to import leads to Neodove and the pull method typically used to update leads **within five minutes** in Neodove campaigns.&#x20;

However, now we have came up with an **improved process** to enhance user experience and efficiency that is the **Push method**.&#x20;

{% hint style="success" %}
The Push method **instantly updates** your Neodove account as soon as a lead is generated in IndiaMart on **real time**.
{% endhint %}

<figure><img src="https://2103666731-files.gitbook.io/~/files/v0/b/gitbook-x-prod.appspot.com/o/spaces%2F-MJasmeOMeAJhTVh0M75%2Fuploads%2FFoYgsj7BUWkAMsr7i8Ag%2Fimage.png?alt=media&amp;token=b05edbc6-01f4-49f6-a1c3-5c0eaaab7f8b" alt=""><figcaption></figcaption></figure>

### Steps:

***

1. First you need to **log in** using your admin credentials. The **dashboard** will be the first screen you see. Post that, navigate to the '**Integrations**' option on the left-hand side and click it.

<figure><img src="https://2103666731-files.gitbook.io/~/files/v0/b/gitbook-x-prod.appspot.com/o/spaces%2F-MJasmeOMeAJhTVh0M75%2Fuploads%2Fmjfys8NRboLZt2WlApyG%2Fimage.png?alt=media&amp;token=9e6d4358-7153-4c3b-a74b-270ee8a7e6fe" alt=""><figcaption></figcaption></figure>

2. A **new page** will appear and over there you need to scroll down to find '**IndiaMart**' among other apps that can be **integrated** with Neodove. Post that, click on '**IndiaMart**' to proceed.

<figure><img src="https://2103666731-files.gitbook.io/~/files/v0/b/gitbook-x-prod.appspot.com/o/spaces%2F-MJasmeOMeAJhTVh0M75%2Fuploads%2FQctw85dokSJJpNBrZTmG%2Fimage.png?alt=media&amp;token=6759145a-1105-4123-b14f-e5936a6701b5" alt=""><figcaption></figcaption></figure>

3. You'll see the options '**Push**' and '**Pull**.' Previously, we used to use '**Pull**' option which used to update leads in Neodove in **every five minutes**. Now, choose '**Push**' for instant updates on **real time basis**.

<figure><img src="https://2103666731-files.gitbook.io/~/files/v0/b/gitbook-x-prod.appspot.com/o/spaces%2F-MJasmeOMeAJhTVh0M75%2Fuploads%2FtyvYB0D5cPectQBStRGw%2Fimage.png?alt=media&amp;token=2da9fb62-073c-4aee-b255-434fc9d23a3f" alt=""><figcaption></figcaption></figure>

4. By selecting '**Push**' option, leads will be captured in **real-time** and directly reflect in Neodove campaigns. Post that click on '**Next**'.

<figure><img src="https://2103666731-files.gitbook.io/~/files/v0/b/gitbook-x-prod.appspot.com/o/spaces%2F-MJasmeOMeAJhTVh0M75%2Fuploads%2Ft9sTbVQm2iKgwldVYGHx%2Fimage.png?alt=media&amp;token=b4fbb860-a750-4033-9744-170f77ca9980" alt=""><figcaption></figcaption></figure>

5. Then Neodove will ask if you want to **create** a new campaign or **add leads** to an existing one. You can **choose** to create a new campaign. So, for that you can **select the pipeline** where the new campaign will be created, such as '**Sales**'.

<figure><img src="https://2103666731-files.gitbook.io/~/files/v0/b/gitbook-x-prod.appspot.com/o/spaces%2F-MJasmeOMeAJhTVh0M75%2Fuploads%2FF6ZaDX9YKJb9u4DmD3SD%2Fimage.png?alt=media&amp;token=102333fc-2fc9-499c-bd73-255ec774626c" alt=""><figcaption></figcaption></figure>

6. After **selecting** the Pipeline where you want the **campaign** to be created, click on '**Submit**' to complete the setup.

<figure><img src="https://2103666731-files.gitbook.io/~/files/v0/b/gitbook-x-prod.appspot.com/o/spaces%2F-MJasmeOMeAJhTVh0M75%2Fuploads%2FrpdHiAhuRtglTZ9ifOw7%2Fimage.png?alt=media&amp;token=3a8dde66-2251-4b01-bf16-830185111f93" alt=""><figcaption></figcaption></figure>

7. Now, your IndiaMart campaign is **being created** in Neodove. You can send these details to your IndiaMart account manager to **activate** the integration, or do it **directly** from your IndiaMart account.

<figure><img src="https://2103666731-files.gitbook.io/~/files/v0/b/gitbook-x-prod.appspot.com/o/spaces%2F-MJasmeOMeAJhTVh0M75%2Fuploads%2F1cwCa8jVja9LnlXfs1Lv%2Fimage.png?alt=media&amp;token=13b2e7bb-84ff-4004-9139-3642baa69195" alt=""><figcaption></figcaption></figure>

8. Once integration is **successful**, all new leads generated on IndiaMart **will appear** in Neodove instantly. This update is a **significant enhancement** for Neodove users. With the push method, leads usually **get reflected** in Neodove immediately, **eliminating** the previous five-minute delay. This real-time update **enhances** lead management efficiency.

{% hint style="success" %}
By **implementing** the push method, leads are now **automatically updated** in Neodove the instant they are **generated** in IndiaMart.
{% endhint %}

This automation **improves** time management and operational efficiency. The process now **operates** on a real-time basis, facilitating **efficient lead management**.


# Shopify Integration

Learn how to integrate your NeoDove account with Shopify

This Shopify integration enables you to **integrate** your Shopify account with NeoDove.&#x20;

{% hint style="success" %}
You’ll be able to view all the new orders **generated** from Shopify on NeoDove as lead.
{% endhint %}

## Features that come with Shopify integration

***

* **Make every lead count -** Any person who is ordering something on your Shopify sites, gets captured automatically into your NeoDove campaign, ensuring zero lead leakage.
* **Stop entering leads manually -**  Lead gets captured and mapped automatically, thereby eliminating the effort of entering each lead detail manually.

### Steps:

***

1. **Log in** to your NeoDove account (<https://connect.neodove.com/login>).
2. Go to the **Integrations** section, present on the left side-bar of your screen.

<figure><img src="https://2103666731-files.gitbook.io/~/files/v0/b/gitbook-x-prod.appspot.com/o/spaces%2F-MJasmeOMeAJhTVh0M75%2Fuploads%2FnoINXfuWnrCEe8lOZwUt%2FIntegration.png?alt=media&amp;token=ab2db7c7-1db2-4039-975c-2d81a323c108" alt=""><figcaption></figcaption></figure>

3. Once clicked, it will re-direct to a new window which shows all the types of **Integration** present in the system.&#x20;
4. Then need to click on the "**Shopify**" option from the lot.

<figure><img src="https://2103666731-files.gitbook.io/~/files/v0/b/gitbook-x-prod.appspot.com/o/spaces%2F-MJasmeOMeAJhTVh0M75%2Fuploads%2FSXnGqLBjcbx6Z2t2nwAo%2FShopify.png?alt=media&amp;token=63157918-d4ba-4e72-b9bb-bf8c36f36484" alt=""><figcaption></figcaption></figure>

5. A menu bar will appear, select the **campaign** for which you want to integrate Shopify.

<figure><img src="https://2103666731-files.gitbook.io/~/files/v0/b/gitbook-x-prod.appspot.com/o/spaces%2F-MJasmeOMeAJhTVh0M75%2Fuploads%2Fc99MKrwZtbedxz3OZsmZ%2FShopify%20Campaign.png?alt=media&amp;token=19402b6d-ccb6-4c77-ba6f-ab5b20e65a15" alt=""><figcaption></figcaption></figure>

6. Now, click on the **Submit** button. The integration has been **created** in NeoDove successfully.

<figure><img src="https://2103666731-files.gitbook.io/~/files/v0/b/gitbook-x-prod.appspot.com/o/spaces%2F-MJasmeOMeAJhTVh0M75%2Fuploads%2Fey3lQVuqJWn8ZZvl1tJc%2FShopify%20Done.png?alt=media&amp;token=0b994d2a-aacc-4f14-9545-7dee3dfd7433" alt=""><figcaption></figcaption></figure>

7. To **activate** this integration, you need take the **API URL (Endpoint)** from NeoDove Active Integration and **add** into your Shopify Account.

### Steps to add this API URL in your Shopify Account

***

1. Login into your **Shopify Account**.
2. Go to "**Settings**" and then navigate to the "**Notifications**" option.
3. Click on **Webhook**.
4. Create a new **webhook** and there add this **API URL** of NeoDove.
5. Then select the **event/trigger** of this webhook as **"Order Creation".**
6. Save it and your **integration** is completed now.


# Pabbly Integration

Learn how to integrate your NeoDove account with Pabbly

This Pabbly integration enables you to **integrate** your Pabbly account with NeoDove.&#x20;

{% hint style="success" %}
You’ll be able to view all the new leads **generated** from any software through Pabbly on NeoDove as **lead**.
{% endhint %}

If you need to **retrieve** lead details from software not **integrated** with NeoDove, you can use Pabbly.&#x20;

{% hint style="success" %}
It's a **third-party automation tool** that reads lead details from any software via webhook and sends them to NeoDove in a **format compatible** with its API.
{% endhint %}

## Features that come with Pabbly integration

***

* **Make every lead count-** Any lead who enquires for your services on the particular software triggered to Pabbly gets captured automatically into your NeoDove campaign, ensuring zero lead leakage by the Action button.
* **Stop entering leads manually-**  Lead gets captured and mapped automatically, thereby eliminating the effort of entering each lead detail manually.

### Steps:

***

1. **Log in** to your NeoDove account (<https://connect.neodove.com/login>).
2. Go to the **Integrations** section, present on the left side-bar of your screen.

<figure><img src="https://2103666731-files.gitbook.io/~/files/v0/b/gitbook-x-prod.appspot.com/o/spaces%2F-MJasmeOMeAJhTVh0M75%2Fuploads%2FnoINXfuWnrCEe8lOZwUt%2FIntegration.png?alt=media&amp;token=ab2db7c7-1db2-4039-975c-2d81a323c108" alt=""><figcaption></figcaption></figure>

3. Once clicked, then need to click on the "**Pabbly**" option.

<figure><img src="https://2103666731-files.gitbook.io/~/files/v0/b/gitbook-x-prod.appspot.com/o/spaces%2F-MJasmeOMeAJhTVh0M75%2Fuploads%2FrIzLuzKLvoDCe6Q8jzEt%2FPabblys.png?alt=media&amp;token=a97cf1f0-e40b-480f-b43c-df83676b5988" alt=""><figcaption></figcaption></figure>

4. A menu bar will appear, select the **campaign** for which you want to integrate **Pabbly.**

<figure><img src="https://2103666731-files.gitbook.io/~/files/v0/b/gitbook-x-prod.appspot.com/o/spaces%2F-MJasmeOMeAJhTVh0M75%2Fuploads%2FMN35tFXp7MtOZN57TWof%2FPabbly.png?alt=media&amp;token=acfdf08c-6723-4a4f-8504-8b73ec754697" alt=""><figcaption></figcaption></figure>

5. Now, click on the **Submit** button. The integration has been created in NeoDove successfully.
6. To activate this integration, you need to copy the **Integration ID** and need to go to your **Pabbly account** and need to put it there for the integration.
7. The details of this integration are present under this integration on **Active Integration page**. Just click on the created integration to **view the details.**

<figure><img src="https://2103666731-files.gitbook.io/~/files/v0/b/gitbook-x-prod.appspot.com/o/spaces%2F-MJasmeOMeAJhTVh0M75%2Fuploads%2FljJbb29V8C10PMdhOXEs%2FPabbly%20Integration.png?alt=media&amp;token=0f7f1236-ff86-473f-87f6-d6c1fe8026a6" alt=""><figcaption></figcaption></figure>

### Pabbly Automation:

***

1. Firstly you need to go to (**accounts.pabbly.com**) and login through your **credentials**.
2. Post login, you will be redirected to the '**All Pabbly Apps**'. There you need to click on the **Pabbly Connect** option.

<figure><img src="https://2103666731-files.gitbook.io/~/files/v0/b/gitbook-x-prod.appspot.com/o/spaces%2F-MJasmeOMeAJhTVh0M75%2Fuploads%2FOOrOjfh9CVlKD7wIH4cA%2FPabbly%20Connect.png?alt=media&amp;token=41d66928-0ccb-4b0e-8f36-d1893dffe08d" alt=""><figcaption></figcaption></figure>

3. Then, you will be redirected to your **Dashboard** where you will be able to view your **existing automation** and even also would be able to create a **new workflow automation** as well.

<figure><img src="https://2103666731-files.gitbook.io/~/files/v0/b/gitbook-x-prod.appspot.com/o/spaces%2F-MJasmeOMeAJhTVh0M75%2Fuploads%2F3CME6lL7RFq7XhajAZlu%2FPabbly%20Dashboard.png?alt=media&amp;token=d76d8fc2-15b3-46ac-82e0-2f8ce1a6dfcd" alt=""><figcaption></figcaption></figure>

4. If you want to **create** a new automation workflow, then need to click on '**Create Workflow**'.

<figure><img src="https://2103666731-files.gitbook.io/~/files/v0/b/gitbook-x-prod.appspot.com/o/spaces%2F-MJasmeOMeAJhTVh0M75%2Fuploads%2FMntZmdDTVlOuaiekEiaw%2FCreate.png?alt=media&amp;token=7d122d9f-477b-4753-b6cd-4391620c7576" alt=""><figcaption></figcaption></figure>

5. You can **search** for your application name in the **Trigger search button** and if its not there then you can use the **webhook option** so that atleast with the help of webhook, Pabbly would be able to **read** the data from that **particular software**.

<figure><img src="https://2103666731-files.gitbook.io/~/files/v0/b/gitbook-x-prod.appspot.com/o/spaces%2F-MJasmeOMeAJhTVh0M75%2Fuploads%2F7fBw6ZUAuYljta4djq2J%2FTrigger.png?alt=media&amp;token=0e565f04-4e3d-41ef-be64-c7794eb5977c" alt=""><figcaption></figcaption></figure>

6. If we get that particular software name in the **Trigger option** then we will select on that or else we will select the **Webhook option** to trigger it from that particular software to **Pabbly**.
7. Whatever suitable App will be **available** we will select that, then need to first **login** in that particular application.&#x20;
8. If in case that particular application is not there in the **Trigger option** then we can select the **Webhook by Pabbly** App.&#x20;
9. After **selecting** any of the suitable application you need to select the **Trigger Event** as per your requirements. &#x20;

<figure><img src="https://2103666731-files.gitbook.io/~/files/v0/b/gitbook-x-prod.appspot.com/o/spaces%2F-MJasmeOMeAJhTVh0M75%2Fuploads%2F1ruvrMNavFZs8quKygo7%2FTrigger%20Event.png?alt=media&amp;token=48e36444-2402-4c99-9c8e-d933e73047b9" alt=""><figcaption></figcaption></figure>

10. Post **selecting** the App and Trigger Event, if we are using **Webhook By Pabbly** App then need to copy the **Webhook URL**.

<figure><img src="https://2103666731-files.gitbook.io/~/files/v0/b/gitbook-x-prod.appspot.com/o/spaces%2F-MJasmeOMeAJhTVh0M75%2Fuploads%2FjL2ibPWkWM8Fl9xRlbo5%2FWebhook.png?alt=media&amp;token=9217a288-1e12-40d1-b537-c6f91b520c86" alt=""><figcaption></figcaption></figure>

11. The Webhook URL then needs to be **pasted** from that particular software or application's trigger point or area from where we want to **read** the data.
12. Post a **successful triggered webhook automation** from that particular software, the data will get captured in your **Pabbly workflow**.

<figure><img src="https://2103666731-files.gitbook.io/~/files/v0/b/gitbook-x-prod.appspot.com/o/spaces%2F-MJasmeOMeAJhTVh0M75%2Fuploads%2FO8qQXpEay4bNLp8sfU2X%2FResponses.png?alt=media&amp;token=b67c0a2c-9bc8-4abd-995c-54deefb36b5a" alt=""><figcaption></figcaption></figure>

13. Then in order to **send** the particular data to the NeoDove campaign, you need to click on the **'+'** button and post that a search button will arrive under the **Action section**.

<figure><img src="https://2103666731-files.gitbook.io/~/files/v0/b/gitbook-x-prod.appspot.com/o/spaces%2F-MJasmeOMeAJhTVh0M75%2Fuploads%2FPizMUckiH8GDTUcL20aH%2FAction.png?alt=media&amp;token=a4ecf25a-95ae-4af4-9fcd-628cdcd98de9" alt=""><figcaption></figcaption></figure>

14. There, you can search for **NeoDove** and click on it.

<figure><img src="https://2103666731-files.gitbook.io/~/files/v0/b/gitbook-x-prod.appspot.com/o/spaces%2F-MJasmeOMeAJhTVh0M75%2Fuploads%2FwecLMDBhB2bkPcWD5qf6%2FActionss.png?alt=media&amp;token=7cfef22f-3f0e-4455-9184-803b2d4d25b3" alt=""><figcaption></figcaption></figure>

15. Post that, you can select the **Action Event** as per your requirements.&#x20;

<figure><img src="https://2103666731-files.gitbook.io/~/files/v0/b/gitbook-x-prod.appspot.com/o/spaces%2F-MJasmeOMeAJhTVh0M75%2Fuploads%2F432j54A3MyggfOBBWJ5p%2FAction%20Event.png?alt=media&amp;token=ef61bd37-233b-4980-9b49-d581cfb7dad5" alt=""><figcaption></figcaption></figure>

16. After selecting the required Action Event, then need to click on the **Connect** button to get the Pabbly workflow **connected** with NeoDove.&#x20;

<figure><img src="https://2103666731-files.gitbook.io/~/files/v0/b/gitbook-x-prod.appspot.com/o/spaces%2F-MJasmeOMeAJhTVh0M75%2Fuploads%2Fd8xgBTvItjHjrVUuurSZ%2FConnect.png?alt=media&amp;token=de126ea6-b701-4ac3-a54d-178b237846a0" alt=""><figcaption></figcaption></figure>

17. After it gets connected, then need to put the **Integration ID** from the NeoDove Integration Page and need to **map** the lead details like Name and Mobile Number of the Lead from the **captured data** in Pabbly. &#x20;

<figure><img src="https://2103666731-files.gitbook.io/~/files/v0/b/gitbook-x-prod.appspot.com/o/spaces%2F-MJasmeOMeAJhTVh0M75%2Fuploads%2FaN2MHbKJ0e4jhWnBwCrv%2FMapping.png?alt=media&amp;token=a980181c-8852-46ee-8f5c-92c397415911" alt=""><figcaption></figcaption></figure>

18. Post mapping, you need to click on the **Save and Send Test Request** at the bottom of the page to get the **Successful or Received Response**.

<figure><img src="https://2103666731-files.gitbook.io/~/files/v0/b/gitbook-x-prod.appspot.com/o/spaces%2F-MJasmeOMeAJhTVh0M75%2Fuploads%2FLBa5KVSBaSL25uFleGHu%2FSave.png?alt=media&amp;token=fb0afe77-2231-4553-8498-59ea3f25c055" alt=""><figcaption></figcaption></figure>

19. It shows that the **integration** is completed and then you can directly go to the **NeoDove** and check that **particular campaign** whether the lead has been **populated** or not.&#x20;

{% hint style="success" %}
**Note:** If in case after the successful integration also, the leads are not **populating** in NeoDove campaign then please **consult** either with your NeoDove Customer Success Manager or **raise** the request to the NeoDove Delight Team.
{% endhint %}


# WhatsApp API Integration

Learn how to integrate your NeoDove account with Whatsapp API

{% hint style="success" %}
This **WhatsApp API integration** enables you to **integrate** your WhatsApp API account with NeoDove.&#x20;
{% endhint %}

You’ll be able to **view** all the leads generated from WhatsApp API on NeoDove.

## Features that come with WhatsApp API integration

***

* **Make every lead count -** Any lead who enquires for your services through your Whatsapp API campaign, gets captured automatically into your NeoDove campaign, ensuring zero lead leakage.
* **Stop entering leads manually -**  Lead gets captured and mapped automatically, thereby eliminating the effort of entering each lead detail manually.

### Steps:

***

1. **Log in** to your NeoDove account (<https://connect.neodove.com/login>).
2. Go to the **Integrations** section, present on the left side-bar of your screen.

<figure><img src="https://2103666731-files.gitbook.io/~/files/v0/b/gitbook-x-prod.appspot.com/o/spaces%2F-MJasmeOMeAJhTVh0M75%2Fuploads%2FnoINXfuWnrCEe8lOZwUt%2FIntegration.png?alt=media&amp;token=ab2db7c7-1db2-4039-975c-2d81a323c108" alt=""><figcaption></figcaption></figure>

3. Once clicked, then need to click on the "**Whatsapp API**" option.

<figure><img src="https://2103666731-files.gitbook.io/~/files/v0/b/gitbook-x-prod.appspot.com/o/spaces%2F-MJasmeOMeAJhTVh0M75%2Fuploads%2FROwFkcdYP1GdftiPrrBJ%2FWhatsapp%20API.png?alt=media&amp;token=e77ae5cd-ec23-4976-91fc-90c0fb70bbe2" alt=""><figcaption></figcaption></figure>

4. A menu bar will appear, select the **campaign** for which you want to integrate your **Whatsapp API.**

<figure><img src="https://2103666731-files.gitbook.io/~/files/v0/b/gitbook-x-prod.appspot.com/o/spaces%2F-MJasmeOMeAJhTVh0M75%2Fuploads%2FoTee9lOGRZEFwcEWv6Yh%2FWhatsapp%20APIs.png?alt=media&amp;token=c747ae3e-afb6-4c72-b5f9-bc9209837354" alt=""><figcaption></figcaption></figure>

5. Now, click on the **Submit** button. The integration has been **created** in NeoDove successfully.
6. To **activate** this integration, you need to send some details via e-mail to the **Whatsapp API** team.
7. The details of this **integration** are present under this integration on **Active Integration page**. Just click on the created integration to **view the details.**&#x20;

<figure><img src="https://2103666731-files.gitbook.io/~/files/v0/b/gitbook-x-prod.appspot.com/o/spaces%2F-MJasmeOMeAJhTVh0M75%2Fuploads%2FyAbcm3ICqtDlaeRPNi2y%2FWhatsapp%20APIss.png?alt=media&amp;token=e1fbbacb-9127-46de-9ff5-eaf06b0c1b2d" alt=""><figcaption></figcaption></figure>

8. Details will appear, Copy these details and you need to send these complete details to your **WhatsApp API team** to send the lead details on **NeoDove API**.
9. Your integration will be **activated** by the WhatsApp API team.


# Trade India Integration

Learn how to integrate your NeoDove account with Trade India

{% hint style="success" %}
This **Trade India integration** enables you to **integrate** your Trade India account with NeoDove.&#x20;
{% endhint %}

You’ll be able to **view** all the leads generated from **Trade India** on NeoDove.

## Features that come with Trade India integration

***

* **Make every lead count -** Any lead who enquires for your services through your Trade India campaign, gets captured automatically into your NeoDove campaign, ensuring zero lead leakage.
* **Stop entering leads manually -**  Lead gets captured and mapped automatically, thereby eliminating the effort of entering each lead detail manually.

### Steps:

***

1. **Log in** to your NeoDove account (<https://connect.neodove.com/login>).
2. Go to the **Integrations** section, present on the left side-bar of your screen.

<figure><img src="https://2103666731-files.gitbook.io/~/files/v0/b/gitbook-x-prod.appspot.com/o/spaces%2F-MJasmeOMeAJhTVh0M75%2Fuploads%2FnoINXfuWnrCEe8lOZwUt%2FIntegration.png?alt=media&amp;token=ab2db7c7-1db2-4039-975c-2d81a323c108" alt=""><figcaption></figcaption></figure>

3. Once clicked, then need to click on the "**Trade India**" option.

<figure><img src="https://2103666731-files.gitbook.io/~/files/v0/b/gitbook-x-prod.appspot.com/o/spaces%2F-MJasmeOMeAJhTVh0M75%2Fuploads%2FbWSn1EhZQxKhN7LZDzcy%2FTrade%20India.png?alt=media&amp;token=e512502f-b8cc-419d-91c0-9502e44b57b5" alt=""><figcaption></figcaption></figure>

4. A **menu bar** will appear, where you need to put a few of the **details** from your Trade India account including **User Id, Profile Id & API Key**.&#x20;

<figure><img src="https://2103666731-files.gitbook.io/~/files/v0/b/gitbook-x-prod.appspot.com/o/spaces%2F-MJasmeOMeAJhTVh0M75%2Fuploads%2FkQV1eco6PUhka9nCGZvr%2FTradeIndia.png?alt=media&amp;token=bef4937d-b3a5-4e82-ba7b-bd547b3e9d95" alt=""><figcaption></figcaption></figure>

5. Then you need to go to your **TradeIndia account** and login through your **credentials**.

<figure><img src="https://2103666731-files.gitbook.io/~/files/v0/b/gitbook-x-prod.appspot.com/o/spaces%2F-MJasmeOMeAJhTVh0M75%2Fuploads%2FgnR38DVtMxfRlctFCcxD%2FTradeIndias.png?alt=media&amp;token=ead18b57-993f-4788-848f-05c96531d12a" alt=""><figcaption></figcaption></figure>

6. Post that, you need to **click** on the top right corner of the screen where the **name** of the account holder is visible.&#x20;

<figure><img src="https://2103666731-files.gitbook.io/~/files/v0/b/gitbook-x-prod.appspot.com/o/spaces%2F-MJasmeOMeAJhTVh0M75%2Fuploads%2FChy1xjmKTytgfzCSPOrL%2FInquiries.png?alt=media&amp;token=409dc5bb-c1d2-406e-ab81-9edd0ceca3d1" alt=""><figcaption></figcaption></figure>

7. Then, it will **redirect** you to a new page where you need to click on the '**Inquiries & Contacts**' option.

<figure><img src="https://2103666731-files.gitbook.io/~/files/v0/b/gitbook-x-prod.appspot.com/o/spaces%2F-MJasmeOMeAJhTVh0M75%2Fuploads%2FojN0Z1DTNRB2e8IWKrr8%2FInquiries%20and.png?alt=media&amp;token=1a3a321e-1724-4556-ab5d-f275124368dd" alt=""><figcaption></figcaption></figure>

8. Post that, you need to click on the '**My Inquiry API**' option.

<figure><img src="https://2103666731-files.gitbook.io/~/files/v0/b/gitbook-x-prod.appspot.com/o/spaces%2F-MJasmeOMeAJhTVh0M75%2Fuploads%2FVmUCwDiCyK40YVoVZP1n%2FInquiries%20%26%20Contacts.png?alt=media&amp;token=39a64768-1f77-417d-9bd2-12ba2fad31d2" alt=""><figcaption></figcaption></figure>

9. After that the **complete API details** will get visible including the API Link, user id, profile\_id and the key. &#x20;

<figure><img src="https://2103666731-files.gitbook.io/~/files/v0/b/gitbook-x-prod.appspot.com/o/spaces%2F-MJasmeOMeAJhTVh0M75%2Fuploads%2FxhKn7ZbeEDV6VeS3CEKG%2FInquiries%20%26%20Contact.png?alt=media&amp;token=cb841b36-c412-4e97-8510-797bd3de0e63" alt=""><figcaption></figcaption></figure>

10. Copy the **complete API details** from the TradeIndia account and then paste it to the **NeoDove Integration page** under the TradeIndia section and then click on '**Next**'.

<figure><img src="https://2103666731-files.gitbook.io/~/files/v0/b/gitbook-x-prod.appspot.com/o/spaces%2F-MJasmeOMeAJhTVh0M75%2Fuploads%2F7sScXG7cosUfZ6Avfaiu%2FTI.png?alt=media&amp;token=0f1fa76e-859c-4f66-9ff9-58461b1e4032" alt=""><figcaption></figcaption></figure>

11. Post that, you need to select a **Campaign** with which you are integrating your **TradeIndia Account**. Then accordingly, the leads will start **populating** in the NeoDove campaign from your TradeIndia account.&#x20;


# Webhook

Let us understand about the webhook

{% hint style="success" %}
A webhook is a method used to automatically **transfer data** from NeoDove to another application as it happens in **real-time**.&#x20;
{% endhint %}

Essentially, it is a way for NeoDove to provide other applications with real-time information.&#x20;

Webhooks are typically used to **notify** your system of an event or change that occurred, without the need for your **system** to constantly poll for updates.

### Here’s how it works:

***

1. **Setup:** You configure a NeoDove webhook by providing a URL endpoint on any of your particular software's or application's server where you want to receive data.
2. **Trigger:** An event occurs in the source application (e.g., a new lead gets created or updated, an order is placed, a payment is processed).
3. **Notification:** NeoDove makes an HTTP request (usually a POST) to the webhook URL, sending data about the event in the requested application.
4. **Processing:** Your particular application's server receives the data and processes it according to your needs (e.g., updating a database, sending a notification, triggering a workflow).

### Example:

***

Imagine you have an **e-commerce website** and you want to keep your inventory system updated in **real-time** when an order is placed. You can set up a **webhook** in your NeoDove portal that triggers an **HTTP POST request** to your inventory system’s **URL endpoint** whenever a new order is placed. The inventory system **receives** the order details and **adjusts** the stock levels accordingly.

### Benefits:

***

* **Real-time Data Transfer:** Immediate notification and data transfer as events occur.
* **Efficiency:** Reduces the need for constant polling or checking for updates, saving bandwidth and resources.
* **Automation:** Enables automatic and seamless workflows between NeoDove and different applications and services.

### Steps:

***

1. **Log in** to your NeoDove account (<https://connect.neodove.com/login>)  &#x20;
2. &#x20;Go to the **Integrations** section, present on the left side-bar of your **screen**.

<figure><img src="https://2103666731-files.gitbook.io/~/files/v0/b/gitbook-x-prod.appspot.com/o/spaces%2F-MJasmeOMeAJhTVh0M75%2Fuploads%2Fe1RZfWNQSWDafRxfEUOx%2FIntegrations.png?alt=media&amp;token=3e86f09f-1d31-44e8-a9e1-c061fd86c6ff" alt=""><figcaption></figcaption></figure>

1. Once clicked, then need to click on the "**Webhook**" option.

<figure><img src="https://2103666731-files.gitbook.io/~/files/v0/b/gitbook-x-prod.appspot.com/o/spaces%2F-MJasmeOMeAJhTVh0M75%2Fuploads%2F7oM3DytoDRcyHDPAdI43%2FWebhook%20option.png?alt=media&amp;token=8b5af801-7c03-4bb9-b91a-ee933ffb28f6" alt=""><figcaption></figcaption></figure>

4. Post that, a new window will **appear** where you need to select the **events** on which the lead should behave or get triggered to some other software from NeoDove.

* **Trigger - 1 - Lead Create** (If you want the lead to be created in other software when it is being created in NeoDove)
* **Trigger - 2 - Lead Dispose** (If you want the lead to be created in other software when it is being disposed in NeoDove)
* **Trigger - 3 - Lead Delete** (If you want the lead to be created in other software when it is being deleted in NeoDove)

<figure><img src="https://2103666731-files.gitbook.io/~/files/v0/b/gitbook-x-prod.appspot.com/o/spaces%2F-MJasmeOMeAJhTVh0M75%2Fuploads%2FbWpRHYuzrnIkSnhrRwfi%2FEvents.png?alt=media&amp;token=99ad4ba3-791f-4da6-bd7e-3ba24c4b1893" alt=""><figcaption></figcaption></figure>

5. After selecting the **triggering events**, need to put the "**Webhook URL**" for the software where you want the lead to be **created**.&#x20;

<figure><img src="https://2103666731-files.gitbook.io/~/files/v0/b/gitbook-x-prod.appspot.com/o/spaces%2F-MJasmeOMeAJhTVh0M75%2Fuploads%2FgreMz2VMp4IsOSVXxqvA%2FWebhook%20URL.png?alt=media&amp;token=17d2d184-cfc3-4eb8-bf5c-9fd6720073e7" alt=""><figcaption></figcaption></figure>

6. Then you need to click on the "**Save**" button to get the Webhook added and ensure to "**Turn it On**" as well for the webhook to work properly.

<figure><img src="https://2103666731-files.gitbook.io/~/files/v0/b/gitbook-x-prod.appspot.com/o/spaces%2F-MJasmeOMeAJhTVh0M75%2Fuploads%2FeBLyGZyVIa2qMdy5eGkQ%2FSavedd.png?alt=media&amp;token=7d84376a-9e6e-44a5-8321-082f2da0e49a" alt=""><figcaption></figcaption></figure>

7. After the webhook **gets added** successfully, you would be able to check the **lead event status** also for your analysis.

<figure><img src="https://2103666731-files.gitbook.io/~/files/v0/b/gitbook-x-prod.appspot.com/o/spaces%2F-MJasmeOMeAJhTVh0M75%2Fuploads%2FmmH1w4AnZ0zdhXeZtDj2%2FEvent%20Status.png?alt=media&amp;token=43ec730c-390d-4aeb-8647-57010190358b" alt=""><figcaption></figcaption></figure>

&#x20;


# Aisensy Integration

Learn how to integrate your NeoDove account with Aisensy

You’ll be able to **view** all the leads **generated** from Aisensy on NeoDove.<br>

### Features that come with Aisensy integration <a href="#features-that-come-with-sulekha-integration" id="features-that-come-with-sulekha-integration"></a>

***

* **Make every lead count -** Any lead who sends a message to your account on Aisensy.com gets captured automatically into your NeoDove campaign, ensuring zero lead leakage.
* **Stop entering leads manually -** Lead gets captured and mapped automatically, thereby eliminating the effort of entering each lead detail manually.

#### Steps: <a href="#steps" id="steps"></a>

***

1. **Log in** to your NeoDove account (<https://connect.neodove.com/login>)
2. Go to the **Integrations** section, present on the left side-bar of your **screen**.
3. Once clicked, then need to click on the **"Aisensy"** option.

<figure><img src="https://2103666731-files.gitbook.io/~/files/v0/b/gitbook-x-prod.appspot.com/o/spaces%2F-MJasmeOMeAJhTVh0M75%2Fuploads%2FaSmD2kiLDHvZPYIJKy5Z%2Faisensy%201.png?alt=media&amp;token=625db160-b7f5-42f6-ac33-306fa3f67de3" alt=""><figcaption></figcaption></figure>

4. A menu bar will appear, select the **campaign** for which you want to integrate **Aisensy.**
5. Now, click on the **Submit** button. The integration has been **created** in NeoDove successfully.

<figure><img src="https://2103666731-files.gitbook.io/~/files/v0/b/gitbook-x-prod.appspot.com/o/spaces%2F-MJasmeOMeAJhTVh0M75%2Fuploads%2FYXVDjAIPkfzl92Z3FKVj%2Faisesny%202.png?alt=media&amp;token=a04f0e34-78c3-4053-994a-ad3a0e95be29" alt=""><figcaption></figcaption></figure>

6. To **activate** this integration, you need to send some details via e-mail to the **Aisensy** team.
7. The **details** of this integration are present under this integration on **Active Integration page**. Just click on the created integration to **view the details.**

<figure><img src="https://2103666731-files.gitbook.io/~/files/v0/b/gitbook-x-prod.appspot.com/o/spaces%2F-MJasmeOMeAJhTVh0M75%2Fuploads%2FAoFLpliVGu2MNBrRAdkU%2Faisensy%203.png?alt=media&amp;token=873d0536-12f4-47b9-8afc-88e1f1dabefd" alt=""><figcaption></figcaption></figure>

8. Details will appear, Copy these details and you need to send these complete details to your **Aisensy** **team** to send the lead details on **NeoDove API**.
9. Your integration will be **activated** by the **Aisensy** team.


# Interakt Integration

Learn how to integrate your NeoDove account with Interakt

You’ll be able to **view** all the leads **generated** from Interakt on NeoDove.

### Features that come with Interakt integration <a href="#features-that-come-with-sulekha-integration" id="features-that-come-with-sulekha-integration"></a>

***

* **Make every lead count -** Any lead who sends a message to your account on Interakt gets captured automatically into your NeoDove campaign, ensuring zero lead leakage.
* **Stop entering leads manually -** Lead gets captured and mapped automatically, thereby eliminating the effort of entering each lead detail manually.

#### Steps: <a href="#steps" id="steps"></a>

***

1. **Log in** to your NeoDove account (<https://connect.neodove.com/login>)
2. Go to the **Integrations** section, present on the left side-bar of your **screen**.
3. Once clicked, then need to click on the **"Interakt"** option.

<figure><img src="https://2103666731-files.gitbook.io/~/files/v0/b/gitbook-x-prod.appspot.com/o/spaces%2F-MJasmeOMeAJhTVh0M75%2Fuploads%2FN266I06px9BXObBr86YC%2Finterakt%201.png?alt=media&amp;token=ef4832a0-9f1f-468f-b14b-28b154504346" alt=""><figcaption></figcaption></figure>

4. A menu bar will appear, select the **campaign** for which you want to integrate **Interakt.**
5. Now, click on the **Next** button. The integration has been **created** in NeoDove successfully.

<figure><img src="https://2103666731-files.gitbook.io/~/files/v0/b/gitbook-x-prod.appspot.com/o/spaces%2F-MJasmeOMeAJhTVh0M75%2Fuploads%2F68NLkZ2Bvb1DQho3LWhv%2Finterakt%202.png?alt=media&amp;token=c8f14fb3-95cb-4e96-854f-121535f0a13b" alt=""><figcaption></figcaption></figure>

<figure><img src="https://2103666731-files.gitbook.io/~/files/v0/b/gitbook-x-prod.appspot.com/o/spaces%2F-MJasmeOMeAJhTVh0M75%2Fuploads%2FBmwQUGX74KqmMFYZVghe%2Finterakt%203.png?alt=media&amp;token=f1e7ebc5-ab14-4fa0-9931-60fa499ac0cb" alt=""><figcaption></figcaption></figure>

6. To **activate** this integration, you need to send some details via e-mail to the **Interakt** team.
7. The **details** of this integration are present under this integration on **Active Integration page**. Just click on the created integration to **view the details.**

<figure><img src="https://2103666731-files.gitbook.io/~/files/v0/b/gitbook-x-prod.appspot.com/o/spaces%2F-MJasmeOMeAJhTVh0M75%2Fuploads%2FZrwhHQSjCoQtc7ZW6cZZ%2Finyerakt%204.png?alt=media&amp;token=7e82112b-5ca3-4ce2-a91c-df191f1c1908" alt=""><figcaption></figcaption></figure>

8. Details will appear, Copy these details and you need to send these complete details to your Interakt **team** to send the lead details on **NeoDove API**.
9. Your integration will be **activated** by the Interakt team


# Wati Integration

Learn how to integrate your NeoDove account with Wati

You’ll be able to **view** all the leads **generated** from Wati on NeoDove.

#### Features that come with Wati integration <a href="#features-that-come-with-sulekha-integration" id="features-that-come-with-sulekha-integration"></a>

***

* **Make every lead count -** Any lead who sends a message to your account on Wati gets captured automatically into your NeoDove campaign, ensuring zero lead leakage.
* **Stop entering leads manually -** Lead gets captured and mapped automatically, thereby eliminating the effort of entering each lead detail manually.

**Steps:**

***

1. **Log in** to your NeoDove account (<https://connect.neodove.com/login>)
2. Go to the **Integrations** section, present on the left side-bar of your **screen**.
3. Once clicked, then need to click on the **"Wati"** option.

<figure><img src="https://2103666731-files.gitbook.io/~/files/v0/b/gitbook-x-prod.appspot.com/o/spaces%2F-MJasmeOMeAJhTVh0M75%2Fuploads%2F5F4g9JLgwgLaeaGJo4QB%2Fwati%201.png?alt=media&amp;token=d3efbb15-6956-43ce-a1dc-26983d90ba23" alt=""><figcaption></figcaption></figure>

1. A menu bar will appear, select the **campaign** for which you want to integrate **Wati.**
2. Now, click on the **Next** button. The integration has been **created** in NeoDove successfully.

<figure><img src="https://2103666731-files.gitbook.io/~/files/v0/b/gitbook-x-prod.appspot.com/o/spaces%2F-MJasmeOMeAJhTVh0M75%2Fuploads%2FYS2T0puqVAc7rX8bTAWE%2Fwati%202.png?alt=media&amp;token=841f8df8-fd52-415b-acf9-9a937b062d8d" alt=""><figcaption></figcaption></figure>

<figure><img src="https://2103666731-files.gitbook.io/~/files/v0/b/gitbook-x-prod.appspot.com/o/spaces%2F-MJasmeOMeAJhTVh0M75%2Fuploads%2Fau8LOMuEZHaaoGf24Y59%2Fwati%203.png?alt=media&amp;token=3aeba7d0-e32f-4beb-a02c-fe477f78d444" alt=""><figcaption></figcaption></figure>

1. To **activate** this integration, you need to send some details via e-mail to the **Wati** team.
2. The **details** of this integration are present under this integration on **Active Integration page**. Just click on the created integration to **view the details.**

<figure><img src="https://2103666731-files.gitbook.io/~/files/v0/b/gitbook-x-prod.appspot.com/o/spaces%2F-MJasmeOMeAJhTVh0M75%2Fuploads%2Fws7QBJ5ZNAozaEq8XTRu%2Fwati%204.png?alt=media&amp;token=74ecc145-e3ba-4281-80b1-48b2d01bf4e4" alt=""><figcaption></figcaption></figure>

1. Details will appear, Copy these details and you need to send these complete details to your Wati **team** to send the lead details on **NeoDove API**.
2. Your integration will be **activated** by the Wati team


# DoubleTick Integration

Learn how to integrate your NeoDove account with DoubleTick

You’ll be able to **view** all the leads **generated** from DoubleTick on NeoDove.

**Features that come with** DoubleTick **integration**

***

* **Make every lead count -** Any lead who sends a message to your account on DoubleTick gets captured automatically into your NeoDove campaign, ensuring zero lead leakage.
* **Stop entering leads manually -** Lead gets captured and mapped automatically, thereby eliminating the effort of entering each lead detail manually.

**Steps:**

***

1. **Log in** to your NeoDove account (<https://connect.neodove.com/login>)
2. Go to the **Integrations** section, present on the left side-bar of your **screen**.
3. Once clicked, then need to click on the **"DoubleTick"** option.

<figure><img src="https://2103666731-files.gitbook.io/~/files/v0/b/gitbook-x-prod.appspot.com/o/spaces%2F-MJasmeOMeAJhTVh0M75%2Fuploads%2FfiamjSunFnBchQ9ZeNvJ%2Fdoubltick%201.png?alt=media&amp;token=715c11dc-e1e8-4dea-ab98-07bdb74bbc48" alt=""><figcaption></figcaption></figure>

4. A menu bar will appear, select the **campaign** for which you want to integrate **DoubleTick**.
5. Now, click on the **Next** button. The integration has been **created** in NeoDove successfully.

<figure><img src="https://2103666731-files.gitbook.io/~/files/v0/b/gitbook-x-prod.appspot.com/o/spaces%2F-MJasmeOMeAJhTVh0M75%2Fuploads%2F5ALtL95nhyu9ugYVklOy%2Fdt%202.png?alt=media&amp;token=1fd29b2c-5c7a-404e-a344-f277303ba8e5" alt=""><figcaption></figcaption></figure>

<figure><img src="https://2103666731-files.gitbook.io/~/files/v0/b/gitbook-x-prod.appspot.com/o/spaces%2F-MJasmeOMeAJhTVh0M75%2Fuploads%2F2rBscxx8iifkgK8gSohv%2Fdt%2033.png?alt=media&amp;token=57814929-e9ba-4985-a660-c67a14b47169" alt=""><figcaption></figcaption></figure>

6. To **activate** this integration, you need to send some details via e-mail to the **DoubleTick** team.
7. The **details** of this integration are present under this integration on **Active Integration page**. Just click on the created integration to **view the details.**

<figure><img src="https://2103666731-files.gitbook.io/~/files/v0/b/gitbook-x-prod.appspot.com/o/spaces%2F-MJasmeOMeAJhTVh0M75%2Fuploads%2Fmlk2vifX0CAuz6PDagib%2Fdt%204.png?alt=media&amp;token=929869be-b1bb-4784-be59-fc8f57bea20f" alt=""><figcaption></figcaption></figure>

8. Details will appear, Copy these details and you need to send these complete details to your DoubleTick **team** to send the lead details on **NeoDove API**.
9. Your integration will be **activated** by the DoubleTick team


# Zoho Integration

Learn how to integrate your NeoDove account with Zoho

You’ll be able to **view** all the leads **generated** from Zoho on NeoDove.

### Features that come with Zoho integration <a href="#features-that-come-with-sulekha-integration" id="features-that-come-with-sulekha-integration"></a>

***

* **Make every lead count -** Any lead who enquires for your services on Zoho.com gets captured automatically into your NeoDove campaign, ensuring zero lead leakage.
* **Stop entering leads manually -** Lead gets captured and mapped automatically, thereby eliminating the effort of entering each lead detail manually.

#### Steps: <a href="#steps" id="steps"></a>

***

1. **Log in** to your NeoDove account (<https://connect.neodove.com/login>)
2. Go to the **Integrations** section, present on the left side-bar of your **screen**.
3. Once clicked, then need to click on the **"Zoho"** option.

<figure><img src="https://2103666731-files.gitbook.io/~/files/v0/b/gitbook-x-prod.appspot.com/o/spaces%2F-MJasmeOMeAJhTVh0M75%2Fuploads%2FrA5fOjlNILge0ogicmEu%2F1z1.png?alt=media&amp;token=0216cc40-a216-4c94-b0b5-e841a9770224" alt=""><figcaption></figcaption></figure>

4. A menu bar will appear, select the **campaign** for which you want to integrate Zoh&#x6F;**.**

<figure><img src="https://2103666731-files.gitbook.io/~/files/v0/b/gitbook-x-prod.appspot.com/o/spaces%2F-MJasmeOMeAJhTVh0M75%2Fuploads%2FpWRZKkXMsYoFQLZBPrxW%2Fz2.png?alt=media&amp;token=a44e88e8-1b36-47ec-80c6-4de4bf396a5a" alt=""><figcaption></figcaption></figure>

<figure><img src="https://2103666731-files.gitbook.io/~/files/v0/b/gitbook-x-prod.appspot.com/o/spaces%2F-MJasmeOMeAJhTVh0M75%2Fuploads%2FdjbYeK64H6e4yYDmPgZ9%2Fz3.png?alt=media&amp;token=d83bfcbb-a8ce-4c3f-932d-c43188d926bf" alt=""><figcaption></figcaption></figure>

5. Now, click on the **Next** button. The integration has been **created** in NeoDove successfully.
6. To **activate** this integration, you need to send some details via e-mail to the Zoho team.
7. The **details** of this integration are present under this integration on **Active Integration page**. Just click on the created integration to **view the details.**

<figure><img src="https://2103666731-files.gitbook.io/~/files/v0/b/gitbook-x-prod.appspot.com/o/spaces%2F-MJasmeOMeAJhTVh0M75%2Fuploads%2FGipNTT8HlWO4pSYWDafw%2Fz4.png?alt=media&amp;token=83ccece1-f8c1-48fd-be6a-0bc338d73f90" alt=""><figcaption></figcaption></figure>

8. Details will appear, Copy these details and you need to send these complete details to your Zoho **team** to send the lead details on **NeoDove API**.
9. Your integration will be **activated** by the Zoho team.


# Marketplace - Value Added Services

Let's take a closer look at the marketplace.

{% hint style="success" %}
The Marketplace is essentially the section where we configure the **Value Added Services** for you.
{% endhint %}

***

<figure><img src="https://2103666731-files.gitbook.io/~/files/v0/b/gitbook-x-prod.appspot.com/o/spaces%2F-MJasmeOMeAJhTVh0M75%2Fuploads%2FGfQFFq9OcoyG33XoMeAH%2FMarketplace.png?alt=media&amp;token=843af905-df35-44d0-aaa3-cb542ceeb21b" alt=""><figcaption></figcaption></figure>

NeoDove offers a range of **value-added services** focused on communication and engagement. Here's a breakdown of the **services** listed below.

1. IVR Services
2. WhatsApp API Services
3. SMS API Services

<figure><img src="https://2103666731-files.gitbook.io/~/files/v0/b/gitbook-x-prod.appspot.com/o/spaces%2F-MJasmeOMeAJhTVh0M75%2Fuploads%2FVvert2G8xt0ur3s5ACSH%2FMarketplaces.png?alt=media&amp;token=c84b1ec1-ed87-447f-a2f1-303d77666f45" alt=""><figcaption></figcaption></figure>


# IVR Services

IVR stands for "Interactive Voice Response."

IVR systems are commonly used in **telecommunications** to provide automated assistance and gather information from callers through pre-recorded voice prompts and menu options.&#x20;

This technology is often used for **tasks** like call routing, information retrieval, and handling customer queries without **direct human intervention**.

The **number masking** feature functions effectively within the IVR. Using the IVR, you can **monitor** all incoming calls.&#x20;

{% hint style="success" %}
Additionally, when an incoming call is answered automatically, there is a **functionality** to create a lead with the **actual number** of the customer or lead in the corresponding campaign and call logs section. This allows for **efficient tracking** and **management** of calls within the system.&#x20;
{% endhint %}

### Benefits of IVR services:

***

1. Call Recordings
2. Call Barging
3. Live Call Feed Tracking
4. Monitoring Incoming Calls
5. Capturing the detailed history of the Call Logs
6. Automated voice modulation for different purposes
7. Other Miscellaneous Things (Come with your problem we will provide you with the solution)

### We have two main types of IVR systems in our product:

***

1. PSTN (SIM Based Calling)
2. SoftPhone or WEBRTC (Internet-Based Calling or VoIP)

<figure><img src="https://2103666731-files.gitbook.io/~/files/v0/b/gitbook-x-prod.appspot.com/o/spaces%2F-MJasmeOMeAJhTVh0M75%2Fuploads%2FNLfDczMcwwWOJ1axD3B8%2FIVR%20Services.png?alt=media&amp;token=fefaa0fa-d793-4783-b6ba-00e2eb38a6e5" alt=""><figcaption></figcaption></figure>


# PSTN (Sim-Based IVR Call)

Basic overview of PSTN type of (IVR) Calls

{% embed url="<https://youtu.be/w2o-BVWcrns>" %}

### PSTN stands for Public Switched Telephone Network.

***

In PSTN call functionality, the first call is **directed** to the user's phone through a virtual number when a user initiates a call. Once connected, the call is then **routed** to the intended person, customer, or lead.&#x20;

{% hint style="success" %}
Importantly, both parties involved in the call can only see the **virtual number**; the personal details and actual phone numbers of both parties remain **hidden** from each other for **privacy**.
{% endhint %}

***

<figure><img src="https://2103666731-files.gitbook.io/~/files/v0/b/gitbook-x-prod.appspot.com/o/spaces%2F-MJasmeOMeAJhTVh0M75%2Fuploads%2FWCCpFGqq6C6w6KlPb8FT%2FPSTN.png?alt=media&amp;token=252cb7c6-de04-4392-bc34-51843ca42215" alt=""><figcaption></figcaption></figure>


# SoftPhone or VOIP (Internet-Based Calling)

Basic overview of VOIP type of (IVR) Calls

{% embed url="<https://youtu.be/L3P89LxGR2E>" %}

### VOIP stands for Voice over Internet Protocol.&#x20;

***

In VOIP calling, when a user initiates a call, it typically connects automatically through the **internet** on the **desktop**. Similarly, for incoming calls, the call is directed to the **desktop** via the Internet.&#x20;

{% hint style="success" %}
VOIP relies on **internet connectivity** for both making and receiving calls, **offering** flexibility and accessibility.
{% endhint %}

***

<figure><img src="https://2103666731-files.gitbook.io/~/files/v0/b/gitbook-x-prod.appspot.com/o/spaces%2F-MJasmeOMeAJhTVh0M75%2Fuploads%2FsomnFE6zmxqiFonjwD7b%2FVOIP.png?alt=media&amp;token=8b6d62a1-6744-4b6d-af05-62b7b81b6253" alt=""><figcaption></figcaption></figure>


# Basic Differences (PSTN & SoftPhone)

Let's understand the basic difference between both IVR modes.

### The basic differences between PSTN & VOIP are:

***

1. PSTN is the **sim-based** calling but VOIP is the **internet-based** calling.
2. PSTN supports only **domestic calls** whereas VOIP supports **both** domestic and international calls.
3. **Multiple DIDs** can not be accommodated in PSTN for outbound calls but in VOIP, multiple DIDs can be accommodated for **outbound calls**.
4. **Call Barging** is possible in both mediums.
5. **Call Transferring** and **Conferencing** are possible in VOIP but not in PSTN.

***

{% hint style="success" %}
Both types of **IVR** (PSTN and VOIP) are good at doing what they're supposed to do. They serve the **basic purpose** well. However, when it comes to more **advanced features**, they have some differences.&#x20;
{% endhint %}

The choice between them depends on what the **client needs**. Clients should choose the one that **fits** their requirements better for their **subscription**.


# IVR FAQs

Lets have a clear understanding on a few of the IVR use cases

1. **What is the major reason for using IVR?**

**Answer:** There are a couple of reasons for which IVR is being used by different companies but majorly it is being used for call monitoring and recording purposes.&#x20;

2. **What are the different IVR providers that can get integrated with NeoDove?**

**Answer:** Exotel, TeleCMI and MyOperator.&#x20;

3. **If we have already taken IVR from any IVR providers, then is it possible to integrate with NeoDove?**

**Answer:** Yes, it is only possible if we have taken IVR from either Exotel or TeleCMI or MyOperator as these are the three IVR providers with whom NeoDove has the scopre for integration.&#x20;

&#x20;

4. **How IVR helps to monitor incoming calls?**

**Answer:** Once IVR gets integrated with NeoDove then accordingly as per every incoming calls, the lead gets created in NeoDove with the timestamp.

5. **How IVR caters the incoming calls for a company?**

**Answer:** Need to put the call forwarding from the company's official phone number to the particular IVR number and then accordingly whatever the incoming call comes to the official number it will then redirected to the IVR number and then the call will land to the agents or users of the particular company as per the IVR flow that is being set.&#x20;

6. **Can an automated music or message can be setup in IVR?**

**Answer:** Yes.&#x20;

7. **What are the different scenarios where an automated music or message can be setup in IVR?**

**Answer:** There are a couple of different scenarios where an automated music or message can be setup in IVR like greeting music, waiting music, unanswered music, invalid key music, timeout music.&#x20;

8. **Can the incoming call be segregated to different teams of an organization from one IVR number?**

**Answer:** Yes, it can be done. An IVR call flow needs to be setup in this scenario with a music or message asking for inputs and as per any of the inputs the call will land to the respective teams.&#x20;

9. **Can we do a different time setup for the different users to cater the incoming calls?**

**Answer:** Yes, it can be done. A calendar flow needs to be setup as per the particular timings of the particular user and as per the timing being set, the call will land to the respective user or agent.

10. **Is it possible to get the lead created for incoming calls without being landed to any of the user or agent but a welcome music to be played while anyone calls?**

**Answer:** Yes, it can be done. Either a count option to be enabled in the particular team with the greeting music added or a hangup option to be enabled in the call flow section with the play music option to be added above it.&#x20;

11. **Can we setup the office hours in IVR?**

**Answer:** Yes, the office hours can be setup in IVR and after office hours the call won't land to any user or agent but a lead will get created in NeoDove for the monitoring purposes whoever will call after office hours timing.&#x20;

12. **Can a voice mail be incorporated in IVR at the time of unanswered call?**

**Answer:** Yes, a voice mail can be incorporated in IVR and for that we need to enable the Voice mail option from the Call Flow section.

13. **What is the different between call barging and call merging?**

**Answer:** Call barging means call whispering whereas call merging means call conferencing.&#x20;

In call barging, the supervisor or the admin can join any of the call but whatever he or she will speak it will only be heard by the agent or user but the customer won't be able to hear.&#x20;

In call merging, all the three parties would be able to speak and hear each other's conversation.&#x20;

14. **Is it possible to redirect a particular customer's call to the same user with whom the conversation has happened earlier?**

**Answer:** Yes, it can be done. Sticky Agent option to be enabled in this scenario to redirect the customer's call to the same users with whom the conversation has happened earlier.&#x20;

15. **Is it possible to incorporate separate virtual or DID numbers for the different users or agents?**

**Answer:** Yes, it can be done.&#x20;

In PSTN or sim based calling; for incoming calls only, it can be done.

In WEBRTC or internet based calling; for outgoing and incoming calls both, it can be done.&#x20;

16. **Is it possible to redirect to the phone if the system is locked or logged off at the time of WEBRTC or internet based calling setup?**

**Answer:** Yes, it can be done. The follow-me option to be enabled in that particular user or agent setup so that if the system is logged in, then the call will land on the system and if in case the system is logged off then the call will directly land to the user's phone number.


# WhatsApp API Services

Lets explore more about the WhatsApp API Services

## What is WhatsApp API?

***

WhatsApp Business API, **launched** by Facebook in 2018, allows businesses to Broadcast & receive Unlimited messages.&#x20;

It is a **service** which businesses can use for the enhancing the **engagement** with their customers for multiple purposes be it is marketing or customer service.&#x20;

Businesses can **handle everything** on the most active platform for **communication**, WhatsApp.

{% hint style="success" %}
WhatsApp API services allow businesses to **integrate** the WhatsApp messaging platform into their own NeoDove account.&#x20;
{% endhint %}

This integration **enables** businesses to send and receive messages, automate responses, provide customer support, and create leads directly through WhatsApp into a **specific campaign** of your NeoDove account.

### Features of Whatsapp API Services

***

Get closer to your prospects by **connecting** with them on WhatsApp. With WhatsApp API, you can **send 1000s of messages**, with a click!

1. Bulk WhatsApp
2. Dedicated Platform&#x20;
3. WhatsApp API&#x20;
4. Live Chat&#x20;
5. Dedicated Support

### Benefits of Whatsapp API Services

***

1. Seamless **communication** with customers.
2. **Automate** the reply through **chatbot** by setting up the prompt.
3. Can automate any **message template** to trigger to customers as per the **disposition**.
4. Can **generate** a lead within NeoDove from Whatsapp API **response**.
5. Can run any **campaigns** and automate it to a specific **customer data**.
6. Drive **efficiency** and save a lot of time and efforts.
7. Can be used as one of the **best Marketing Technique**.
8. Monitor and analyze the **report exported** from Whatsapp API.

### Difference between Business WhatsApp and WhatsApp API Marketing

***

#### Business WhatsApp:

1. This is just another Mobile application to run WA&#x20;
2. Can add business details like, address, brochures, products, prices etc.&#x20;
3. Can be active across 4 screen (Web WhatsApp)

#### WhatsApp API Marketing Solution:

1. This is a solution provided by Meta to interact with thousands of our users in one go.
2. Helps to automate the customer journey over WA.
3. Can have multiple agents who can use one portal to respond to messages.

### Terminologies:

***

1. **Live Chat -** Have multiple team members to drive Live Chat Support on the Same WhatsApp Business Number. Filter Chats according to tags, campaigns and attributes for Smart Agent Chat Routing.&#x20;
2. **Broadcast Messages -** You can simply Import all your Contacts and Broadcast Approved Messages Instantly. See real-time analytics on the AiSensy Platform for delivered, read rates and more.&#x20;
3. **Template message categories -** WhatsApp Conversations are Charged depending on the category of Template message & vary as per the receiver's country.

### Prerequisites for WhatsApp Business API

***

**Following are the prerequisites you must match in order to apply for the WhatsApp Business API on META:**

1. **Business website -** A business website is a must to get access to the WhatsApp Business API.
2. **A fresh phone number -** You need an active phone number that isn't currently registered with any of the WhatsApp accounts. You can use an old phone number too but you'll have to permanently delete the WhatsApp App/Account active on it.&#x20;
3. **Verified Facebook business manager account -** You should have your Facebook Business Manager Account verified to get complete access to WhatsApp Business API! To get your Facebook Business Manager Verified, you must have these documents:

* **Legal Details Of Your Business** (business name, address, contact info)
* **A legal document containing the Legal Name of the Business** as well as Legal Address, preferably a GST or Bank Account Statement.
* **A working website for your business**. The website must mention at its footer the exact Legal Business Name (as cited in the documents).
* **Proof of access to the business such as official Business email** (email with the same domain as your website).

Once you have these things ready, you're set to **apply** for WhatsApp Business API.

{% hint style="success" %}
By integrating WhatsApp API services with NeoDove, businesses can unlock a range of **benefits** that enhance customer engagement, streamline operations, and drive overall business growth.
{% endhint %}

<figure><img src="https://2103666731-files.gitbook.io/~/files/v0/b/gitbook-x-prod.appspot.com/o/spaces%2F-MJasmeOMeAJhTVh0M75%2Fuploads%2FkUfuSDABXIZY7qtjNufW%2FWhatsapp%20API.png?alt=media&amp;token=0a5c9c90-ba59-4d15-990a-def532963b06" alt=""><figcaption></figcaption></figure>


# Facebook Business Manager Account

Let us understand the overview of the Facebook Business Manager Account

## What is a Facebook Business Manager Account?

***

With Facebook Business Account, any individual can **manage** all the business related activities which can be **performed** on META, Business Page, Ad Accounts, Whatsapp Accounts and Instagram Accounts.&#x20;

All of these can be managed through **Facebook Business account**.

<figure><img src="https://2103666731-files.gitbook.io/~/files/v0/b/gitbook-x-prod.appspot.com/o/spaces%2F-MJasmeOMeAJhTVh0M75%2Fuploads%2FIKidhdI1ZX7gO8m0hvXj%2FFB%20Business%20Manager%20Account.png?alt=media&amp;token=bbfab041-bbeb-47a6-ab05-4a331af948e6" alt=""><figcaption></figcaption></figure>

### How to create a FB Business Manager Account?

***

* Go to this **page of Meta** - ([https://business.facebook.com/overview](<https://business.facebook.com/overview>))
* Click ‘**Create Account**’
* **Enter** a name for your business, your name and work email address and click ‘**Next**’&#x20;
* Enter your **business details** and click ‘Submit’

### What is the difference between a Business account and a Facebook account?

***

If you don't want a personal Facebook profile, you can **sign up** for a business account, specifically designed for people who want to **manage advertisements and pages** without having a personal profile.&#x20;

Business profiles have **limited access** to personal profiles and cannot communicate with them, except when **using a page**.


# Facebook Business Manager Account Verification

Let us understand that how to do the verification and why it is necessary to do

### Why Facebook Business Manager Account verification is necessary?

***

For using the WhatsApp Business API, your **Business Manager Account verification** is necessary because it allows you to **access** all the feature of WA API.&#x20;

If it not verified there are **high chances** that your WhatsApp Display name may not get **approved** and you will not be able to **use messages**.&#x20;

Also, your WhatsApp business API message **limit** for 24 hours will only be 250 messages.

### How to check if the business is verified?

***

On your Facebook Business account **navigate** to the following steps written below:&#x20;

* **Go** to the ([https://business.facebook.com/overview](<https://business.facebook.com/overview>)).
* Then on the top left click on the drop down and **select** your business account, setting icon.
* Then click on the “**Business Settings**” option.
* Then on left side you will see “**Business Info**”.
* On this page you will see the “**business verification status**”.

&#x20;

### What documents you need to get you account verified?

***

* **Legal details** of your business (business name, address, contact info).
* **A legal document** containing the Legal Name of the Business and Legal Address, preferably a GST, Business PAN Card or Business Bank Account Statement.
* **A working website**. The website must mention at its footer the exact Legal Business Name (as cited in the documents).

<figure><img src="https://2103666731-files.gitbook.io/~/files/v0/b/gitbook-x-prod.appspot.com/o/spaces%2F-MJasmeOMeAJhTVh0M75%2Fuploads%2F3wMuQGQjSHZk7chu8UiO%2Fimage.png?alt=media&amp;token=e32d1ab0-f546-4456-a92e-0a081a3c1c6a" alt=""><figcaption></figcaption></figure>

* **Recommended for OTP verification** -> Proof of access to the business such as an official Business email (email with the same domain of your website). **For Example - <abc@neodove.com>.**

&#x20;

### Steps to apply for Facebook Business Manager Account verification.&#x20;

***

**Refer to this video:-** <https://drive.google.com/file/d/1UEuTdrya3j0nIRSxfSBnLPlh11j25UOG/view?usp=sharing>

**Note:**

* At the step of **Document uploadation**, please make sure that both the documents you are uploading have the same Legal Name and Legal Address.&#x20;
* At the step of **OTP verification email** with your website verification is recommended by META and has high chance of getting **verified**.
* Verification of Facebook Business Manager Account is solely **dependent** on META. NeoDove is **not responsible** for any non-verification. However, we’ll work closely with you to **help raise ticket** with META for verification.

### How it is related with your Website?

***

The website **establishes** the existence of your business on internet.&#x20;

The legal name of your business should be **mentioned** on the copyright line on the footer of your website.&#x20;

This is **proof** that the website belongs to you.


# Whatsapp Display Name Verification

Let us understand the basics of Whatsapp Display Name Verification

### Overview of Whatsapp Display Name:

***

* Display name for WhatsApp Business API is the **name** which your customers will see on the **profile** of your WA account.&#x20;
* Display name verification is **important** for using your WA Business API account for broadcasting message or performing any activities.
* The Display name usually gets **verified** at the time of applying for an WhatsApp Business API or in a couple of days.
* The Display Name **should not violate the guidelines** of META.&#x20;

### Important Factors for getting the Display Name verified.

***

* Your Display Name should be on your website on the header part.
* Display Name should match the guidelines of META.

**Refer to this link -**

[https://www.facebook.com/business/help/757569725593362&#x20;](<https://www.facebook.com/business/help/757569725593362 &#xD;>)

<div align="left"><figure><img src="https://2103666731-files.gitbook.io/~/files/v0/b/gitbook-x-prod.appspot.com/o/spaces%2F-MJasmeOMeAJhTVh0M75%2Fuploads%2F9olH6nO7AobClotSSHN7%2Fimage.png?alt=media&amp;token=374a25b7-11d6-4625-b920-9e589d0684cb" alt=""><figcaption></figcaption></figure></div>

### How to Change your Display Name on META?

***

* Go to **Business Manager** and select your business.
* Click "**WhatsApp Accounts**" & then choose WhatsApp Manager.
* In WhatsApp Manager, click on "**Account Tools**".
* Now, **navigate** to the left-most menu and **click** Phone Numbers.
* Under the Name column, **hover over** your current display name and **select** the pencil (Edit) icon.
* In the **Edit Display Name** section, enter a new display name Select ‘**Next**’.

&#x20;If your new Display Name **mismatching** the guidelines, it will get changed in 2-3 hours.

{% hint style="success" %}
**Note:** Verification of **Display Name** is solely dependent on META. NeoDove is **not responsible** for any non-verification. However, we’ll work closely with you to **help raise ticket** with META for verification.
{% endhint %}

&#x20;

### Migration to NeoDove WA API Services:

***

If you are using any **WA API services** and want to switch on NeoDove, the very first step you have to complete is getting the **2 Factor Authentication** disabled of your WA business API account from your current vendor.&#x20;

That’s it !! You can get your **NeoDove account** at the earliest once it is done.

### OBA - Official Business Account (Green Tick Badging) Verification:

***

You can easily **request** for the Green Tick on Whatsapp Account from your **Facebook business Account**, if you are fulfilling the **prerequisites** for getting the green tick badge:&#x20;

* You should have a **verified Facebook business account**.
* Your business should be a **recognizable business**.
* You should have **three organic** Media Coverage / News Articles / PR.
* A **good reach** on Facebook.
* You should have a **business website**.

{% hint style="success" %}
**Note:-** META will **approve** your request by reviewing these **prerequisites**.
{% endhint %}

### Use Cases:

***

1. **Sending Bulk WhatsApp -** Can do Now; Direct sending it through NeoDove shall be available after some time.
2. **Sending fixed Templates from NeoDove once a call is done -** Not direct integration available; but can be done through 3rd party tool.
3. **Extracting Leads who are interacting on our WA -** Not available right now, expected to be there in some time.


# SMS API

Explore more about the SMS API Services

SMS API services allow businesses to **integrate** SMS (Short Message Service) functionality into their NeoDove account using an **API** (Application Programming Interface).&#x20;

{% hint style="success" %}
This integration **enables** businesses to send and receive text messages programmatically, **automate** messaging workflows, and **manage** SMS communications in a more efficient and scalable manner.
{% endhint %}

### Integrating SMS API with NeoDove provides numerous benefits for businesses:

***

1. **Enhanced Communication Channels**: By integrating SMS capabilities, businesses can communicate with customers through both tele-calling and SMS within the NeoDove CRM platform, providing a more comprehensive and versatile communication approach.
2. **Multi-channel Engagement**: SMS integration allows businesses to reach customers who may prefer text messages over phone calls, ensuring messages are delivered and received regardless of the preferred communication method.
3. **Automated Messaging**: Businesses can automate SMS messages for various purposes such as appointment reminders, follow-ups, or notifications directly from the NeoDove CRM, saving time and reducing manual effort.
4. **Personalized Interactions**: Utilizing customer data stored in NeoDove CRM, businesses can send personalized SMS messages tailored to individual customer preferences and interactions, enhancing engagement and relationship building.
5. **Centralized Management**: All SMS communications are managed within the NeoDove CRM platform, providing a centralized hub for tracking and monitoring customer interactions across multiple channels, leading to better organization and efficiency.
6. **Improved Efficiency**: Agents can handle SMS communications alongside tele-calling tasks within the same interface, streamlining workflows and improving overall efficiency in customer engagement.
7. **Data-driven Insights**: Integration with SMS API services allows businesses to track metrics such as message delivery rates, response times, and customer engagement levels, providing valuable insights for optimizing communication strategies.
8. **Scalability and Flexibility**: Businesses can scale SMS communications easily to accommodate growing customer volumes and adapt messaging strategies based on changing business needs, ensuring continued effectiveness in customer relationship management.

{% hint style="success" %}
Overall, integrating SMS API with NeoDove telecalling CRM **enables** businesses to leverage the **benefits** of both tele-calling and SMS communication channels, enhancing customer engagement, improving efficiency, and driving better outcomes in **customer relationship management**.
{% endhint %}

<figure><img src="https://2103666731-files.gitbook.io/~/files/v0/b/gitbook-x-prod.appspot.com/o/spaces%2F-MJasmeOMeAJhTVh0M75%2Fuploads%2FPWPJvhLxlGtXTFRS31vc%2FSMS%20API.png?alt=media&amp;token=5f61397a-7d36-4c2d-8771-8df52bc1085d" alt=""><figcaption></figcaption></figure>


---

[Next Page](/llms-full.txt/1)